


If you’ve ever felt like your Halloween decorations were missing that “wow” factor from the outside, let’s talk about windows. They’re one of the first things neighbors and trick-or-treaters notice, yet they’re so often left bare. Adding a little painted design is such a clever way to bring your home to life without spending much money or storing a ton of bulky décor.
All you need is some washable paint, a few brushes or sponges, and a little bit of imagination. What I love about this idea is that you can go bold and spooky or keep it playful and fun depending on your vibe. Below are 12 easy DIY Halloween window painting ideas you can try. Pick your favorites, mix and match, and watch your house turn into the perfect October backdrop.
This post contains affiliate links which help to support our blog. You will not be charged anything extra for using the link. We earn a small commission from each sale.
Here are some helpful tools you may need for Halloween window painting:
Washable Window Paint
1. Jack-O’-Lantern Easy DIY Halloween Window Painting Faces
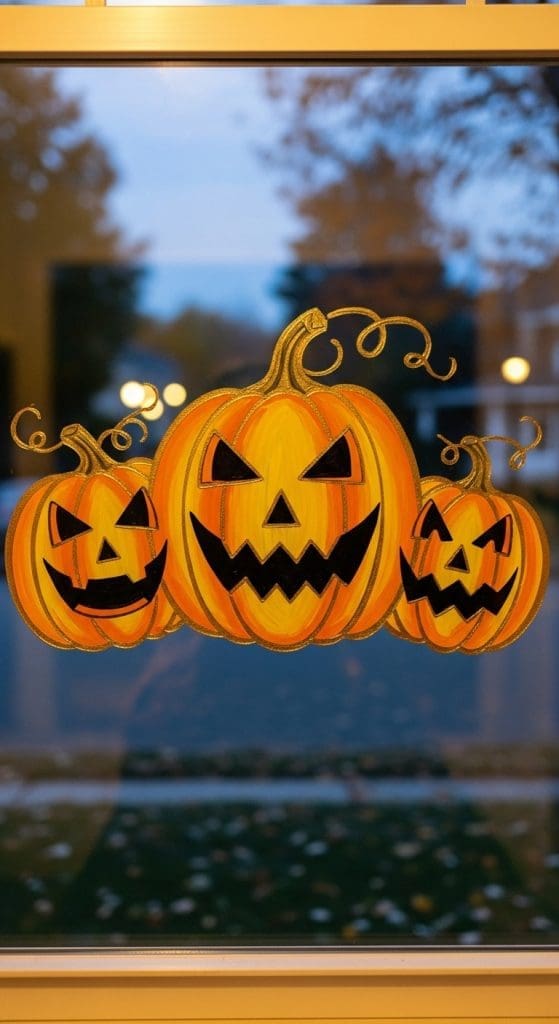
Jack-o’-lantern faces on windows instantly create that Halloween feeling without the mess of carving pumpkins.
This is a clever way to make your windows glow at night when the inside lights shine through.
A simple way to style this is to vary the expressions so some look goofy while others look a little spooky. Kids especially love this one because it feels familiar and fun.
DIY Steps:
- Clean the window so the paint sticks evenly.
- Use orange paint to make big round or oval pumpkin shapes.
- Add triangle eyes and noses with black paint.
- Paint a wide smile, making some happy and some scary.
- Outline the pumpkin in black for extra definition.
- Add yellow highlights inside the face shapes to mimic candlelight.
2. Creepy Crawling Spiders
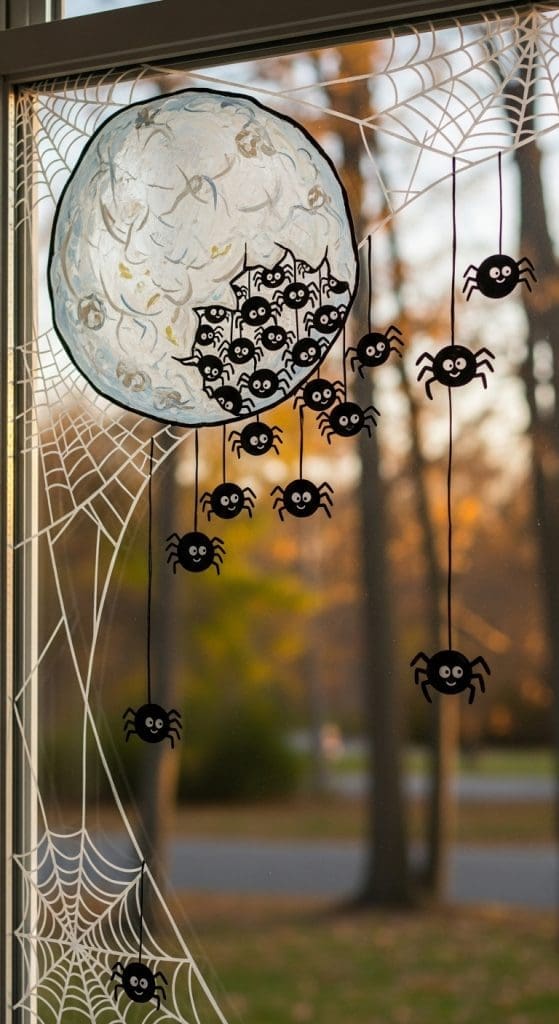
This one looks impressive but is a surprisingly Easy DIY Halloween Window Painting.
Spiders are really just circles with lines, so you don’t need to be artistic to pull it off. I like how you can place one giant spider in the corner and then scatter smaller ones crawling down the glass.
DIY Steps:
- Paint a large black circle for the spider’s body.
- Add a smaller circle on top for the head.
- Draw eight thin legs angled outward.
- Paint a strand of web coming down to “hang” the spider.
- Add smaller spiders in different sizes for variety.
- Optional: use white dots for glowing spider eyes.
3. Haunted House Silhouette
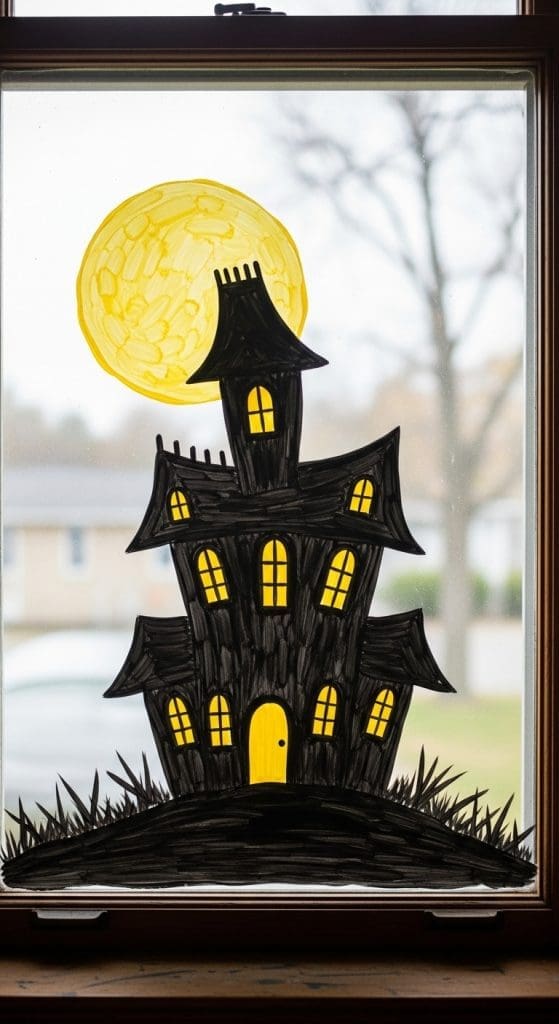
A haunted house silhouette turns your window into a full spooky scene.
This is a clever way to make one design feel like a whole display without needing multiple decorations.
I love the look of a crooked roofline and tiny glowing windows, especially when you add a yellow moon behind it. It works well on a big window where you can spread out the design.
DIY Steps:
- Paint a large rectangle or house shape in solid black.
- Add pointed or jagged rooftops for a creepy effect.
- Leave spaces for windows, then fill them with yellow or orange paint.
- Paint a round moon off to the side or behind the house.
- Add small trees or gravestones in black around the edges.
- Finish with a few bats flying overhead.
4. Flying Bats in Motion
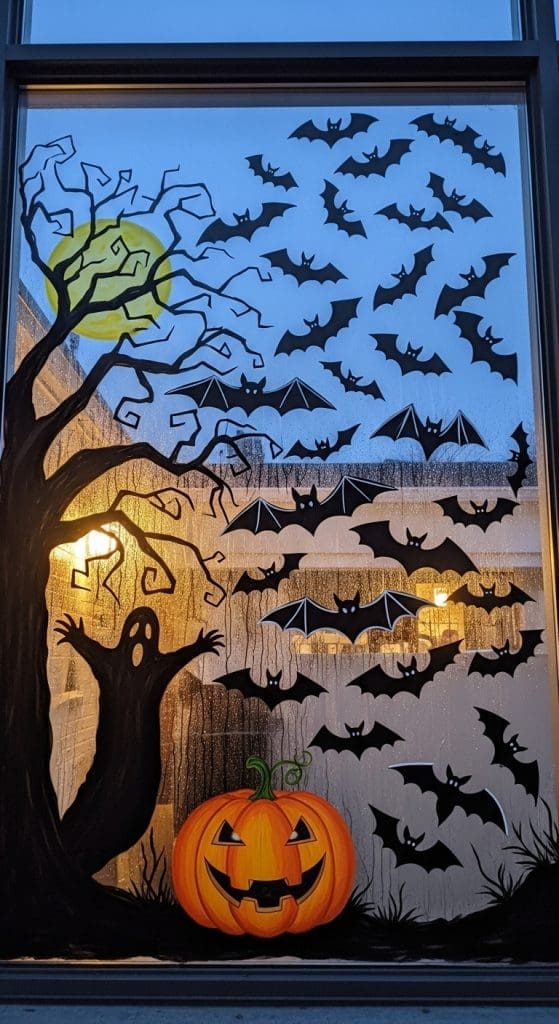
Bats are an easy DIY Halloween Window Painting design to paint and they look amazing at night.
A simple way to style this is to paint them in different sizes and angles so it looks like they’re really flying.
I like how they can be clustered in one corner or spread out across the whole window. This is one of those designs that’s minimal but really effective.
DIY Steps:
- Start with black paint and a flat brush.
- Paint small curved wings shaped like stretched “M” letters.
- Add little bodies in the middle of each wing shape.
- Make some large bats and some smaller ones for depth.
- Angle them in different directions as if they’re in flight.
- Add a white or yellow moon for contrast if you like.
5. Easy DIY Halloween Window Painting Dripping Effect
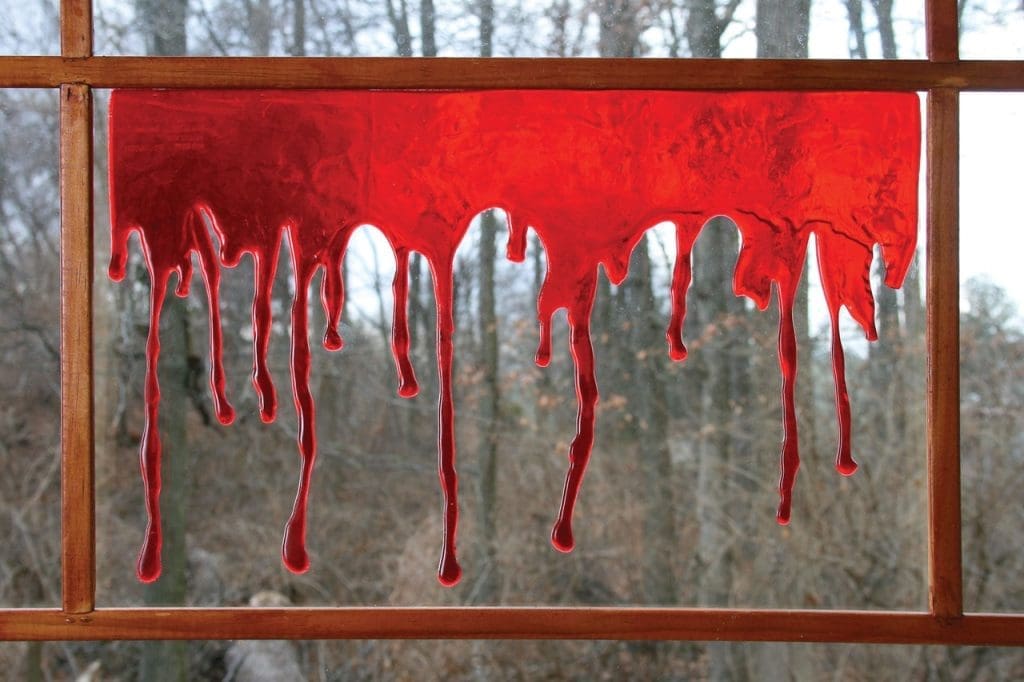
If you’re into spooky vibes, the dripping effect is a showstopper.
It looks dramatic, but it’s literally just dragging paint downward in uneven streaks. This is a clever way to decorate without needing detailed drawings.
I love the look of it over smaller windows near a doorway, it really catches people off guard.
DIY Steps:
- Dip your brush into the bright red paint.
- Start at the top of the window and drag downward slowly.
- Vary the lengths so some drips are longer than others.
- Round off the ends of the drips for a realistic look.
- Fill in the top with a solid red “pool” line.
- Optional: add darker red accents for dimension.
6. Floating Ghost Friends Easy DIY Halloween Window Painting
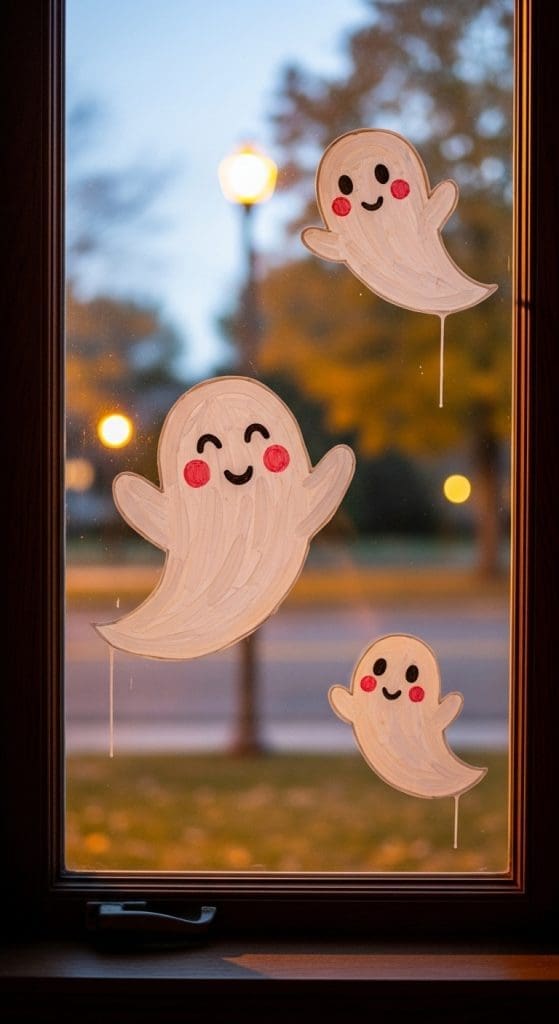
Friendly ghosts are a sweet, kid-friendly idea that still gives you that Halloween vibe.
A simple way to style this is by painting them at different heights, like they’re floating through the air.
Below is a good example of what I mean: some ghosts small and drifting up high, others larger and closer to the bottom. Their simplicity makes them charming.
DIY Steps:
- Paint oval or rounded sheet-like shapes in white.
- Curve the bottoms into flowing edges.
- Add two large black circles for eyes.
- Paint a small oval mouth for expression.
- Make some ghosts tilted sideways for movement.
- Add a light gray shadow for a floating effect.
7. Black Cat in the Window
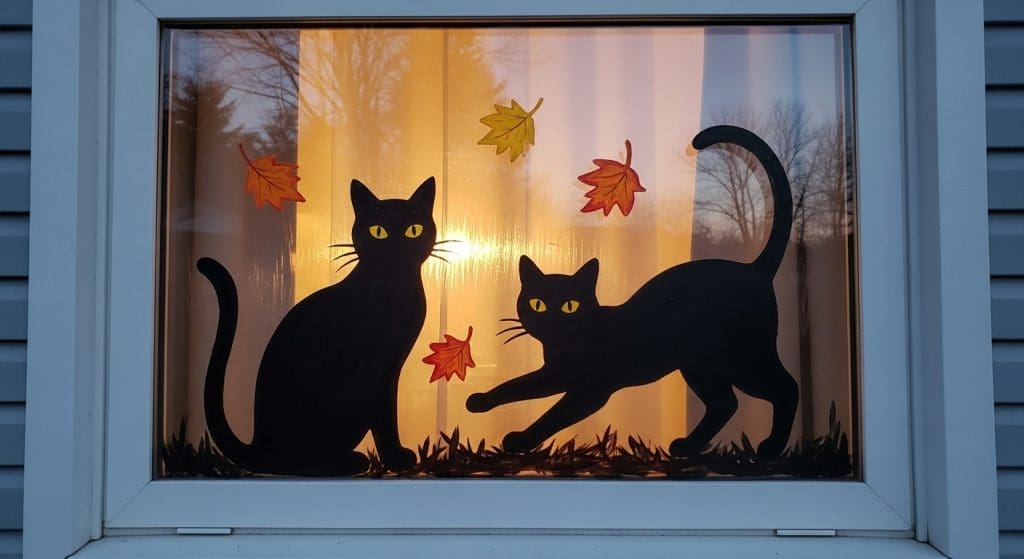
Black cats always look mysterious and sleek.
I like how this design can be either playful or spooky depending on the eyes you paint.
A simple way to style this is to sit the cat along the bottom ledge of the window, almost as if it’s really perched there. Add yellow eyes for a glowing look at night.
DIY Steps:
- Paint a black oval body and smaller round head.
- Add two pointed triangle ears.
- Draw a long curved tail curling upward.
- Fill the shape solid black.
- Add two almond-shaped yellow eyes.
- Outline the whiskers in white if you want extra detail.
8. Wicked Witch Silhouette
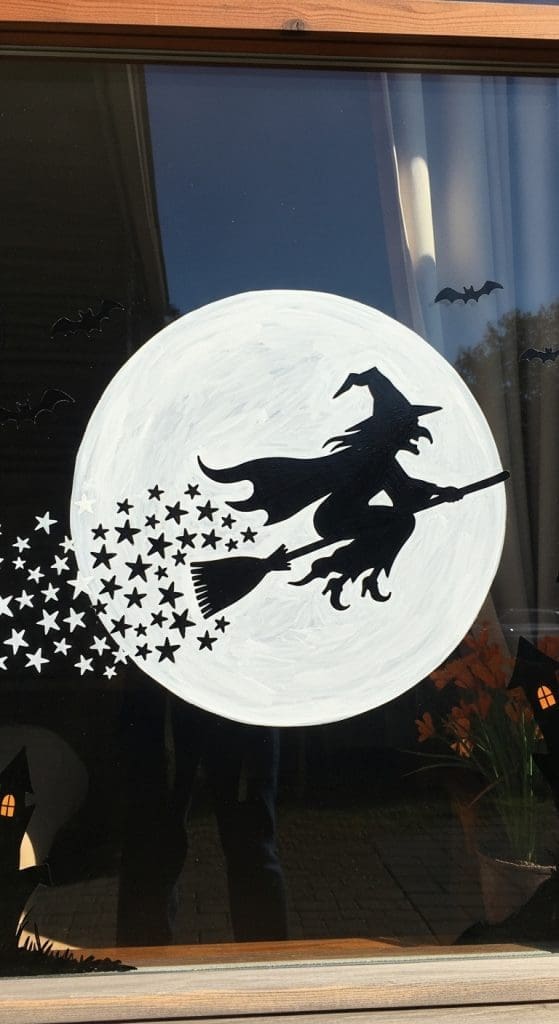
A witch with her pointy hat is instantly recognizable and makes a bold statement.
I love the look of her flying on a broomstick across a glowing moon.
This is a clever way to cover a big window with one dramatic image. Keep it simple and in silhouette, it looks cleaner and shows up better at night.
DIY Steps:
- Paint a large circle for the moon in yellow or orange.
- Add a black triangular hat with a crooked tip.
- Paint a profile face with a hooked nose.
- Draw the broomstick underneath her.
- Add flowing cloak lines behind her for movement.
- Place the witch so she overlaps the moon slightly.
9. Easy DIY Halloween Window Painting Spider Web Corners
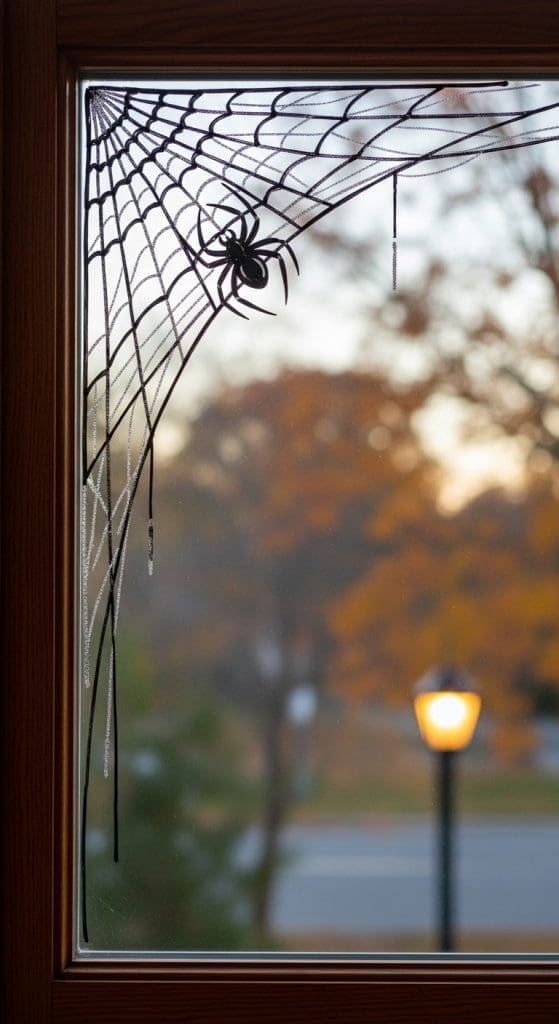
Spider webs are one of the quickest and an Easy DIY Halloween Window Painting design to fill space and they always look festive.
This is a clever way to make your window look decorated without a lot of effort.
Paint webs just in the corners so they frame the window. Add one spider in the middle if you want to go a little creepier.
DIY Steps:
- Start with a white paint pen or thin brush.
- Draw straight lines radiating out like a star.
- Connect the lines with small curved lines to form the web.
- Keep the lines uneven for a natural look.
- Add another layer of curved lines closer to the center.
- Optional: paint a small black spider hanging down.
10. Moonlit Graveyard Scene
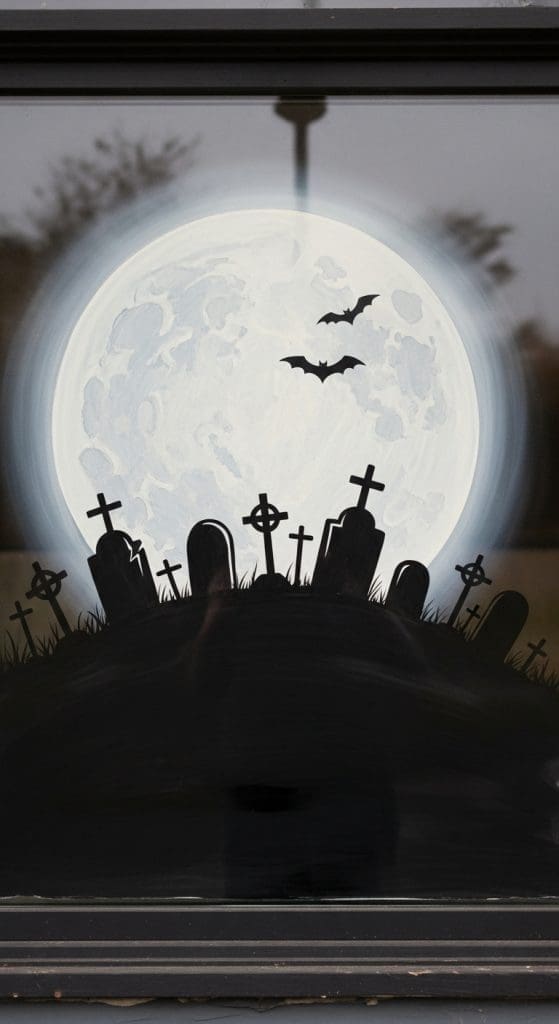
If you want a full scene, a graveyard is perfect. I like how this design instantly tells a story, it feels spooky but not too scary.
Above is a good example of what I mean, crooked gravestones, a glowing moon, and maybe a bat or two flying overhead.
It works especially well across a wide window.
DIY Steps:
- Paint the bottom edge of the window black for “ground.”
- Add gravestone shapes sticking up at different angles.
- Write “RIP” on one or two for detail.
- Paint a yellow or orange moon above them.
- Add tree branches or bats in silhouette.
- Use gray highlights for shadows on the stones.
11. Candy Corn Stripes
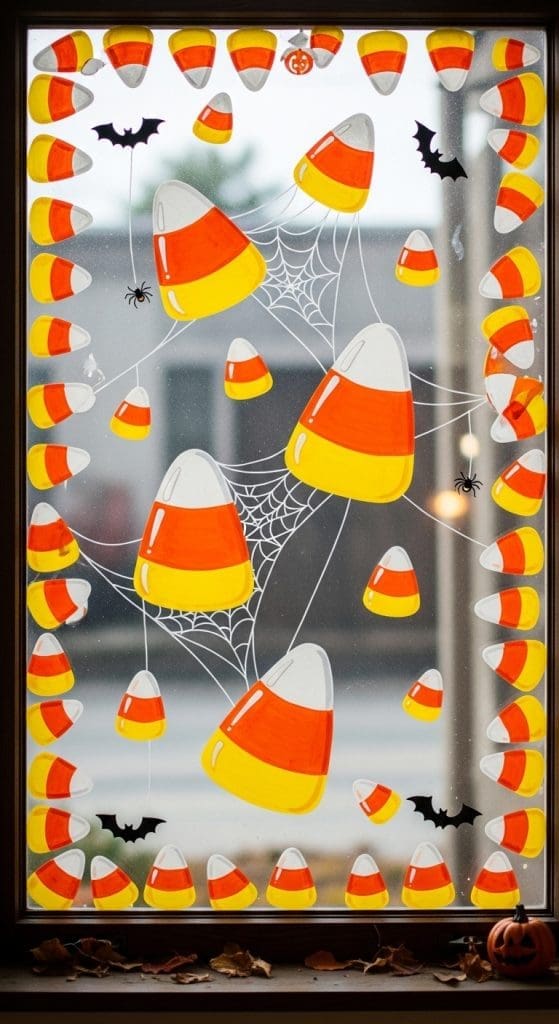
Candy corn stripes are bright, cheerful, and very beginner-friendly.
This is a clever way to add color without needing spooky shapes. I love the look of wide horizontal stripes of orange, yellow and white.
It’s also a great choice if you want Halloween but not too scary.
DIY Steps:
- Tape off horizontal sections on the window.
- Paint the bottom section orange.
- Paint the middle section yellow.
- Paint the top section white.
- Peel the tape carefully for clean lines.
- Optional: outline in black for a bold finish.
12. Shadowy Tree Branches
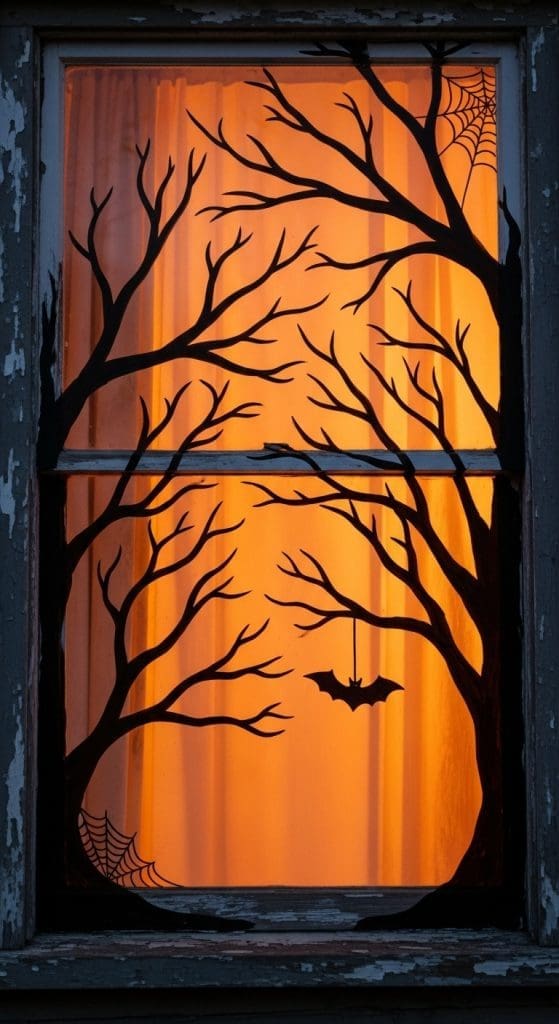
Creepy tree branches are a great way to fill space with just a few strokes.
A simple way to style this is by letting the branches stretch across the whole window, like they’re creeping in.
I like how this looks, especially eerie when the lights are on behind the window. It’s quick to paint but makes a big impact.
DIY Steps:
- Start with black paint and a thin brush.
- Paint one thick trunk line from the edge of the window.
- Branch out thinner lines in all directions.
- Add smaller twig-like offshoots.
- Vary the thickness so it looks natural.
- Extend across multiple panes if you have divided windows.
If you liked this post, check out our post 22 Halloween Window Painting Ideas