


Growing sweet potatoes at home in water is one of the easiest and most rewarding ways to start new sweet potato plants. With nothing more than a healthy sweet potato, a glass of water and a little patience, it is possible to grow vigorous shoots, known as slips, that can later be planted to produce a harvest of homegrown sweet potatoes.
This method is suitable for beginners and experienced gardeners alike because it requires very little equipment and takes up very little space and can be done on a sunny windowsill!
What You’ll Need
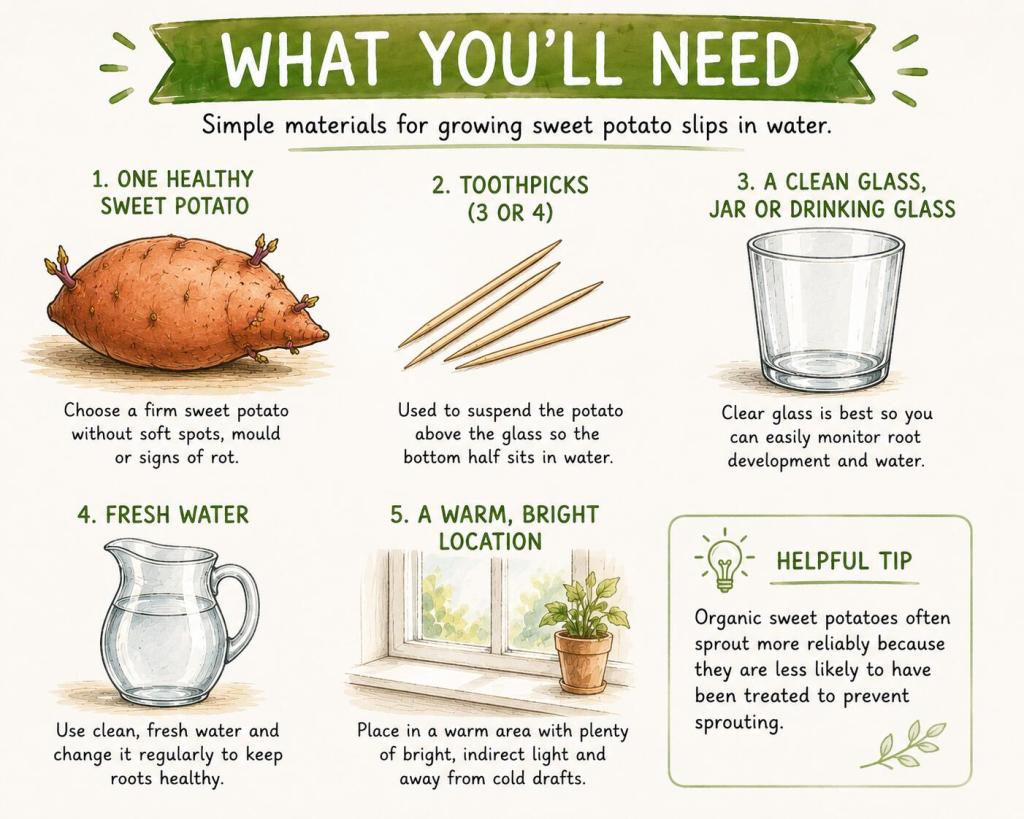
Before getting started, gather the following:
- One healthy sweet potato
- Three or four wooden cocktail sticks or toothpicks
- A clean glass, jar or drinking glass
- Fresh water
- A warm, bright location away from cold draughts
Choose a sweet potato that feels firm with smooth skin. Avoid potatoes with soft patches, mould, cuts or signs of rot. While supermarket sweet potatoes often work perfectly well, organic sweet potatoes usually sprout more reliably because they are less likely to have been treated with chemicals that slow down sprouting.
Choose a clear glass if possible. This makes it much easier to monitor root development and spot any problems early.
Stage 1, Preparing the Sweet Potato

Step 1, Insert the Toothpicks
Insert three or four toothpicks evenly around the middle of the sweet potato.
These will rest on the rim of the glass and suspend the potato so only the lower half sits in the water.
The pointed end should face downwards. The broader end, usually with more small buds or dimples, should face upwards where the slips will eventually develop.
If the potato feels unstable, simply adjust the toothpicks until it balances securely.
What to Expect
For the first two to four weeks, absolutely nothing may appear to happen.
The sweet potato may sit in the glass looking exactly as it did on day one. This is completely normal and does not mean the process has failed.
Most of the early growth happens inside the potato. Before producing leaves, it develops tiny root tissues that cannot yet be seen.
What Not to Do
Do not keep lifting the potato out of the water to check for roots.
Do not rotate it every day.
Avoid moving it between different windowsills looking for a better spot.
Although it might feel like nothing is happening, the sweet potato is preparing for root growth. Constantly disturbing it can slow this process.
Helpful Tip
A room temperature between 21°C and 27°C usually produces the quickest results. If your home is cooler, growth may simply take a little longer.
Bright indirect light works better than harsh afternoon sun.
A sunny windowsill that receives morning light is often ideal.
Stage 2, Waiting for Roots
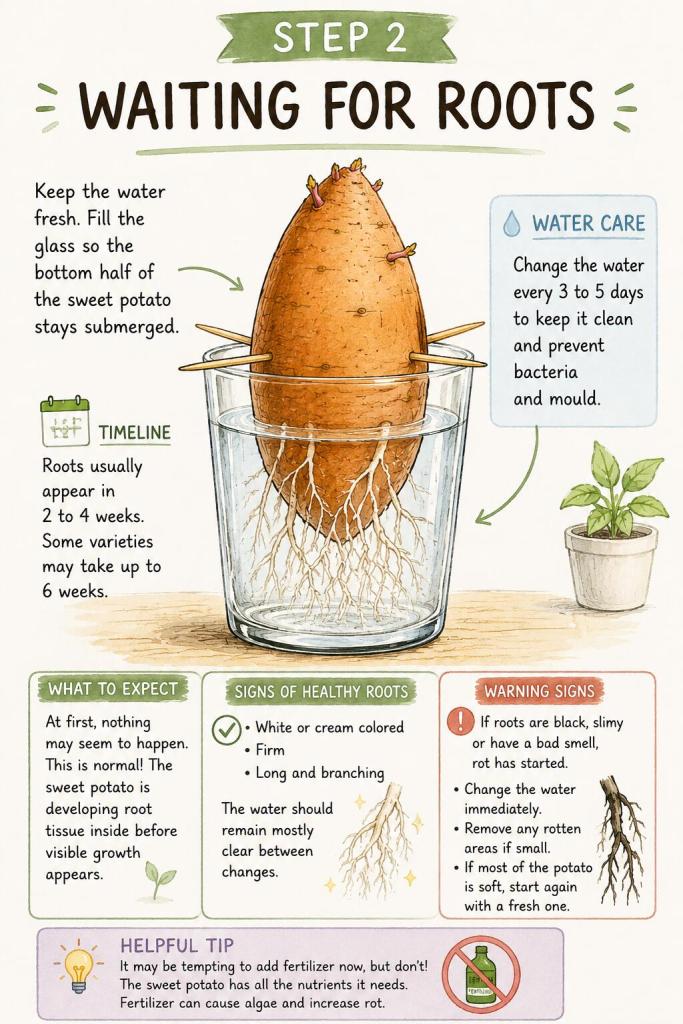
Step 2, Keep the Water Fresh
Fill the glass so the bottom half of the sweet potato remains submerged.
Replace the water every three to five days using fresh clean water. Each time the water is changed, give the container a quick rinse to remove algae or bacteria beginning to develop on the glass.
Clean water helps prevent mould, unpleasant smells and rot.
Timeline
Most sweet potatoes begin producing roots within two to four weeks.
Some varieties naturally take longer and may not show visible growth for up to six weeks.
Warmer temperatures generally encourage faster root development, while cooler rooms slow the process considerably.
Signs Everything Is Healthy
Healthy roots should be:
- White or cream coloured
- Firm
- Long and branching
- Odour free
The water should remain mostly clear between water changes.
The roots usually appear before any green shoots develop. This is exactly what should happen.
Warning Signs
If the roots become black, slimy or develop a strong unpleasant smell, rot has started.
If this happens:
- Replace the water immediately.
- Wash the container thoroughly.
- Remove any small rotten sections if possible.
- If most of the sweet potato has become soft, discard it and start again.
Cloudy water is usually a sign that it needs changing more frequently.
Helpful Tip
At this stage it may feel tempting to add fertiliser to encourage faster growth.
This is a bad idea.
The sweet potato already contains all the nutrients needed to produce roots and shoots during these early stages. Adding fertiliser too soon often encourages algae growth instead of healthy roots.
Stage 3, Growing Slips
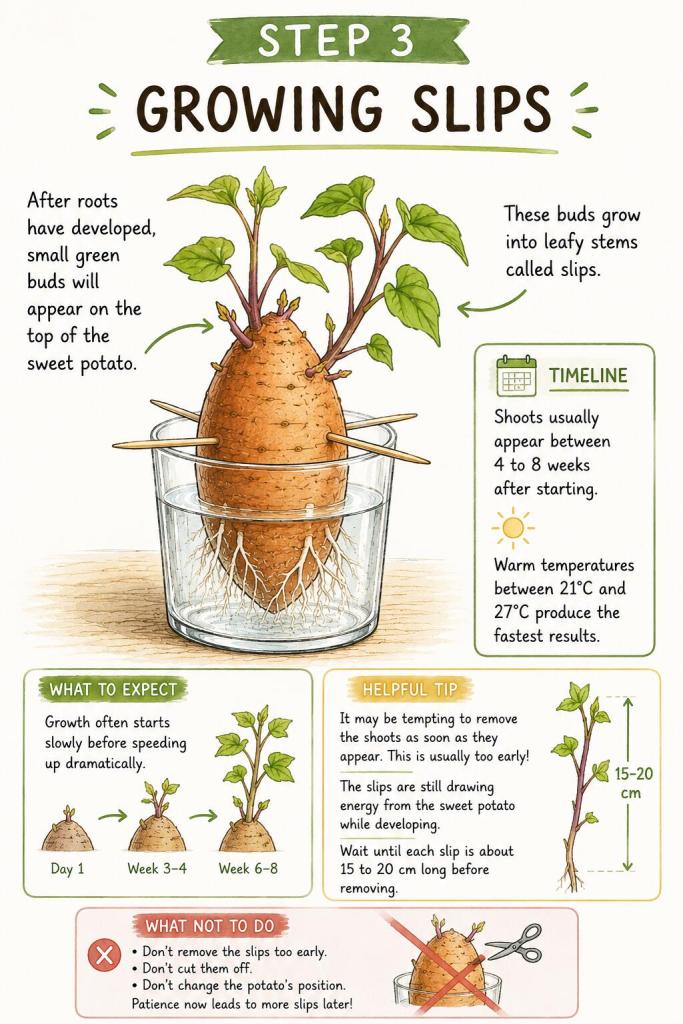
Step 3, Watch for New Shoots
Once healthy roots have developed, small green buds will begin appearing from the top of the sweet potato.
These buds gradually grow into leafy stems known as slips. Each slip has the potential to become an entirely new sweet potato plant.
One sweet potato can often produce between five and twenty slips over several weeks depending on its size and variety.
Timeline
Shoots usually begin appearing between four and eight weeks after starting.
Warm temperatures between 21°C and 27°C produce the fastest results.
Some shoots will grow much faster than others. This is completely normal.
What to Expect
Growth usually starts very slowly before suddenly speeding up.
One day there may only be tiny green buds.
A week or two later those buds may have become leafy stems several centimetres long.
Some buds may stop growing while others become strong slips. The plant naturally directs its energy towards the healthiest shoots.
What Not to Do
Do not remove the shoots as soon as they appear.
Do not pinch off smaller buds to encourage larger ones.
Avoid placing the sweet potato in full afternoon sun, as young shoots can wilt before they are fully established.
Helpful Tip
Many people assume the shoots are ready to remove as soon as they appear.
This is usually too early.
The slips are still drawing energy from the sweet potato while developing leaves and stems. Wait until each slip reaches around 15 to 20 cm long before removing it.
If the shoots become pale or stretched, move the glass somewhere brighter with plenty of indirect sunlight.
Stage 4, Removing the Slips
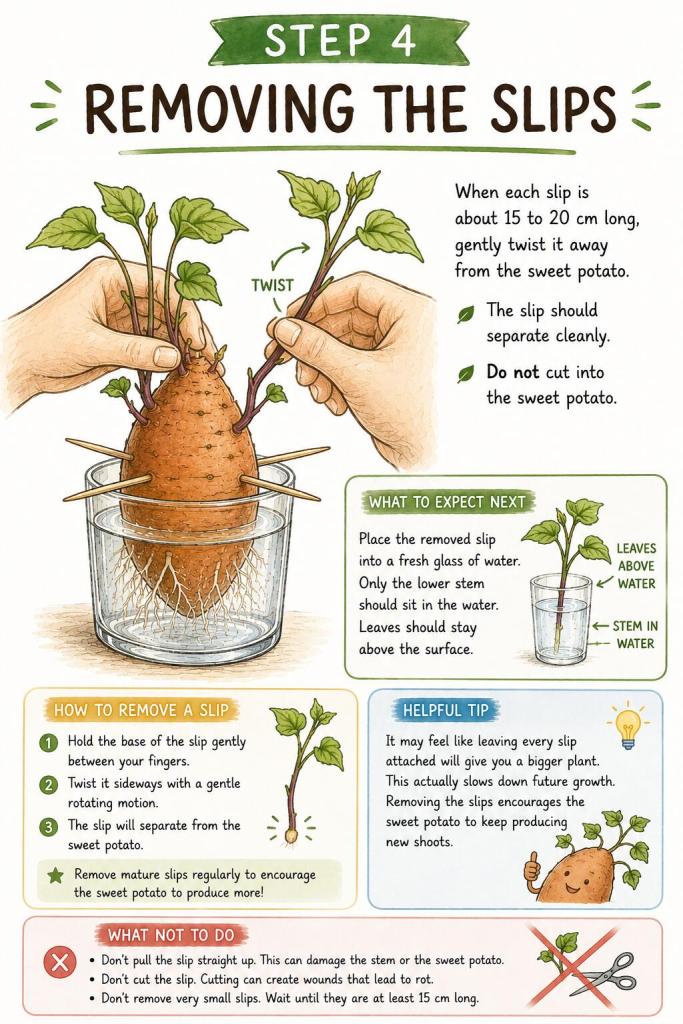
Step 4, Separate the Shoots
Once each slip reaches around 15 to 20 cm tall, gently hold it near the base and twist it away from the sweet potato.
The slip should separate cleanly without damaging the parent potato.
Avoid pulling directly upwards, as this can tear the stem.
Do not cut into the sweet potato itself.
What Happens Next
Place each removed slip into a clean glass of fresh water.
Only the lower part of the stem should sit below the water.
Keep all leaves above the water surface to prevent them from rotting.
Several slips can be rooted together, although giving each slip its own container often produces stronger roots.
Timeline
Most slips begin producing new roots within one to two weeks.
Helpful Tip
It may feel like leaving every slip attached will create a larger plant.
In reality, removing mature slips encourages the sweet potato to produce even more shoots.
Continue caring for the original potato, as it may continue producing new slips for several more weeks.
Stage 5, Rooting the Slips
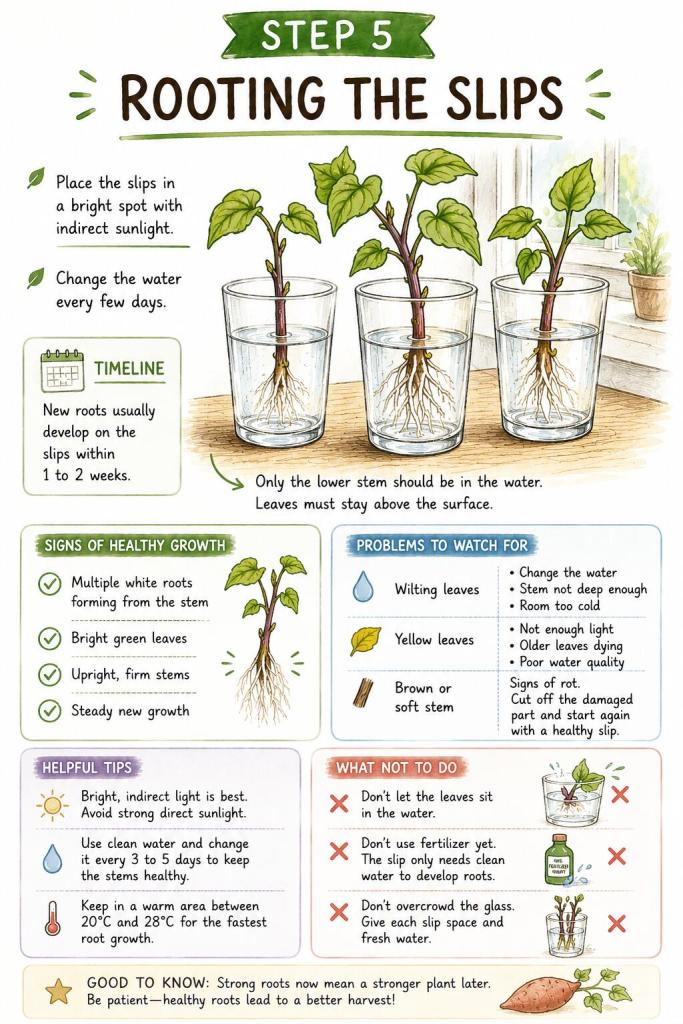
Step 5, Allow Strong Roots to Form
Place the slips somewhere bright with indirect sunlight.
Replace the water every three to five days to keep it clean.
Within one to two weeks, healthy white roots should begin growing from the lower stem.
The more roots that develop before planting, the faster the plant usually establishes itself in soil.
Healthy Root Growth
Strong slips produce:
- Multiple white roots
- Bright green leaves
- Upright stems
- Steady new leaf growth
Healthy roots gradually become thicker and longer as they prepare for planting.
Problems to Watch For
Wilting leaves usually mean:
- The water needs changing.
- The stem is not deep enough in the water.
- The room is too cold.
Yellow leaves may indicate:
- Not enough light.
- Older leaves naturally dying.
- Poor water quality.
Brown or soft stems often indicate rot.
If this happens, remove the damaged section immediately and restart the healthy part of the slip in fresh water.
If several slips are growing in one glass and begin competing for space, move them into separate containers.
Stage 6, Preparing for Planting
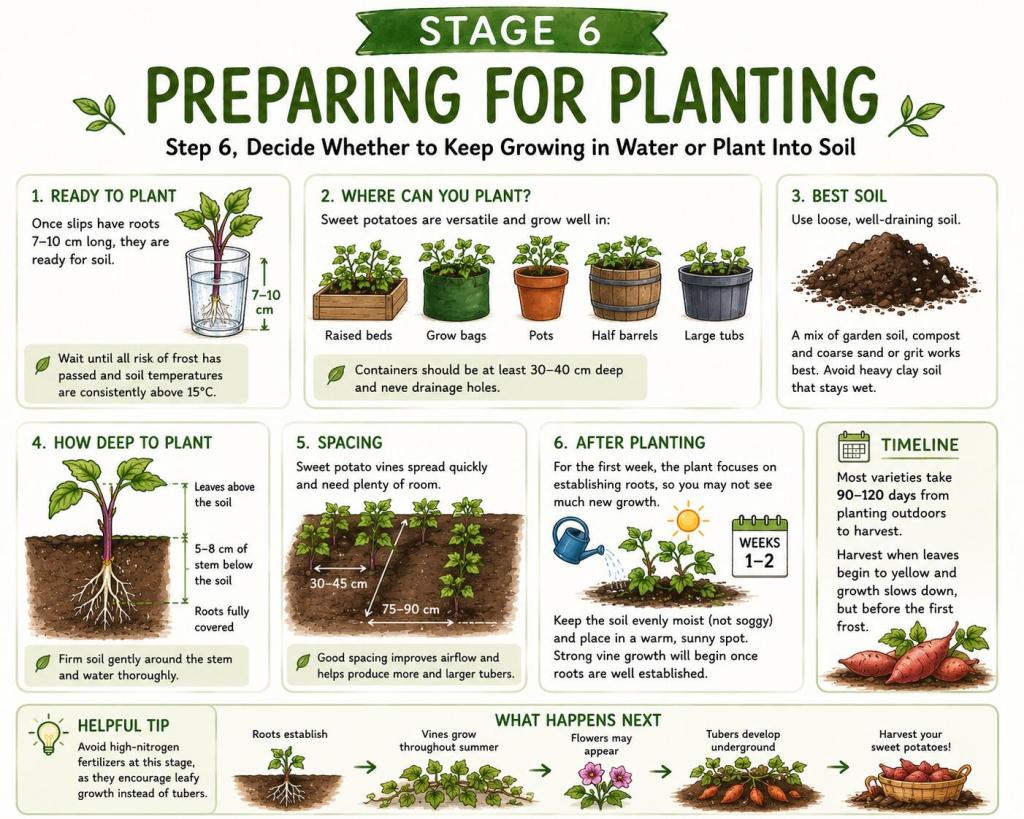
Step 6, Decide Whether to Keep Growing in Water or Plant Into Soil
Once each slip has developed roots measuring around 7 to 10 cm long, it is ready to move into soil.
Although sweet potato slips can continue growing in water for decorative purposes, they will not produce large edible sweet potatoes unless planted into soil. Water simply cannot provide enough nutrients for tuber development.
When Should They Be Planted?
Plant outdoors after all danger of frost has passed.
Sweet potatoes prefer warm weather and grow best when soil temperatures remain above 15°C and daytime temperatures stay between 18°C and 30°C.
Planting into cold soil often slows growth dramatically.
What Soil Is Best?
Sweet potatoes prefer loose, well-draining soil.
A mixture of multi-purpose compost and garden soil works well, especially if improved with horticultural sand or fine grit for drainage.
Avoid heavy clay soils that stay wet for long periods, as this can cause the tubers to rot or become misshapen.
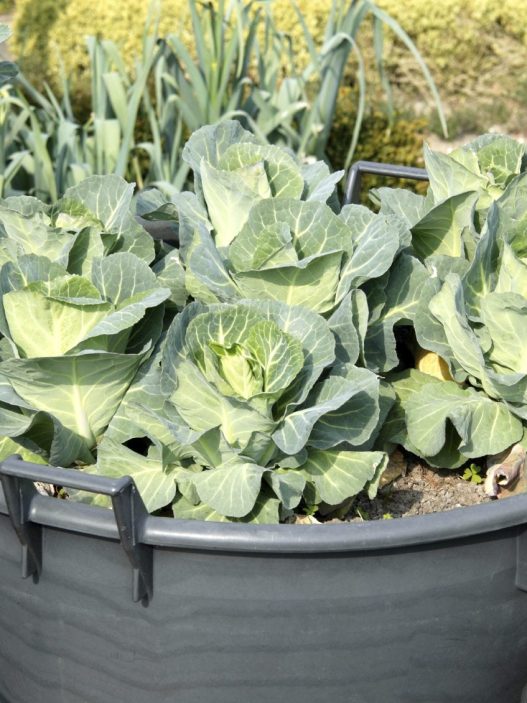
Where Can They Be Grown?
Rooted slips grow well in:
- Raised beds
- Vegetable gardens
- Large pots
- Deep planters
- Grow bags
- Half barrels
- Large tubs
Containers should ideally be at least 30 to 40 cm deep and have drainage holes.
How Deep Should They Be Planted?
Plant each slip so the roots and the lower 5 to 8 cm of stem are buried beneath the soil.
Leave all of the leaves above the surface.
Firm the soil gently around the stem and water thoroughly after planting.
Timeline
Most varieties take between 90 and 120 days from planting outdoors to produce mature sweet potatoes.
Common Problems and Solutions
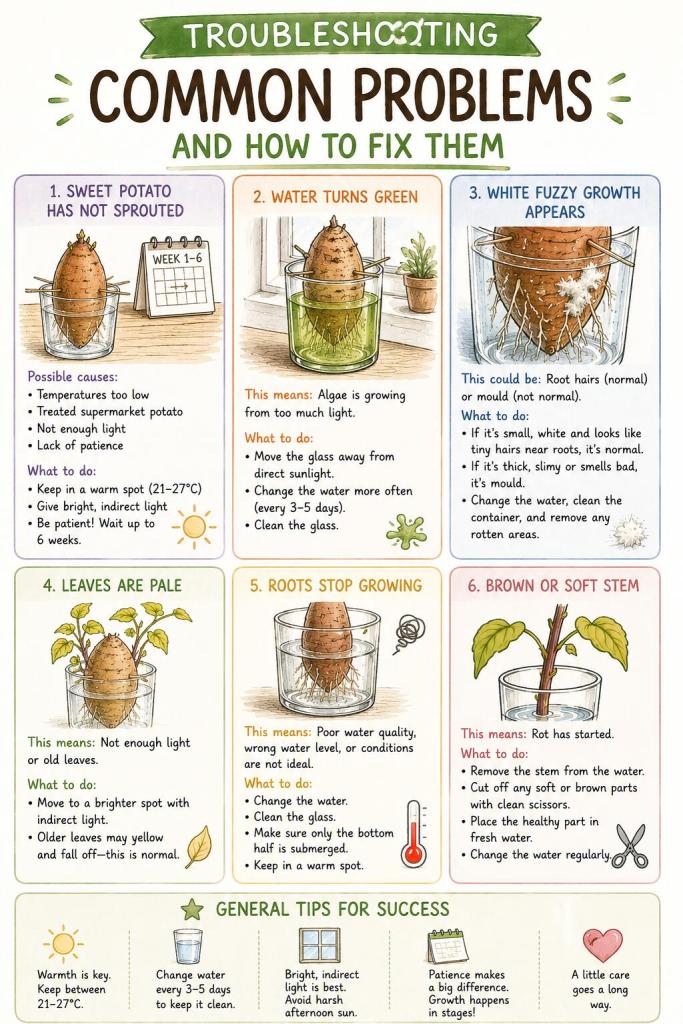
The Sweet Potato Has Not Sprouted
Possible causes include:
- Temperatures below 18°C
- Treated supermarket sweet potatoes
- Insufficient light
- Lack of patience
Move the container somewhere warmer and continue waiting. Some sweet potatoes simply take longer than others and may need up to six weeks before growth begins.
Water Turns Green
Green water usually means algae is developing because the container receives too much direct sunlight.
Move the glass slightly away from the window and continue changing the water every three to five days.
White Fuzzy Growth Appears
Small patches of white fuzz growing directly from healthy roots are often harmless root hairs.
If the growth appears on the sweet potato itself, becomes slimy or develops an unpleasant smell, it is more likely to be mould.
Clean the container thoroughly and replace the water immediately.
Leaves Are Pale
Pale leaves often indicate the plant needs more light.
Move it somewhere brighter while avoiding harsh afternoon sunshine that can scorch young leaves.
Roots Stop Growing
If root growth slows:
- Replace the water.
- Clean the container.
- Check the room temperature.
- Make sure only the lower stem remains underwater.
Avoid pulling tangled roots apart, as they are surprisingly delicate.
Frequently Asked Questions
Can tap water be used?
Yes. Tap water works perfectly well. Allowing it to stand overnight before use may reduce chlorine in some areas, although this is rarely essential.
How often should the water be changed?
Every three to five days, or sooner if it becomes cloudy.
Does the whole sweet potato need to stay underwater?
No.
Only the bottom half should remain submerged.
Can one sweet potato produce multiple plants?
Yes.
A single healthy sweet potato can often produce several slips over many weeks, with each slip capable of becoming a separate plant.
Can sweet potatoes stay in water forever?
They can continue growing in water as an ornamental plant, but they need nutrient-rich soil to produce edible sweet potatoes.
Can sweet potatoes be grown indoors all year?
Yes, if they are being grown for foliage or as a houseplant. For harvesting tubers, they perform much better outdoors during warm weather.
Final Tips for Success
- Keep the water clean by replacing it every three to five days.
- Maintain warm temperatures for the quickest growth.
- Provide plenty of bright indirect light.
- Be patient during the first few weeks while roots develop.
- Wait until slips reach around 15 to 20 cm before removing them.
- Handle roots carefully, as they break easily.
- Plant rooted slips into loose, well-draining soil once they have established healthy roots.
- Do not rush the process. Slow starts often lead to stronger, healthier plants.
With regular care and a little patience, a single sweet potato can produce multiple vigorous slips, each capable of growing into a healthy plant and producing a generous harvest later in the season.