




Dollar Tree Stackable Pumpkin Ideas can turn inexpensive plastic pumpkins into stylish fall decor for porches, patios, entryways, mantels, and tabletops without spending much money.
From painted finishes and stacked topiaries to flowers, ribbon, lights, and textured makeovers, there are plenty of easy ways to customize these pumpkins for both indoor and outdoor spaces.
These Stacking Pumpkins Ideas include simple Dollar Tree Stackable Pumpkins Diy projects, easy Diy Dollar Tree Stackable Pumpkins, and creative Dollar Tree Stackable Pumpkins Craft ideas that are beginner-friendly and easy to adjust
1. Give the Pumpkins a Modern Neutral Makeover
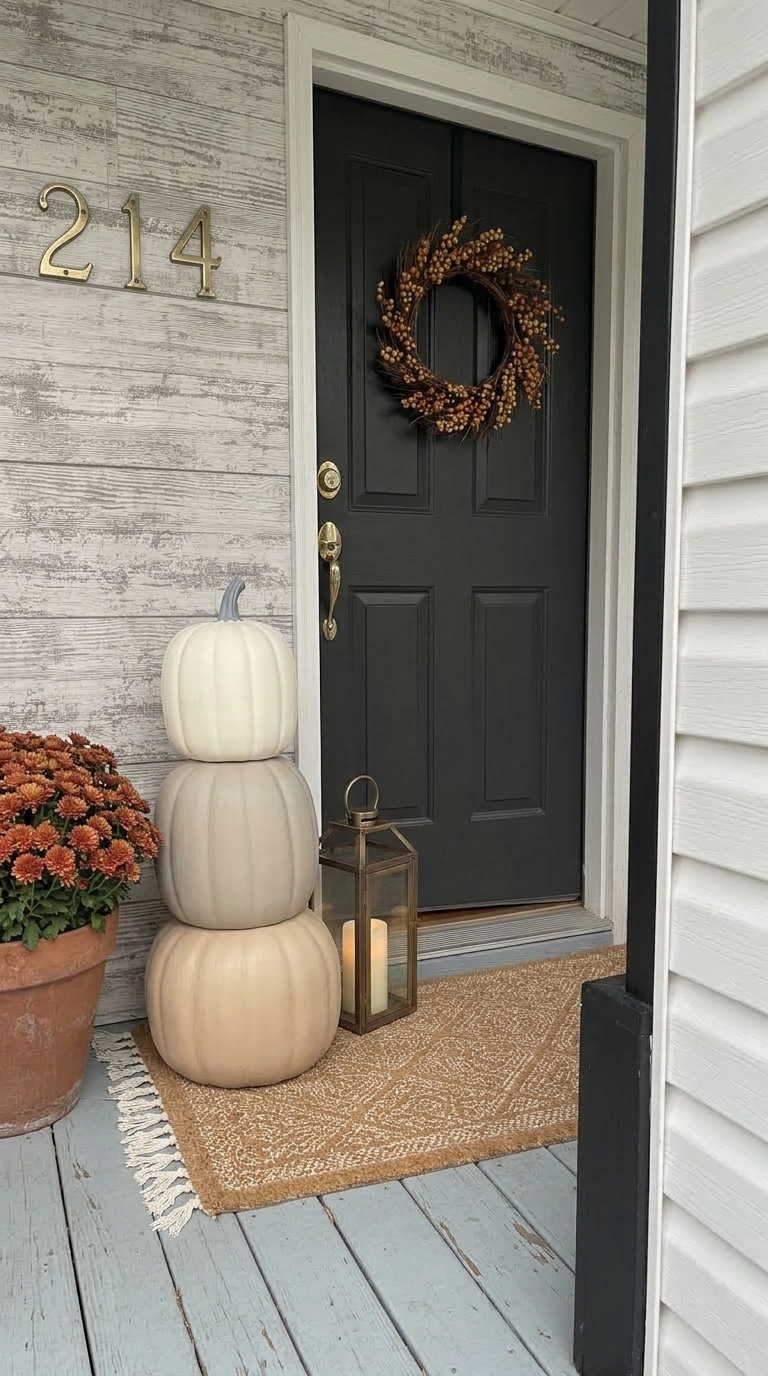
Turn bright orange plastic into a soft designer-style pumpkin stack with warm beige, cream, and taupe paint.
Neutral paint instantly makes inexpensive plastic pumpkins feel calmer and more sophisticated.
Start with a plastic-friendly primer, then paint the bottom pumpkin warm beige, the middle pumpkin greige, and the top pumpkin creamy white. Chalk paint is especially beginner-friendly since the matte finish helps hide small imperfections in the plastic.
FolkArt shades similar to French Linen, Parchment, or warm tan tones are easy choices if mixing custom colors feels intimidating.
Place the finished stack beside a woven doormat, lantern, or basket of mums for a simple fall porch display.
2. Create a Baking Soda Terracotta Pumpkin Stack
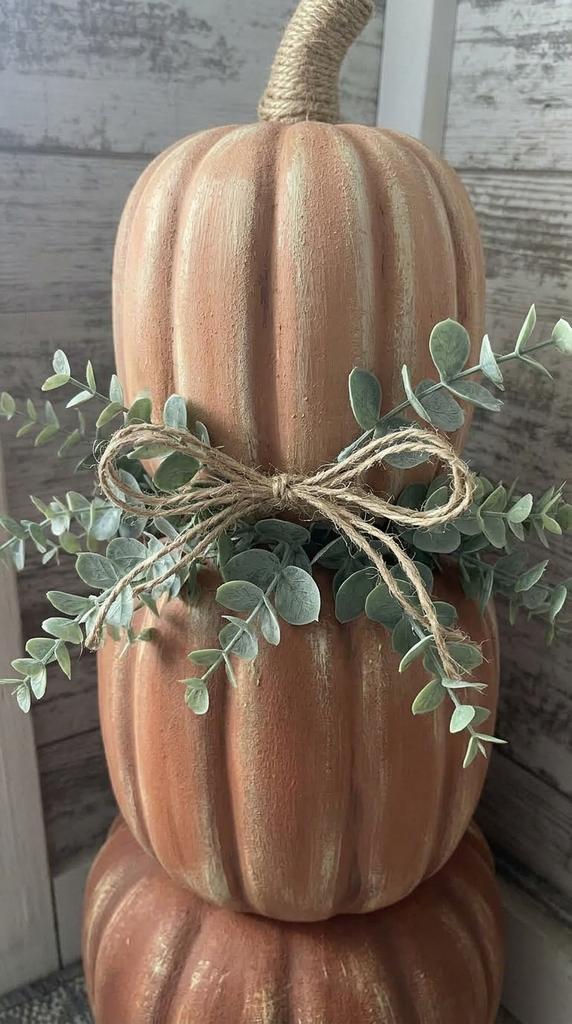
Want that expensive handmade pottery look without buying heavy ceramic pumpkins?
Mixing a spoonful of baking soda into acrylic paint gives smooth Dollar Tree pumpkins a slightly gritty, pottery-like finish.
Terracotta, clay, rust, and muted cinnamon shades bring out the curves of each pumpkin while making shiny plastic look much more substantial. Apply the mixture with a stiff brush or inexpensive sponge, letting visible brush texture remain rather than trying to make every surface perfectly smooth.
Once dry, lightly dab a softer cream or pale tan over the raised areas to create natural-looking variation.
A jute-wrapped stem and a few sprigs of faux eucalyptus complete the earthy look without adding much cost.
3. Make a Black and Cream Jack-O-Lantern Tower
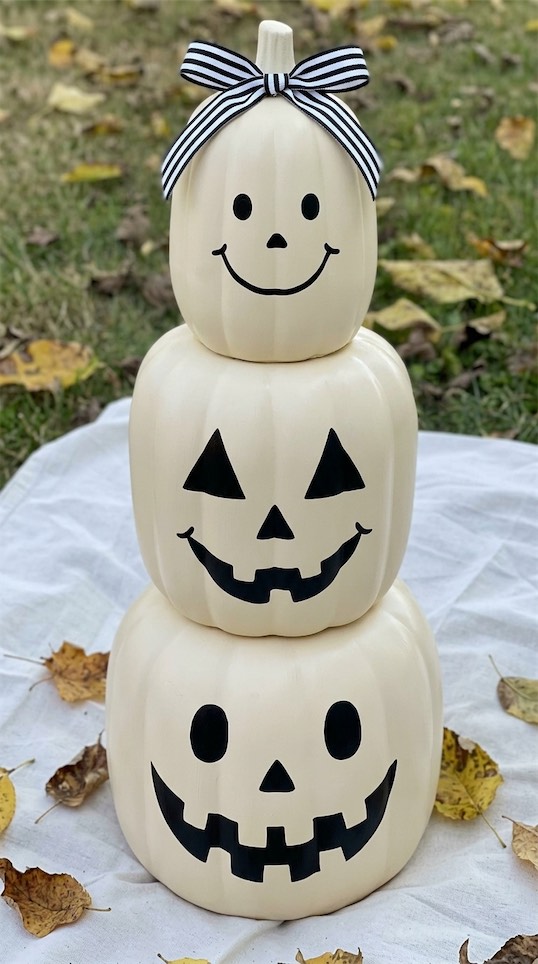
A simple painted face can turn a basic fall stack into Halloween porch decor in an afternoon.
Paint the pumpkins matte cream and add different black jack-o-lantern expressions to each level using a paint marker.
Keeping the palette to just two colors gives the decoration a cleaner look than the usual bright orange Halloween plastic. Try a smiling face on top, triangle eyes in the center, and a wide toothy grin on the bottom pumpkin.
A black and white striped ribbon tied beneath the stem can connect the whole stack visually without making it look busy.
Set the tower near a black lantern or Halloween welcome mat where the faces are easy to see from the walkway.
4. Stack Mini Pumpkins for an Easy Tabletop Display
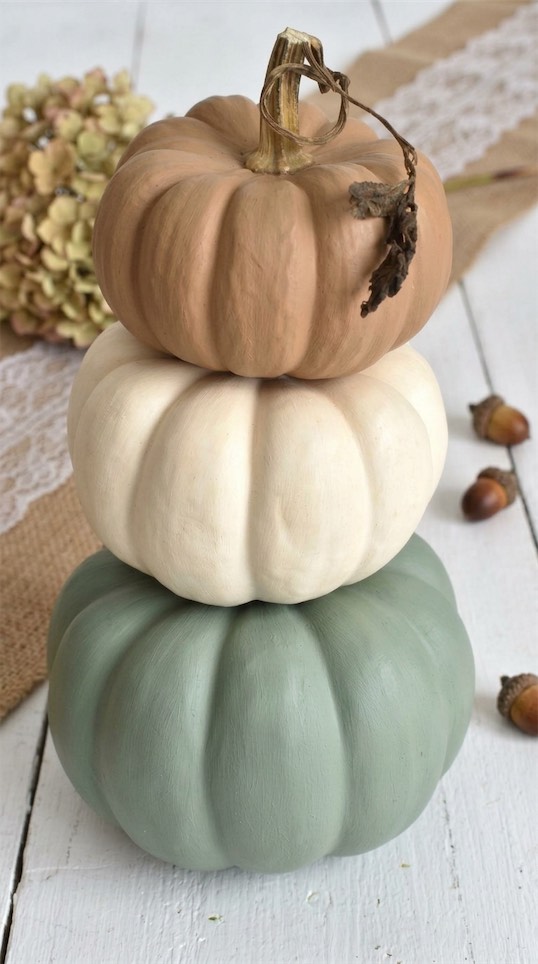
Mini pumpkins are perfect when a full-size porch tower feels too large for the space.
Choose three lightweight Dollar Tree foam pumpkins in graduated sizes and remove the stems from the bottom two.
Attach them with hot glue for indoor use, or run a thin wooden skewer through the centers for extra stability.
Paint each pumpkin a different muted fall shade, such as ivory, dusty green, and caramel brown.
The smaller proportions make this one of the easiest Diy Dollar Tree Stackable Pumpkins projects for beginners and apartment decorators.
Place the finished stack on a kitchen tray with a candle, wooden beads, and a tiny vase of dried-looking stems for an instant autumn vignette.
5. Build a Classic Pumpkin Porch Topiary
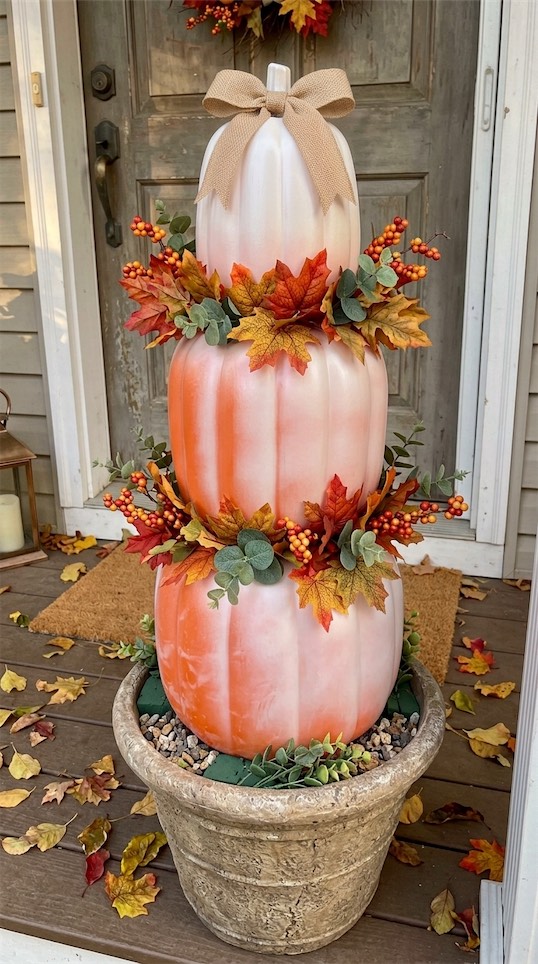
A tall pumpkin topiary gives a small front porch height without taking up much floor space.
Start with three stackable pumpkins and place them inside a sturdy Dollar Tree planter, thrifted urn, or inexpensive resin pot. Adding floral foam, gravel, or small stones to the base helps stop the arrangement from tipping when the weather gets breezy.
Paint the pumpkins all one color for a streamlined look, or use three coordinated shades of orange for a traditional fall display.
Tuck faux maple leaves, eucalyptus, or berry stems between each pumpkin to soften the joins and make the stack look fuller. A simple burlap bow near the top adds texture while still keeping the project beginner-friendly.
6. Add Fairy Lights for an Evening Pumpkin Glow
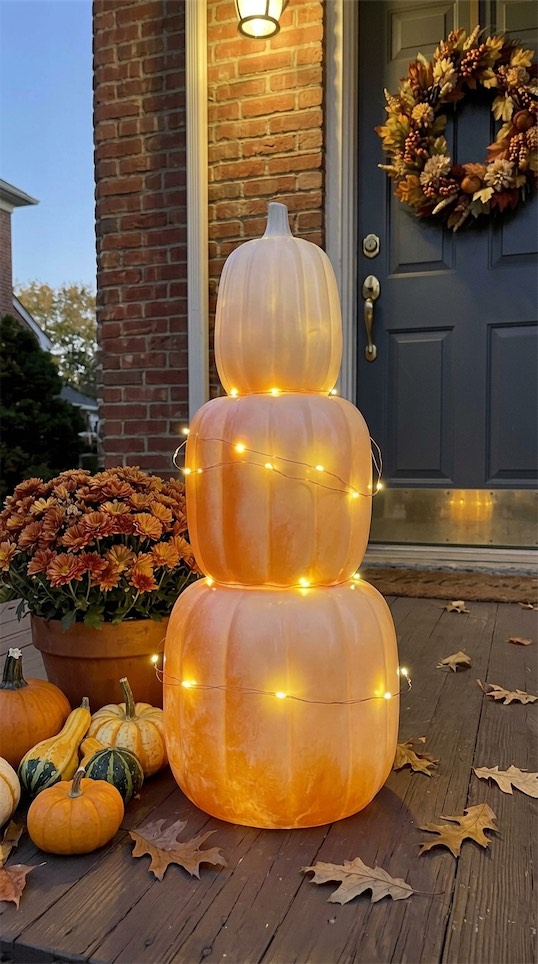
A little warm light makes a pumpkin stack especially pretty once the evenings start getting darker.
Small battery-operated fairy lights can be wrapped loosely around the pumpkins or tucked between each layer before the stack is secured. For outdoor decorating you can even use tiny solar string lights are even easier!
Warm white lights look cozy with cream, rust, or orange pumpkins, while purple lights can push the design toward Halloween.
Keep the wire close to the pumpkin grooves so it almost disappears during daylight hours.
The soft glow adds depth after sunset and helps a simple Dollar Tree project feel much more intentional from the street.
7. Paint a Faux Stone Pumpkin Stack
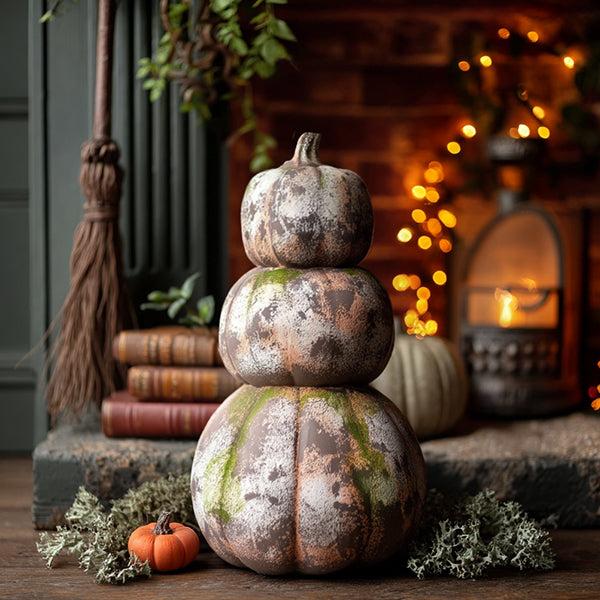
Gray and limestone shades can make lightweight plastic pumpkins resemble heavy garden decor.
Start with charcoal or medium gray paint, then sponge lighter gray and warm beige over the surface in irregular patches. The layered colors are more convincing than one flat gray coat since real stone naturally contains subtle variation.
Mixing a little baking soda into the final coat creates extra texture and removes the shiny plastic appearance.
Finish with a dry brush of pale cream across the ridges so the shape of each pumpkin stands out.
Set the stack beside concrete planters, ornamental grasses, or a simple black lantern for a modern outdoor look.
8. Try a Cream and Sage Farmhouse Pumpkin Stack
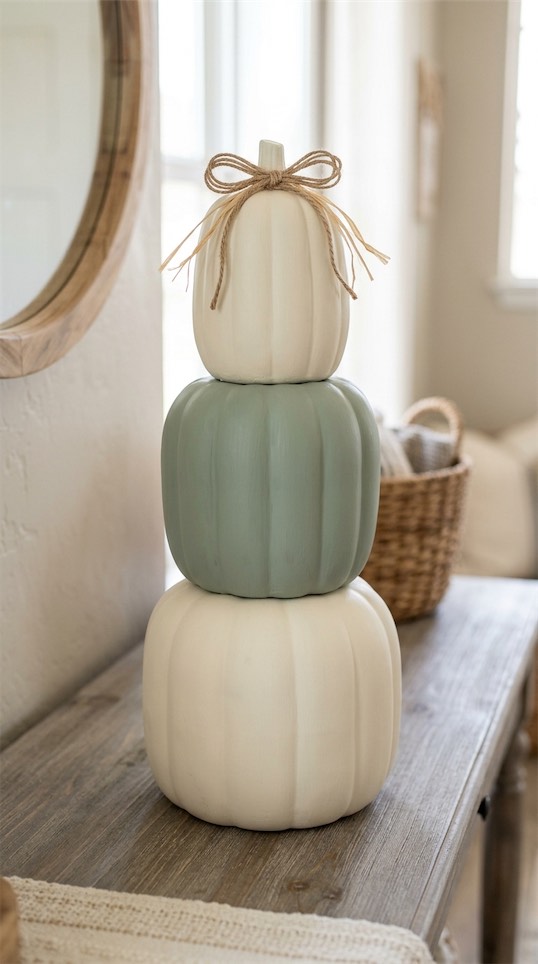
Soft cream and muted green create fall decor that can stay out long after Halloween has passed.
Paint two pumpkins creamy white and use sage green on the center pumpkin to break up the stack. The gentle contrast feels seasonal without relying on traditional bright orange, making it easy to coordinate with neutral entryways.
Add a small jute bow, raffia, or narrow gingham ribbon around the stem for a little farmhouse texture.
A few faux olive branches tucked between the layers add movement without hiding the pumpkins themselves.
This combination looks especially pretty beside a natural coir mat, wicker basket, or galvanized planter filled with mums.
9. Paint a Purple and Black Halloween Stack
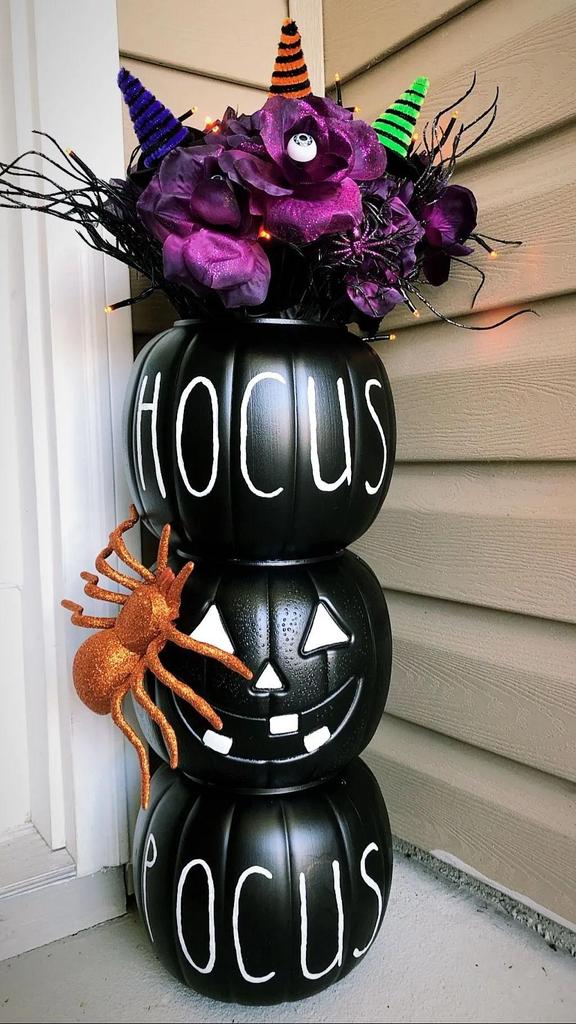
Deep purple and matte black create dramatic Halloween decor without requiring complicated crafting.
Alternate black and plum-colored pumpkins, then dry brush a small amount of metallic silver over the raised ridges. The darker palette gives the tower enough contrast to stand out beside an orange wreath or traditional pumpkins.
Add black faux leaves, inexpensive spiders, or a small velvet bow if the display needs another Halloween detail.
A satin or matte finish generally looks more polished than high-gloss paint on molded plastic.
Place the stack near a lantern with a battery candle so the purple color becomes more noticeable in the evening.
For outdoor use, seal each painted pumpkin before assembling the tower, particularly if the display receives strong afternoon sun.
10. Add Buffalo Check Ribbon and Fall Leaves
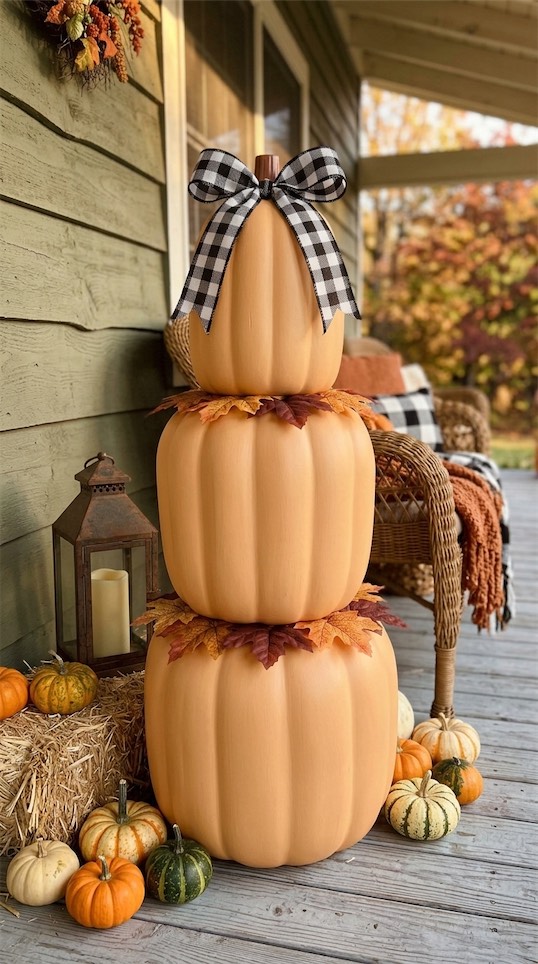
Ribbon is one of the quickest ways to decorate stacking pumpkins when painting the entire piece sounds like too much work.
Start with cream or soft orange pumpkins and tie a black and white buffalo check ribbon around the top stem. Tuck small faux maple leaves between the pumpkins so the stems hide the seams where each piece meets.
The patterned ribbon adds enough contrast to make a basic pumpkin tower feel finished without covering the whole decoration.
Dollar Tree floral picks can usually be separated into several smaller pieces, which helps stretch one inexpensive bundle across the project.
Try combining rust leaves, small berries, and a little raffia for a traditional front porch look that coordinates easily with mums.
11. Fill the Pumpkin Gaps With Fall Flowers
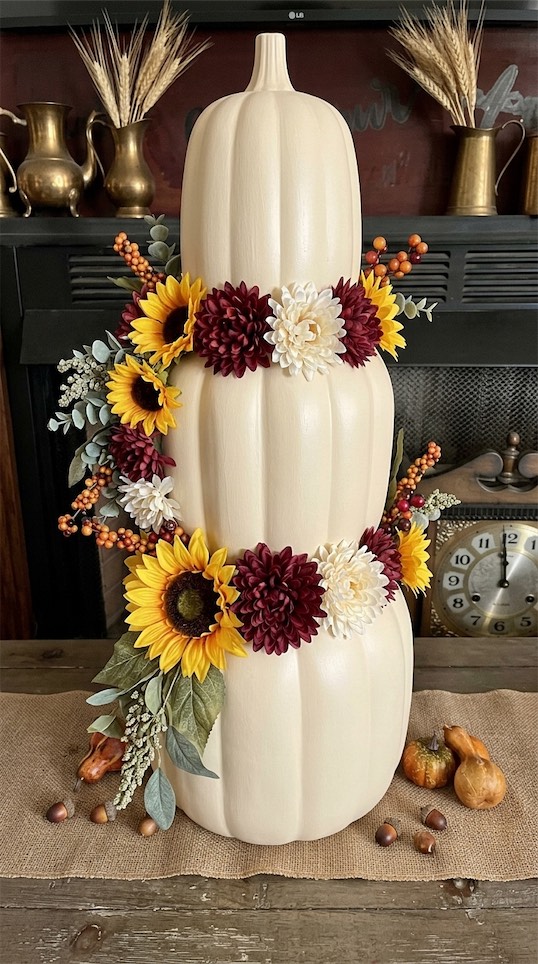
Faux florals can make a simple stack look fuller, softer, and much more custom.
Paint the pumpkins a solid neutral shade first so the flowers become the main decorative feature.
Cut apart inexpensive sunflower, mum, eucalyptus, or berry stems and tuck the pieces between each pumpkin layer. Hot glue works well for an indoor display, while floral wire gives outdoor arrangements a little more security.
Using flowers mainly on one side creates a flowing asymmetrical look that feels more modern than placing them evenly around every pumpkin.
Burnt orange mums with cream pumpkins feel traditional, while burgundy leaves and sage pumpkins create a moodier autumn combination.
12. Make a Glam Mirrored Pumpkin Stack
A little sparkle can turn Dollar Tree stacking pumpkins into playful statement decor.
Use silver metallic paint as the base, then attach small self-adhesive mirror tiles to selected pumpkin sections rather than covering every inch. Leaving some painted areas visible keeps the project easier and prevents the finished stack from becoming too heavy or overly busy.
Mini adhesive rhinestones can fill awkward spaces where square mirror pieces do not sit neatly against the curved surface.
Place the finished tower on a console table, covered porch, or Halloween party table where nearby light can bounce off the reflective pieces.
Black ribbon or dark green velvet at the stem helps ground all that shine and gives the decoration a more finished appearance.
13. Create a Polka Dot Character-Inspired Pumpkin Stack
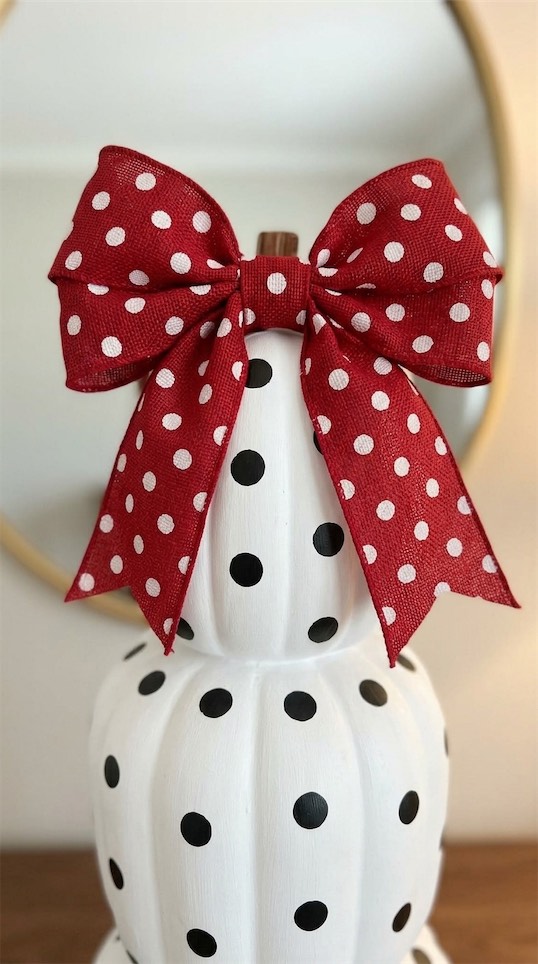
Black, white, red, and playful polka dots make a cheerful alternative to traditional rustic fall decor.
Paint the pumpkin stack white, then add evenly spaced black dots using a round sponge dauber or the end of a foam brush handle. Add a large red bow with white dots near the top for a cute character-inspired look without needing advanced painting skills.
Small black foam circles can also be attached near the stem if a more whimsical silhouette is wanted.
The repeated dot pattern makes mismatched inexpensive pumpkins feel like one coordinated decoration.
14. Turn the Stack Into a Friendly Scarecrow
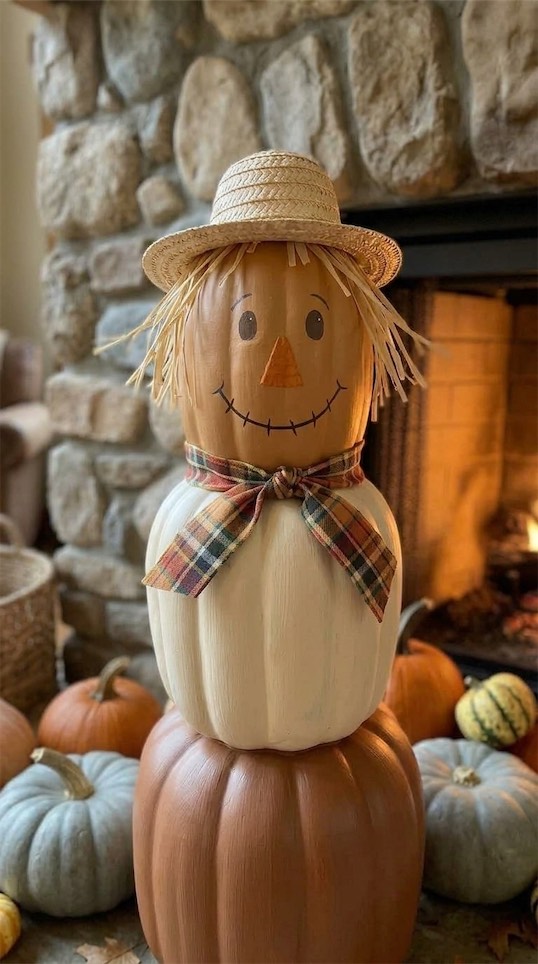
A pumpkin tower can double as an adorable scarecrow without adding many extra supplies.
Paint the top pumpkin a warm tan or soft orange and draw simple eyes, a triangle nose, and a stitched smile with paint markers. Place a small straw hat on top, then glue short pieces of raffia underneath so they resemble messy straw hair.
The lower pumpkins can stay orange or be painted cream and brown to create a more layered harvest look.
Tie a plaid fabric strip around the neck area to separate the scarecrow face from the rest of the stack.
This style feels welcoming rather than spooky, so it can stay on the porch, fireplace or entryway table from early fall right through to Thanksgiving.
15. Make a Pumpkin Nutcracker for Whimsical Fall Decor
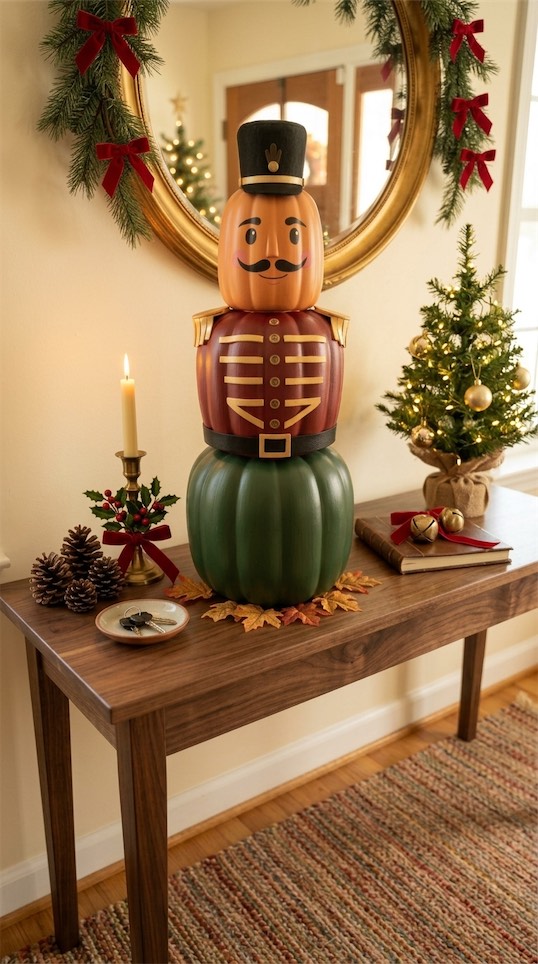
For something transitional different, give a stacked pumpkin tower the bold details of a decorative nutcracker.
Paint the bottom pumpkin deep green, the middle pumpkin burgundy, and the top pumpkin a warm peach or tan.
Add simple gold-painted foam strips, buttons, and a black belt to suggest a little uniform without needing detailed artistic skills. A painted face on the top pumpkin and a small felt hat complete the character.
The same stacked-object approach can even transition into Christmas projects, which is why Dollar Tree Stackable Tree Ideas and stackable snowman crafts pair so naturally with this type of DIY.
16. Give the Pumpkins a Galvanized Metal Look
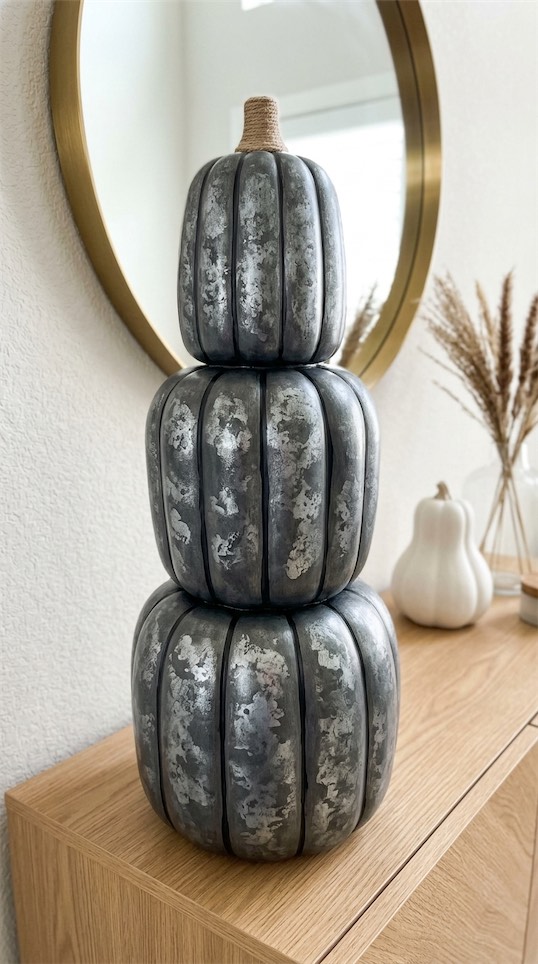
A faux galvanized finish is perfect for anyone who likes rustic fall decor but wants something less predictable than orange.
Paint the entire pumpkin tower charcoal gray, then dab silver and lighter gray paint over it with a crumpled sponge.
Avoid blending the colors completely, since uneven patches are what create the look of aged metal.
Use a tiny amount of black paint around the pumpkin grooves for extra depth.
Finish the stem with jute twine or brown paint to add warmth against the cooler metallic colors.
A galvanized bucket filled with mums or ornamental grass nearby can make the whole porch display feel coordinated.
Exterior acrylic and a matte clear coat make this a practical option for covered outdoor spaces and areas that receive several hours of sun.
17. Add House Numbers to a Porch Pumpkin Tower
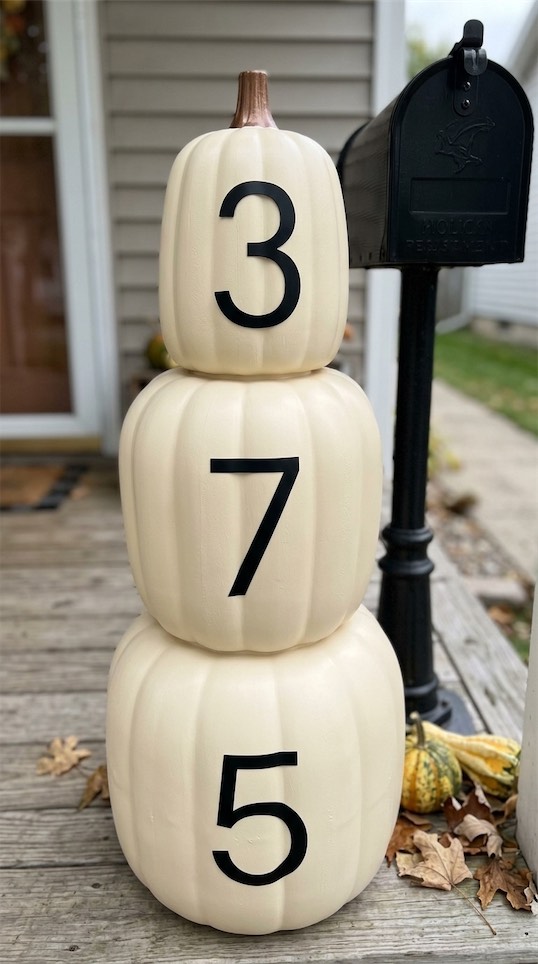
Turn seasonal decor into something useful by adding the house number vertically down the pumpkin stack.
Paint all three pumpkins one solid shade, such as matte black, cream, terracotta, or deep green.
Use number stencils or inexpensive vinyl numbers so one digit sits prominently on each section of the tower.
The simple typography gives the project a cleaner appearance than heavily decorated pumpkins and makes it easy to see from the walkway.
For house numbers longer than three digits, use smaller numbers across the widest pumpkin or repeat two digits on one level.
Place the finished tower beside the entry door where it can complement the welcome mat without blocking the actual address plaque.
An outdoor-rated clear sealer is particularly helpful here since sun and rain can loosen adhesive vinyl over time.
18. Paint an Easy Sunset Ombre Pumpkin Stack
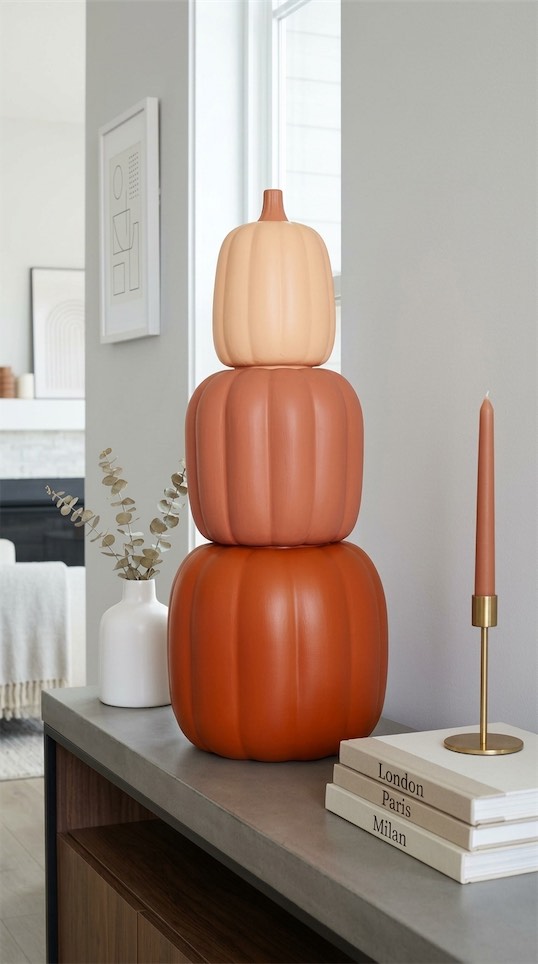
Three coordinating colors can create an ombre look without any complicated blending.
Paint the bottom pumpkin deep burnt orange, the middle pumpkin muted terracotta, and the top pumpkin pale peach or warm cream.
Keeping each pumpkin a separate color is much easier for beginners than trying to create a seamless gradient on one surface.
The gradual change from dark to light naturally draws the eye upward and gives the stack more height visually.
Finish with a natural wood-colored stem and one small sprig of wheat or eucalyptus so the colors remain the focus.
The palette pairs beautifully with brown doormats, cream planters, dried grasses, and traditional orange mums.
19. Create a Full-Sun Weatherproof Pumpkin Stack
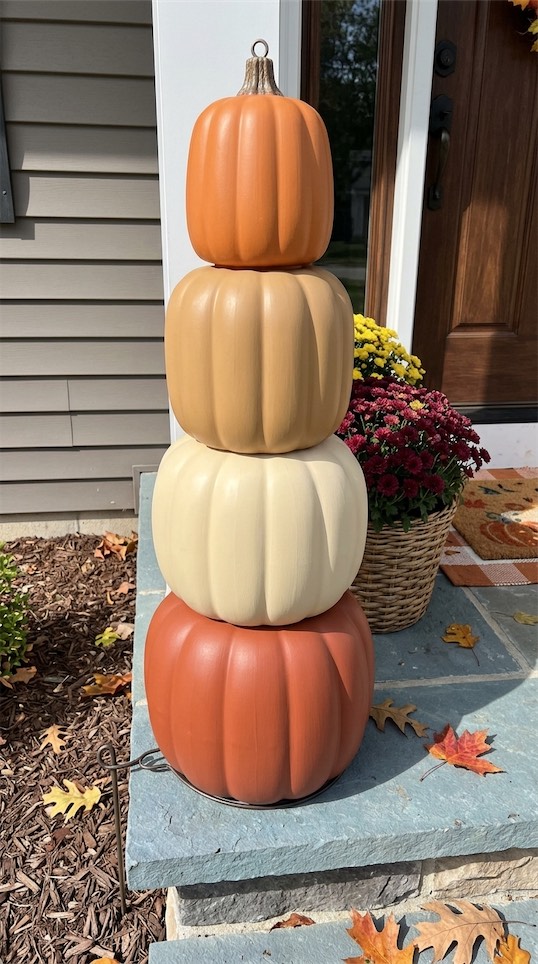
A sunny front step needs a pumpkin makeover that can handle stronger light and changing weather.
Choose plastic stackable pumpkins rather than foam, since plastic generally holds its shape better when exposed outdoors.
Lightly sand glossy areas, apply plastic primer, and use exterior spray paint or outdoor-rated acrylic paint for the color layer.
Cream, terracotta, tan, and medium orange are practical choices because minor fading is less obvious than it would be on very dark colors.
Secure the stack around a short wooden dowel or metal garden stake if wind is common near the entry.
Finish every surface with an exterior UV-resistant clear coat, including hidden edges where moisture can collect.
Among all Dollar Tree Stackable Pumpkin Ideas, this straightforward approach is especially useful for patios, uncovered steps, and spaces that sit in full sun for much of the day.
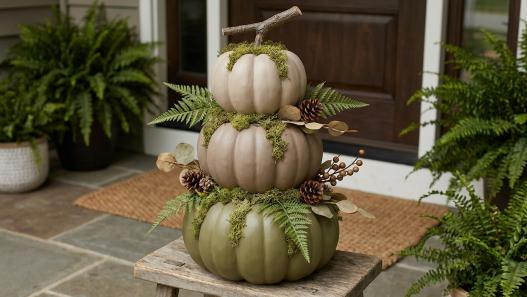
20. Make a Mossy Woodland Pumpkin Stack for a Shaded Porch
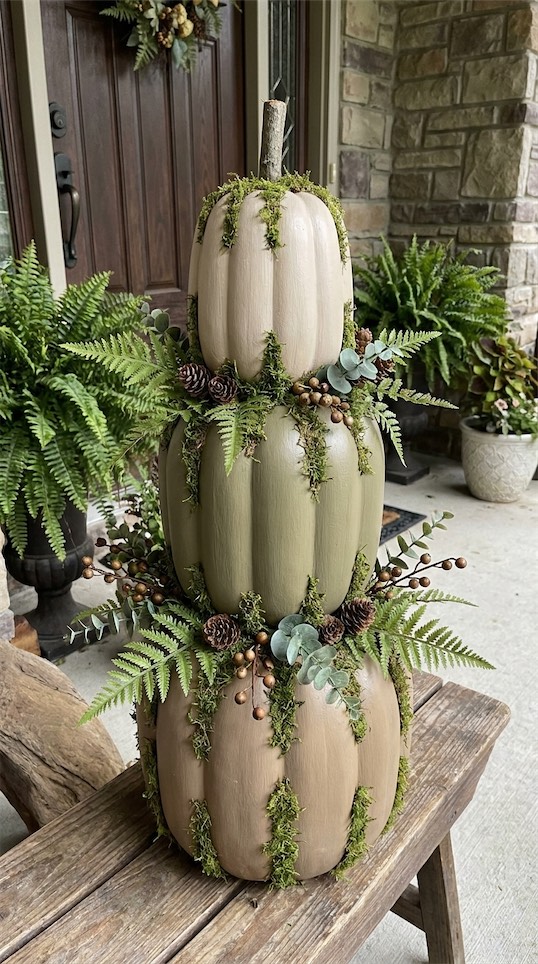
A shaded entryway is the perfect place for a soft woodland pumpkin tower covered with greenery and natural-looking texture.
Paint the pumpkins mushroom beige, muted olive, or warm stone before adding small patches of craft moss around the grooves.
Keep the moss near the pumpkin seams so the shape of each pumpkin still stands out.
Tuck faux fern pieces, tiny pinecones, eucalyptus, and brown berry stems between the layers to add texture.
Use a short branch or painted dowel as a simple rustic stem at the top.
Place the finished stack beside ferns, hostas, or other shade-loving porch plants for an easy woodland look.
Keeping the display in a shaded area also helps the moss and faux greenery hold their color longer through fall.