


Pumpkin floral arrangements are a stunning and easy way to elevate your seasonal decor, especially during the fall months. These natural centerpieces combine the rustic charm of pumpkins with the vibrant beauty of fresh or faux flowers. Whether you’re decorating for Thanksgiving, a fall wedding, or simply adding autumn touches to your home, pumpkin floral arrangements offer creative flexibility and visual impact. In this post, we share 20 DIY Pumpkin Floral Arrangement ideas that are perfect for beginners and experienced decorators alike.
Each idea includes the reasoning behind the arrangement, a list of materials needed, and easy-to-follow instructions. These ideas will help you create centerpieces, porch displays, and gift-worthy fall decor using pumpkins as vases.
1. Classic Pumpkin Floral Arrangements with Sunflowers
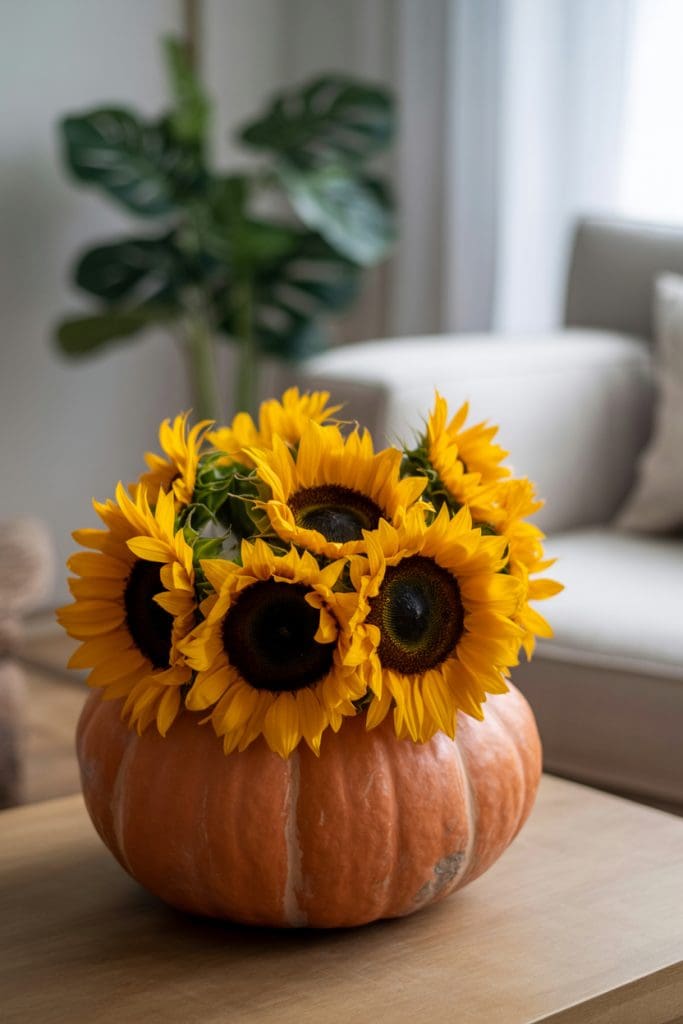
The bright yellow tones of sunflowers contrast beautifully with the deep orange hue of traditional pumpkins. This arrangement celebrates the colors of fall and brings warmth to any table or entryway. Sunflowers are sturdy and long-lasting, which makes them ideal for a floral display that needs to last for days. Combining them with greenery and small filler blooms enhances their vibrancy and creates a fuller, more finished look.
Materials:
- Medium-sized orange pumpkin
- Fresh sunflowers
- Eucalyptus sprigs
- Small white filler flowers (like baby’s breath)
- Floral foam
- Serrated knife
- Spoon or scoop
- Water
Instructions:
- Cut off the top of the pumpkin around the stem to create an opening.
- Scoop out all seeds and pulp to hollow the inside.
- Trim a block of floral foam to fit snugly inside the pumpkin.
- Soak the floral foam in water for 10 minutes.
- Place the soaked foam into the pumpkin base.
- Trim sunflower stems and insert them into the foam.
- Add eucalyptus sprigs around the sunflowers.
- Fill in empty spots with small white filler flowers.
- Adjust the height and angle of the flowers for balance.
- Lightly mist the flowers to keep them fresh.
2. White Pumpkin with Dusty Millers and Blush Roses
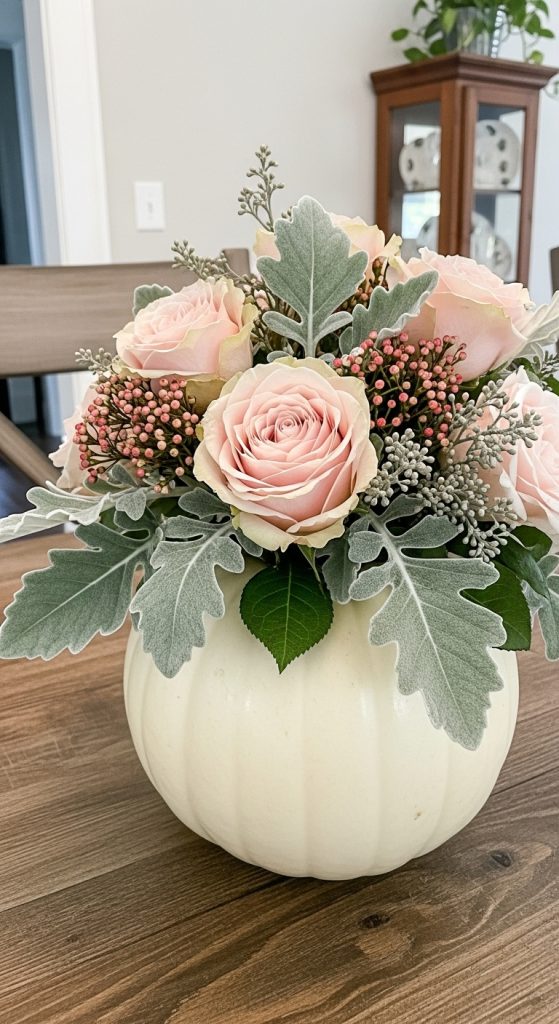
Using a white pumpkin offers a neutral base that complements soft pastel colors like blush and cream. Dusty millers provide a muted silver backdrop that enhances the romantic and delicate appearance of blush roses. This design works well for weddings, feminine table settings, or elegant fall decor that leans toward a minimalist palette.
Materials:
- White Cinderella pumpkin
- Blush roses (fresh or faux)
- Dusty miller leaves
- Floral foam
- Knife and spoon
- Water
Instructions:
- Cut a circular opening in the top of the pumpkin.
- Remove seeds and flesh to clean out the interior.
- Prepare and soak floral foam.
- Insert the foam into the pumpkin.
- Arrange blush roses in the foam first.
- Add dusty miller leaves around and between the roses.
- Space the flowers evenly for a rounded look.
- Ensure the stems are deep in the foam for hydration.
- Fill in with small greenery as needed.
- Keep arrangement in a cool place.
3. Mini Pumpkin Bud Vase Trio
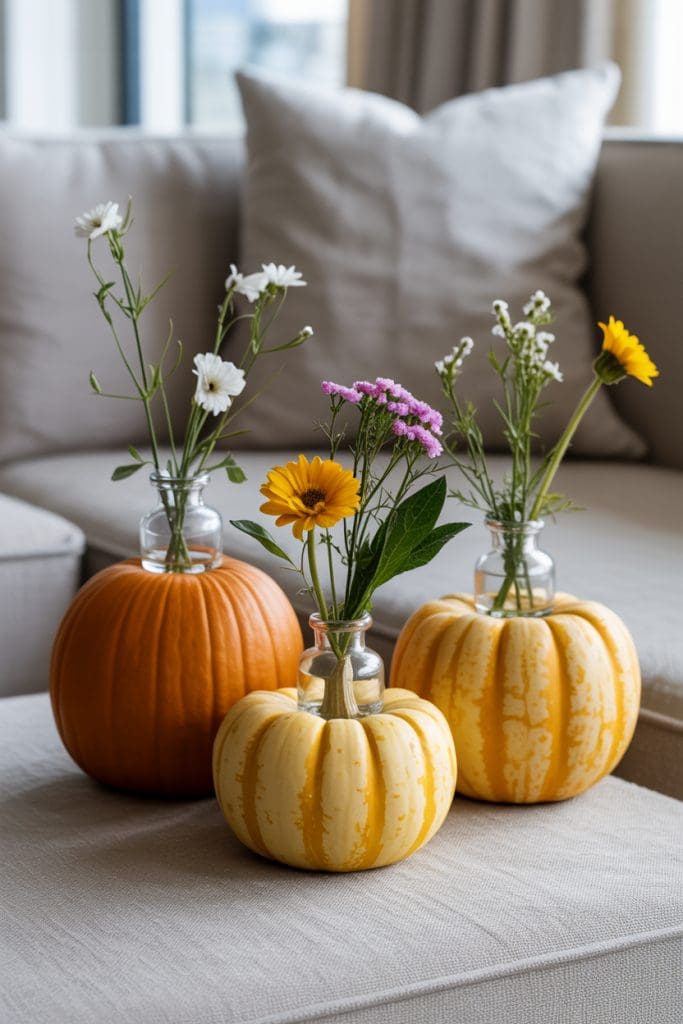
Grouping three mini pumpkins together creates a charming vignette that is both affordable and versatile. Using bud vases tucked into each pumpkin provides structure and simplifies water changes. This setup works well for coffee tables, bookshelves, or place settings and invites visual repetition without overwhelming the space.
Materials:
- Three mini pumpkins
- Small glass bud vases or test tubes
- Fresh small flowers (like zinnias or mums)
- Spoon or melon baller
Instructions:
- Cut a small hole in the top of each mini pumpkin.
- Scoop a cavity just large enough to fit the bud vase.
- Insert the bud vase into each pumpkin snugly.
- Fill each vase with water.
- Trim small flower stems to fit the vase height.
- Arrange two to three stems per vase.
- Group the three pumpkins on a tray or runner.
- Add leaves or acorns around for effect.
- Check water levels daily.
- Rotate flowers every few days for freshness.
4. Rustic Pumpkin Floral Arrangements & Crate Arrangement
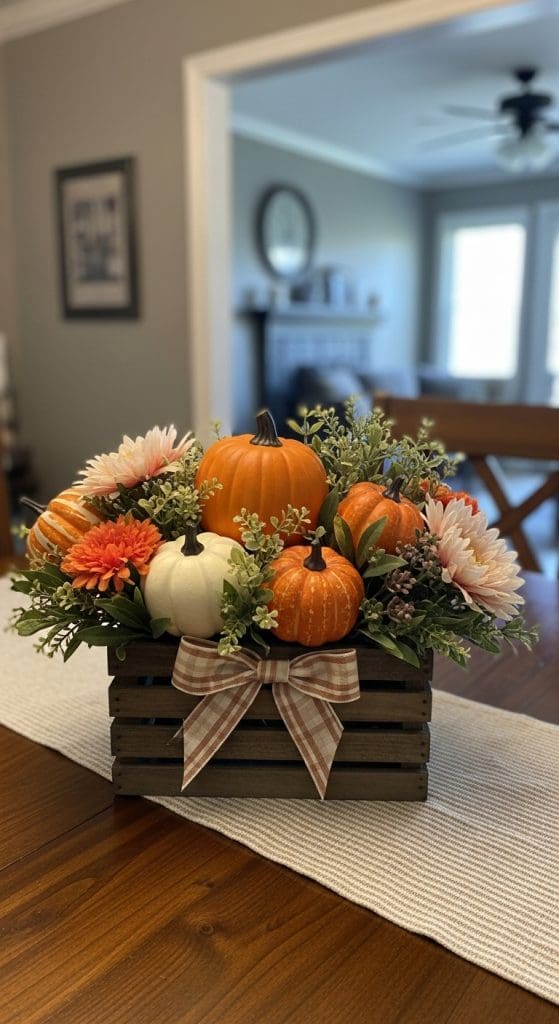
Combining pumpkins and florals inside a wooden crate offers a farmhouse-inspired aesthetic. The container defines the design area, while layered heights and varied textures create interest. This setup is ideal for buffets, mantels, or outdoor covered spaces.
Materials:
- Small wooden crate
- Mini pumpkins (orange, white, or green)
- Fresh or faux flowers
- Moss and berries
- Floral foam or small jars
Instructions:
- Line the crate with moss or a cloth liner.
- Arrange small jars or soaked foam within the crate.
- Add mini pumpkins along one side or corners.
- Insert flowers into the jars or foam.
- Layer taller stems in the back.
- Fill gaps with moss or berries.
- Adjust for balance and coverage.
- Add height by placing the crate on a riser.
- Tuck in fall leaves around edges.
- Use LED string lights if desired.
5. Pumpkin Succulent Topper
Why this works: Succulents need little water and maintenance, making them perfect for topping a small pumpkin. This no-carve design extends the pumpkin’s life and brings a trendy, low-profile style suitable for desks, windowsills, or gifts. The succulents can be replanted later.
Materials:
- Small pumpkin
- Assorted succulents
- Hot glue gun or floral pins
- Moss (Spanish or sheet moss)
Instructions:
- Clean and dry the pumpkin top.
- Apply a thin layer of hot glue or use pins.
- Add moss in a circle at the center.
- Remove soil from succulent roots.
- Press each succulent gently into the moss.
- Start with the largest one in the center.
- Fill around with smaller succulents.
- Add tiny fall accents like berries or nuts.
- Mist with water once a week.
- Replant succulents when pumpkin softens.
6. Monochromatic White Pumpkin Floral Arrangements
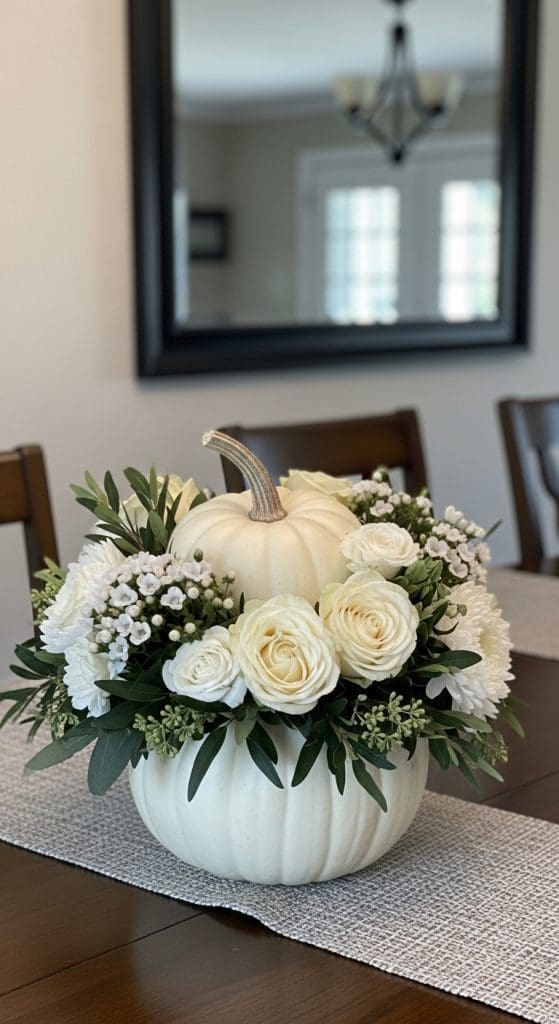
Monochromatic designs feel clean, elegant, and cohesive. Using white pumpkins with only white florals offers a modern yet timeless look. This design fits both casual and formal settings and photographs beautifully for events or online content.
Materials:
- Medium white pumpkin
- White roses, dahlias, or mums
- White filler flowers
- Greenery with white variegation
- Floral foam
Instructions:
- Cut the top off the pumpkin.
- Scoop and clean the inside.
- Insert soaked floral foam.
- Start with the main white blooms.
- Fill around with secondary flowers.
- Add white-accented greenery.
- Keep flowers close for a compact shape.
- Balance all sides visually.
- Place on a white runner or neutral tray.
- Mist lightly for freshness.
7. Velvet Pumpkin with Faux Florals
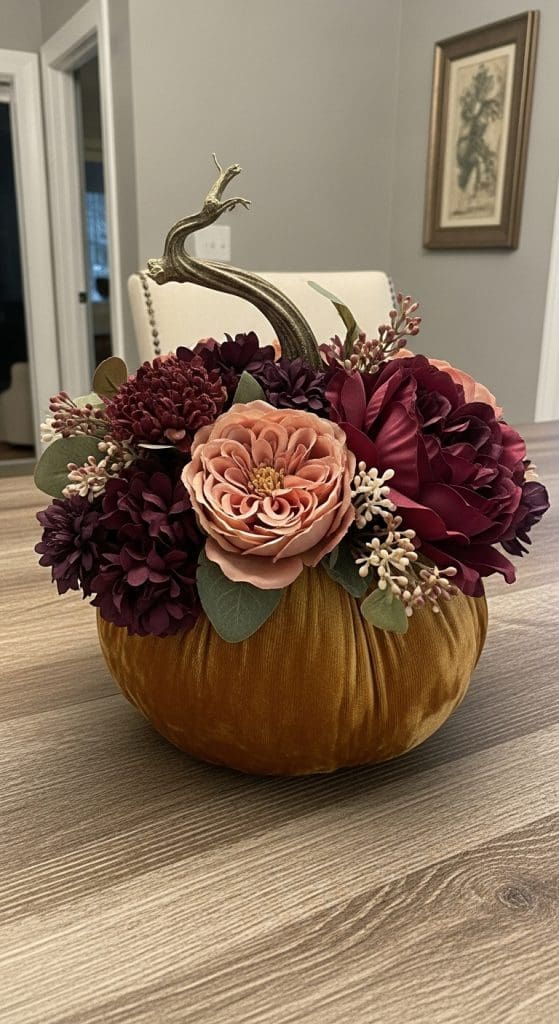
Why this works: Velvet pumpkins bring a luxurious texture to seasonal decor and pair beautifully with faux florals for a long-lasting statement piece. Because they are fabric-covered and filled with polyfill or beans, there’s no need for carving or watering.
Materials:
- Velvet pumpkins (store-bought)
- Faux peonies, dahlias, or ranunculus
- Hot glue or floral picks
- Ribbon and embellishments
Instructions:
- Choose a color palette (blush, burgundy, cream).
- Remove faux flower stems to fit flat.
- Glue or pick flowers onto the top of the pumpkin.
- Add greenery in between large blooms.
- Layer textures with berries or ribbons.
- Create a front-facing bouquet look.
- Attach bows or lace for softness.
- Place on trays or in baskets.
- Store after use to reuse each year.
- Dust periodically to maintain finish.
8. Hanging Pumpkin Floral Arrangements Basket
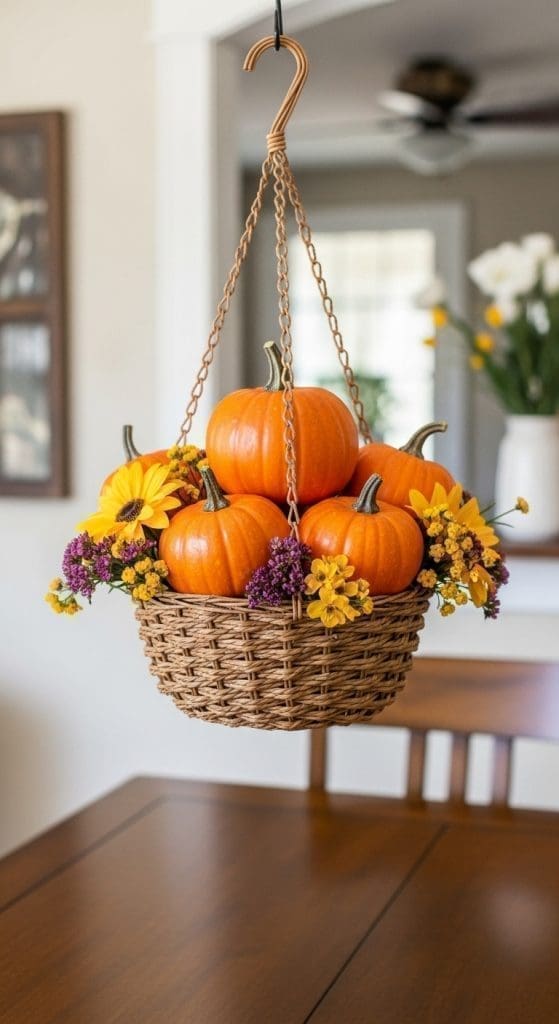
Why this works: Transforming a pumpkin into a hanging basket offers a creative way to decorate porches or patios. It draws the eye upward and saves table space while still showcasing fall colors and florals. Lightweight materials make it easy to suspend securely.
Materials:
- Small faux or hollow pumpkin
- Strong twine or macramé hanger
- Faux or dried florals
- Hot glue or foam
- Hook for hanging
Instructions:
- Cut a top opening in the faux pumpkin.
- Secure floral foam inside.
- Attach twine around the pumpkin base evenly.
- Tie securely and test hanging balance.
- Insert florals into foam.
- Start with greenery for structure.
- Add focal flowers next.
- Fill with smaller accents.
- Hang from porch or ceiling hook.
- Rotate weekly for even wear.
9. Tiered Pumpkin Floral Stack
Why this works: Stacking pumpkins of different sizes adds verticality and drama to a display. Adding flowers between tiers softens the transitions and draws attention. This arrangement makes an excellent porch feature or photo backdrop.
Materials:
- Three pumpkins in varying sizes
- Faux or dried flowers
- Toothpicks or floral picks
- Strong glue (optional)
Instructions:
- Choose pumpkins that stack stably.
- Use toothpicks or glue to secure layers.
- Insert flowers between pumpkin layers.
- Alternate flower types and textures.
- Use larger blooms on the bottom.
- Fill gaps with greenery.
- Balance the arrangement from all angles.
- Add lights or ribbons if desired.
- Place near an entryway.
- Disassemble carefully after season.
10. Pumpkin Planter with Fall Annuals
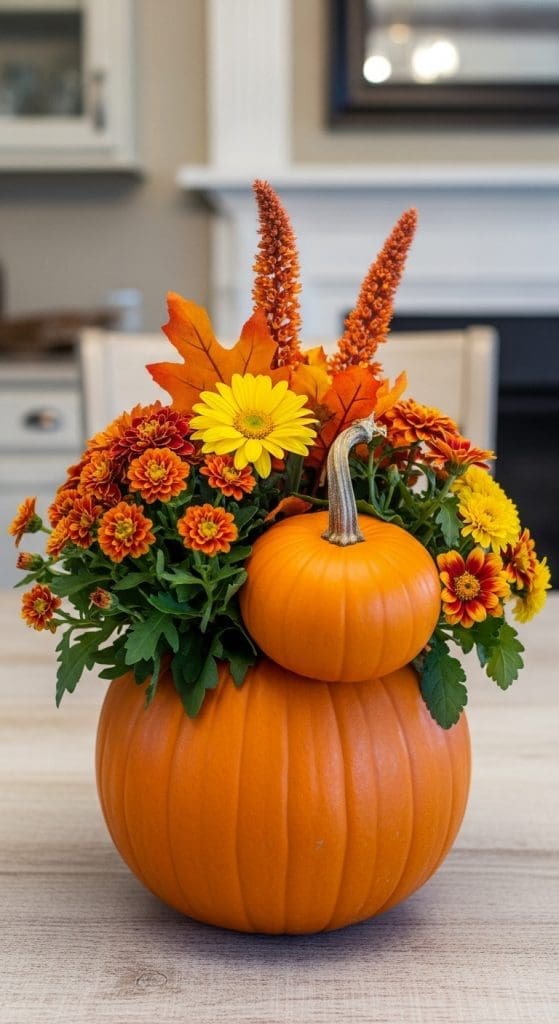
Why this works: Using a pumpkin as a planter for hardy fall flowers like mums or pansies adds color and life to outdoor displays. This method gives a garden feel while maintaining the pumpkin’s seasonal character. The soil also helps the blooms last longer.
Materials:
- Large pumpkin
- Potted fall annuals (mums, pansies)
- Potting soil
- Sharp knife
- Gardening gloves
Instructions:
- Cut off the top of the pumpkin.
- Scoop out seeds and flesh.
- Cut drainage holes if displaying outdoors.
- Add potting soil inside.
- Remove flowers from nursery pots.
- Plant inside the pumpkin.
- Pack soil gently around roots.
- Water lightly.
- Place in partial sun.
- Replace soil or flowers as needed.
11. Hollow Faux Pumpkin with Preserved Blooms
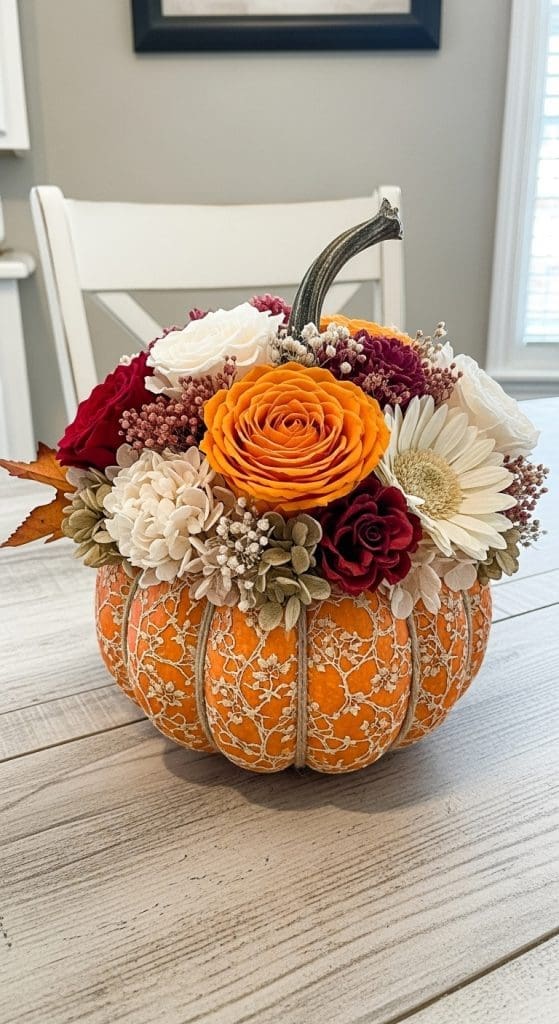
Why this works: Faux pumpkins are reusable and durable, making them ideal for long-term or repeat seasonal decor. Preserved flowers offer a real-flower look but with much longer shelf life and less maintenance. This combination gives you a lasting piece that retains the charm of fresh florals without wilting or water changes.
Materials:
- Faux hollow pumpkin
- Preserved roses or hydrangeas
- Foam block
- Wire cutters
- Decorative moss
Instructions:
- Open the top of the faux pumpkin.
- Insert a foam block inside the cavity.
- Arrange preserved flowers first for balance.
- Secure stems with floral wire if needed.
- Add decorative moss around the foam.
- Fill gaps with preserved filler florals.
- Adjust angles and height of blooms.
- Dust gently to keep clean.
- Place the finished piece on a mantle or shelf.
- Store in a dry container after season.
12. Pumpkin Floral Ring Centerpiece
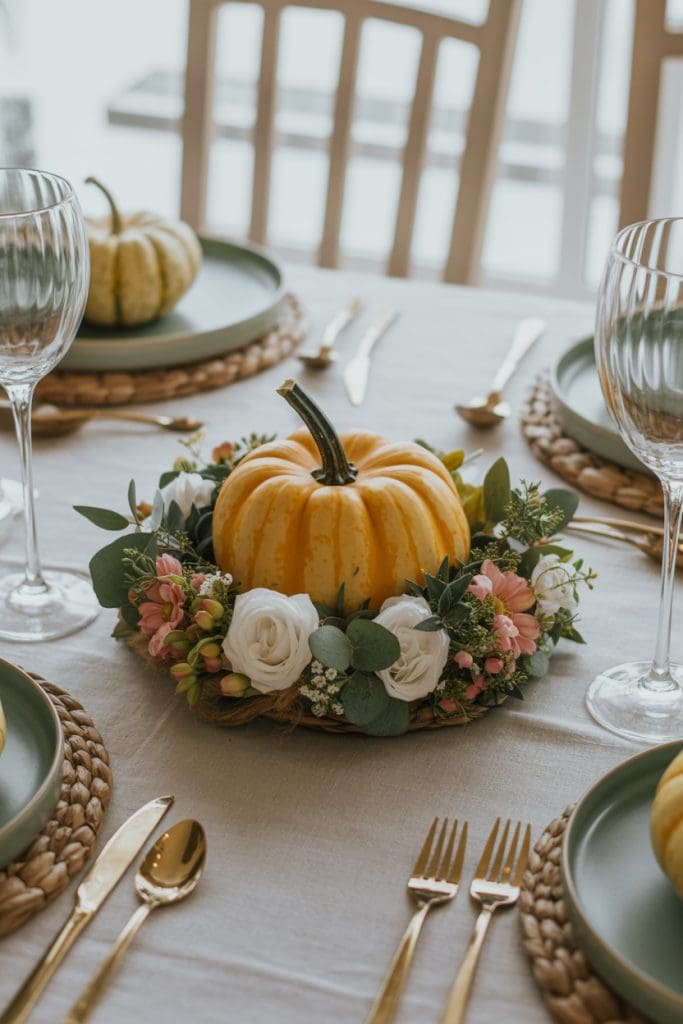
Why this works: Instead of hollowing a pumpkin, placing it at the center of a floral ring creates a unique centerpiece with a rustic-modern feel. This method preserves the whole pumpkin and allows for easy removal or replacement. The surrounding floral ring brings structure and fullness.
Materials:
- Medium round pumpkin
- Grapevine wreath base
- Fresh or faux flowers
- Green floral wire
- Moss and leaves
Instructions:
Use as a dining table focal point.
Place grapevine wreath on a flat surface.
Position pumpkin in the center.
Insert flower stems into the wreath gaps.
Wire heavier stems to the wreath base.
Tuck moss and leaves to hide mechanics.
Alternate flower colors for balance.
Add height with upright blooms.
Mist fresh flowers as needed.
Rotate centerpiece for even coverage.
13. Painted Pumpkin with Bright Wildflowers
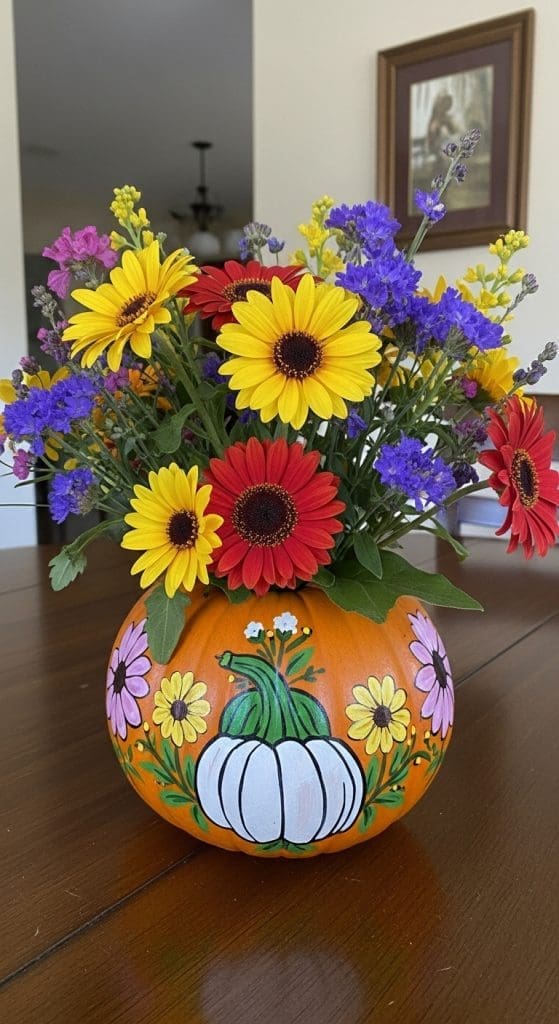
Why this works: Painting a pumpkin allows you to match your decor or seasonal color palette. Bright wildflowers bring contrast and a whimsical, natural appeal. This approach adds a pop of personality and can be customized to suit any room. It’s especially useful when fresh pumpkin colors clash with existing decor or themes.
Materials:
- Medium pumpkin
- Acrylic paint (white, teal, navy, etc.)
- Paintbrush
- Wildflowers (fresh or faux)
- Floral foam
Instructions:
- Paint the entire pumpkin and let it dry completely.
- Cut a hole at the top to create an opening.
- Scoop out the insides.
- Place soaked floral foam inside the pumpkin.
- Insert tall wildflowers in the center.
- Fill around the edges with shorter blooms.
- Balance bright and neutral colors.
- Let some stems trail for a natural look.
- Touch up any scuffed paint.
- Refresh flowers or replace foam weekly.
14. Carved Face Pumpkin with Floral Hair
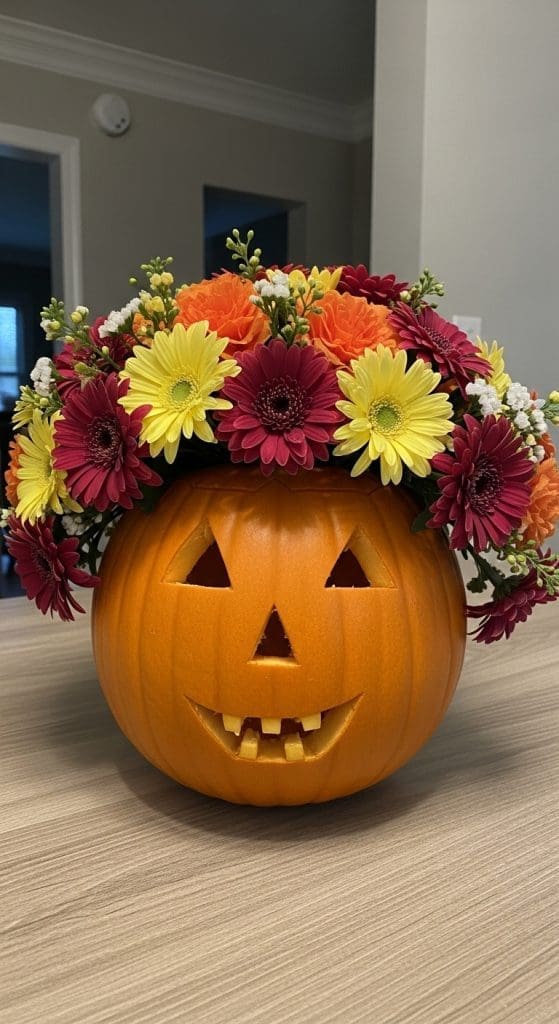
Why this works: Combining Halloween and fall decor, this idea adds charm and playfulness. A carved face gives personality, while florals arranged at the top mimic whimsical hair. It’s great for outdoor decor that entertains kids and adults alike.
Materials:
- Large pumpkin
- Carving knife
- Fresh or faux flowers
- Floral foam
- Spoon or scoop
Instructions:
- Carve a smiling or silly face into the pumpkin.
- Cut off the top to make an opening.
- Remove all pulp and seeds.
- Add soaked floral foam inside.
- Insert large flowers as the hair base.
- Fill gaps with greenery or colorful accents.
- Angle blooms upward and outward.
- Place on porch or entry table.
- Add lighting inside if outdoors.
- Replace flowers as needed.
15. Ombre Pumpkin Flower Display
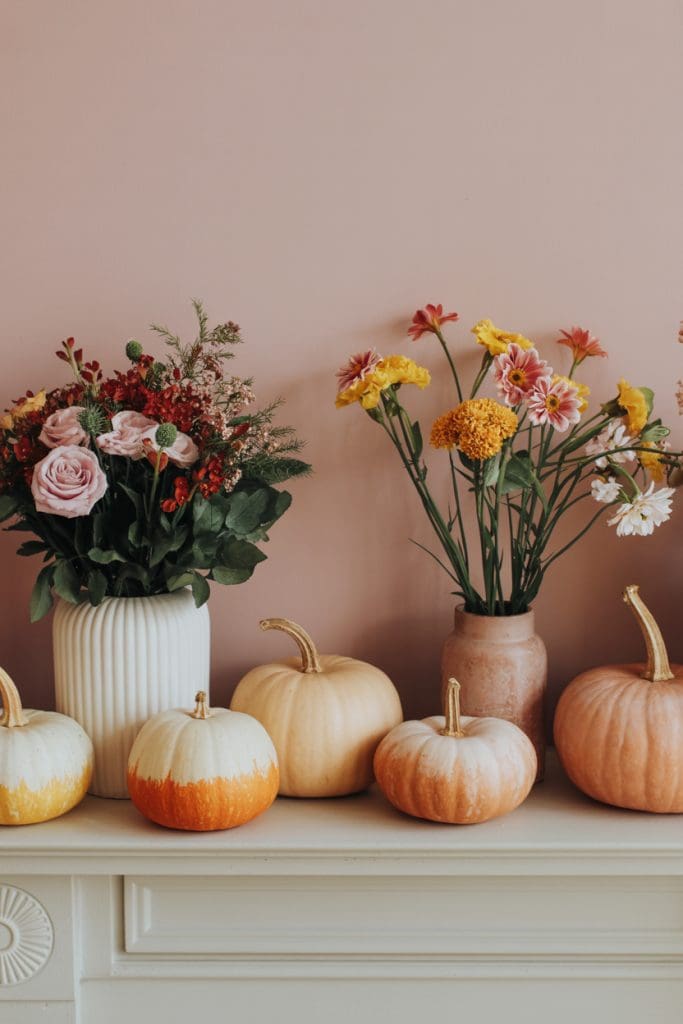
Why this works: Creating a color gradient using both pumpkins and flowers produces a stylish and intentional design. This ombre effect can follow warm fall tones or muted pastels, making it flexible for different aesthetics. It also enhances visual flow across a display area.
Materials:
- Three pumpkins in graduated colors
- Matching flowers in gradient shades
- Foam or bud vases
- Knife and scoop
Instructions:
- Hollow out each pumpkin.
- Place foam or vases inside.
- Group pumpkins in a row.
- Insert lightest color flowers in the light pumpkin.
- Use mid-tone florals in the middle pumpkin.
- Place boldest florals in the darkest one.
- Fill with coordinating filler flowers.
- Line up in a straight or curved formation.
- Add fabric underneath for cohesion.
- Rotate flowers as needed.
16. Pumpkin Basket with Handle
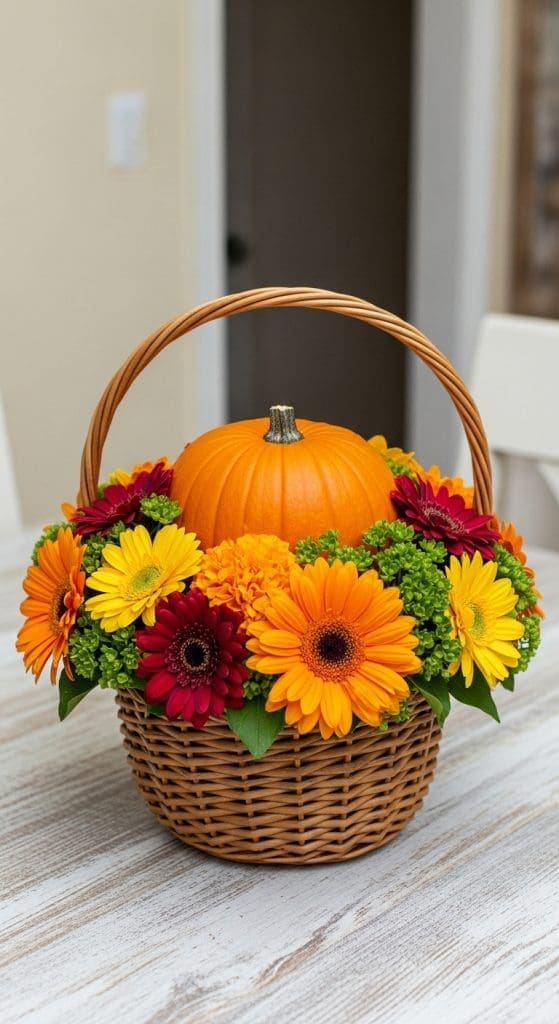
Why this works: Adding a handle transforms a pumpkin into a faux basket, enhancing its rustic charm. This makes it easier to move and display, while still allowing for beautiful flower arrangements. It’s perfect for gifting or as a festive entryway piece.
Materials:
- Medium pumpkin
- Thick floral wire or rope
- Faux or fresh florals
- Knife
- Hot glue gun
Instructions:
- Cut an oval opening at the top.
- Scoop out the interior.
- Poke holes on each side near the top.
- Insert wire or tie rope to form a handle.
- Secure ends with glue inside.
- Add soaked floral foam inside.
- Arrange florals compactly.
- Include cascading vines for effect.
- Place on a porch or windowsill.
- Use seasonally and compost after use.
17. Mini Pumpkin Flower Garland
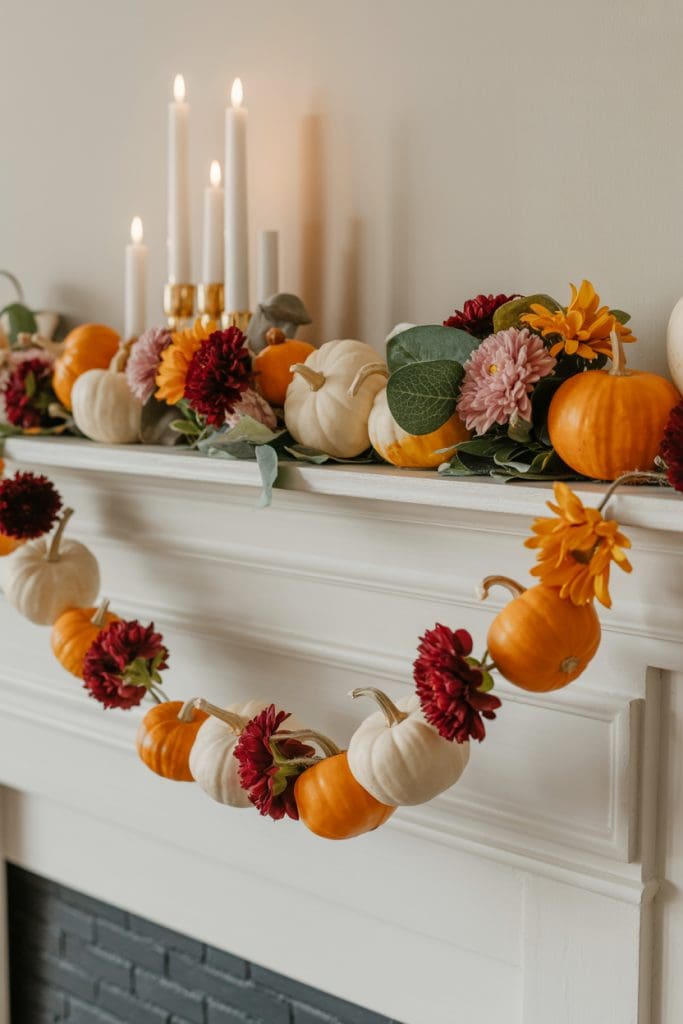
Why this works: A garland made from mini pumpkins and flowers creates a festive table runner or mantelpiece display. It’s lightweight, easy to customize, and adds a pop of fall throughout a space. Ideal for parties or holiday gatherings.
Materials:
- String or twine
- Mini pumpkins
- Faux flower heads
- Floral wire or glue gun
- Leaves or berries
Instructions:
- Poke holes through the tops of mini pumpkins.
- Thread them onto the string evenly spaced.
- Attach flower heads between each pumpkin.
- Add leaves or berries for fullness.
- Hang across a mantel or down a table.
- Secure ends with tape or tacks.
- Use lightweight materials only.
- Adjust spacing for symmetry.
- Combine warm and neutral colors.
- Store flat after use.
18. Pumpkin and Wheat Centerpiece
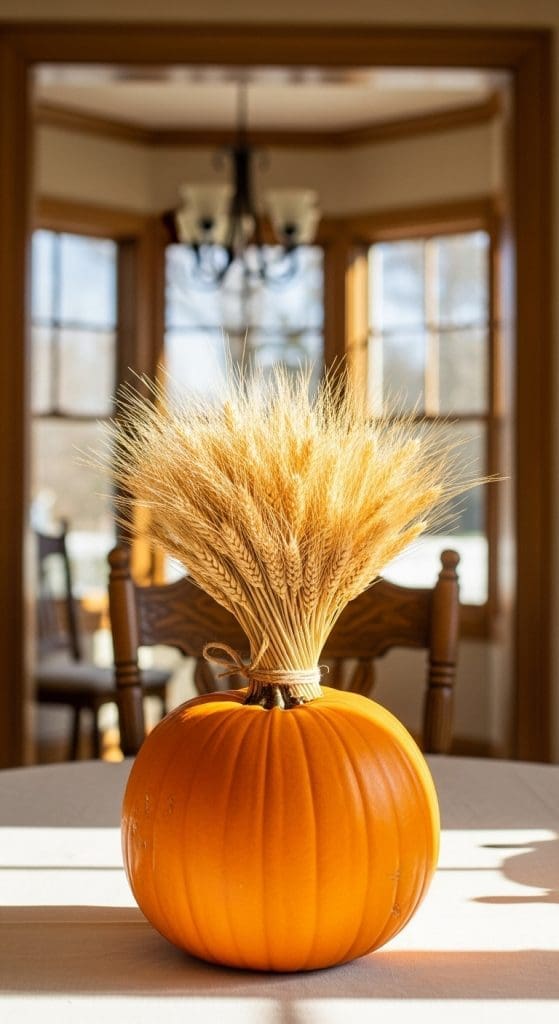
Why this works: Wheat adds vertical lines and a harvest feel to pumpkin arrangements. Combined with florals, it creates a balanced, natural centerpiece that symbolizes abundance. This design is especially fitting for Thanksgiving.
Materials:
- Medium pumpkin
- Dried wheat stalks
- Florals (mums, marigolds)
- Floral foam
- Knife and scoop
Instructions:
- Open and hollow the pumpkin.
- Insert soaked foam inside.
- Add wheat in the center for height.
- Place florals around base of wheat.
- Alternate warm tones for harmony.
- Trim stems as needed for shape.
- Place on burlap or wood tray.
- Mist fresh flowers lightly.
- Keep in cool area.
- Discard or compost after season.
19. Floating Pumpkin Flower Bowl
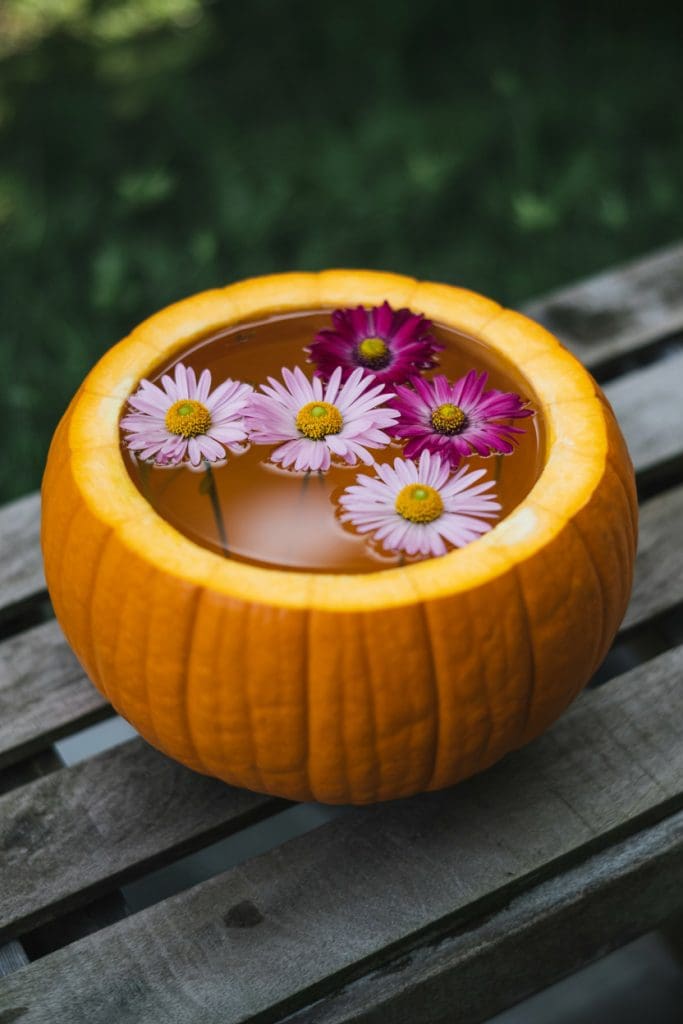
Why this works: A cut pumpkin base filled with water becomes a unique floating flower bowl. It offers a softer, spa-like look and works well indoors. This arrangement is great for bath-side decor or meditation spaces.
Materials:
- Wide, shallow pumpkin
- Water
- Fresh flower heads
- Floating candles (optional)
Instructions:
- Cut the pumpkin horizontally into a bowl shape.
- Clean out the inside thoroughly.
- Fill with clean water.
- Trim flower heads flat.
- Gently place them on the surface.
- Add floating candles for ambiance.
- Refresh water every 2 days.
- Replace wilting flowers promptly.
- Use a tray underneath to catch drips.
- Discard when pumpkin softens.
20. Metallic Pumpkin Vase
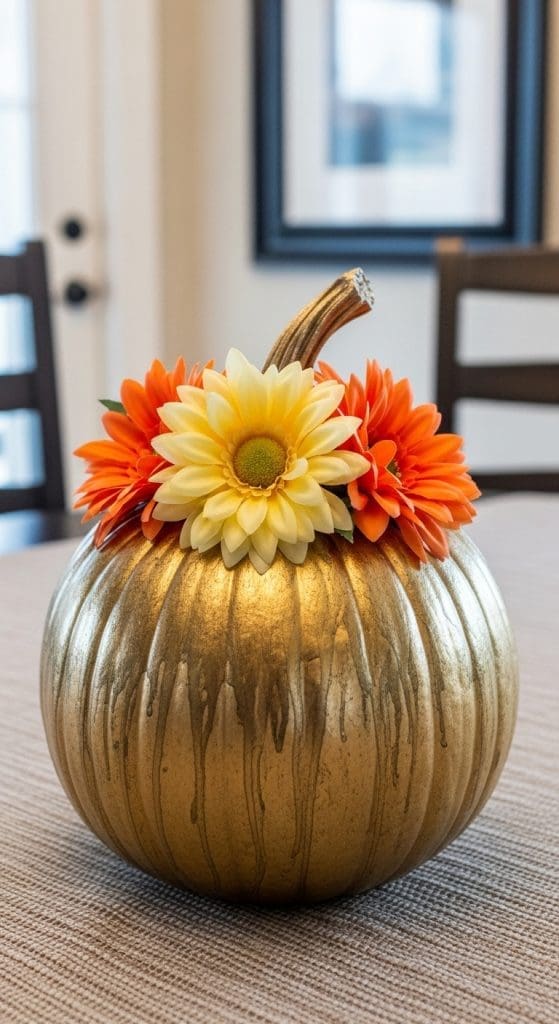
Why this works: Spray painting pumpkins with metallic finishes like gold or bronze creates a glam, modern look. Combined with bold flowers, the result is a chic centerpiece that suits contemporary or upscale environments.
Materials:
- Medium pumpkin
- Metallic spray paint
- Florals in deep jewel tones
- Floral foam
- Gloves and mask
Instructions:
- Spray paint the pumpkin in a well-ventilated area.
- Let dry completely.
- Cut an opening at the top.
- Scoop out the interior.
- Insert floral foam inside.
- Arrange jewel-toned florals.
- Use contrast colors for impact.
- Add greenery for depth.
- Place on mirrored tray for extra shine.
- Avoid moisture to protect paint finish.