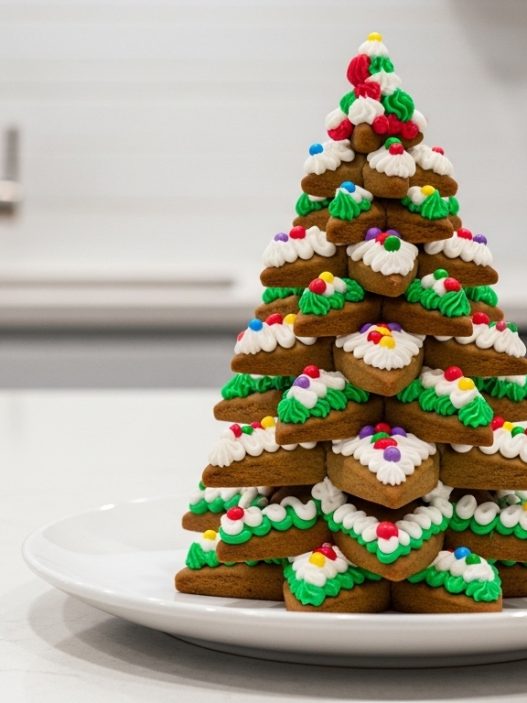
Gingerbread trees are a festive centerpiece that bring warmth and charm to your holiday décor. The key to a beautifully stacked cookie tree lies in perfectly balanced dough and smooth, vibrant buttercream frosting.
With the right preparation and a little patience, you can create a stunning edible decoration that tastes just as good as it looks. In this guide, we’ll walk you through the process of making the perfect gingerbread cookie dough, baking, decorating, and assembling a layered gingerbread tree that will wow family and friends.
If you would like to find 14 Unique Gingerbread Christmas Tree Ideas Check Out Our Post DIY Gingerbread Christmas Tree Ideas
Equipment You’ll Need
- Star Cookie Cutter Set
- Piping Bag
- Parchment Paper
- Rolling Pin
Ingredients
For the Gingerbread Dough:
- 1 cup + 2 tbsp granulated sugar
- ¾ cup unsalted butter, (softened)
- 1 cup + 2 tbsp molasses
- ¾ cup buttermilk
- 6 cups all-purpose flour
- 1 tbsp ground ginger
- 1 ½ tsp baking soda
- 1 tsp salt
- ¾ tsp baking powder
For Buttercream Frosting:
- 3 cups butter at room temperature
- 15 cups powdered sugar
- 4 tbsp vanilla extract
- ¾ cup + 3 tbsp heavy cream
- Pinch of salt
Step 1: Preparing the Dough (Day 1)
The first step in making your gingerbread tree is creating a rich, pliable dough.
- Start by combining your softened butter and granulated sugar in a large mixing bowl.
- Use a stand mixer or hand mixer to whip them together until light and fluffy.
- Once the mixture is creamy, blend in the molasses and buttermilk until fully incorporated.
- Next, add the dry ingredients: flour, ground ginger, baking soda, salt, and baking powder.
- Mix until the dough comes together smoothly, forming a slightly firm but workable consistency.
- Divide the dough into three equal portions, wrap each in plastic wrap to form discs, and refrigerate for at least three hours or overnight.
This resting period allows the dough to firm up, making it easier to roll and cut without losing its shape.
Step 2: Rolling and Cutting Cookies (Day 2)
- Preheat your oven to 375°F and line your baking sheets with parchment paper.
- Lightly flour your work surface and rolling pin, or roll the dough between two sheets of parchment to prevent sticking.
- Roll each dough disc to about ¼-inch thickness, this thickness helps achieve soft, tender cookies that still hold their shape when stacked.
- Using your Wilton star cookie cutters, cut two of each size star.
- A helpful trick is to lightly dust the cookie cutter with flour and use a floured spatula to transfer the cookies to the baking sheet without distortion.
- Bake smaller stars for 6–10 minutes and larger stars for 10–15 minutes, keeping similar sizes together on the same sheet for even baking.
- Once done, let the cookies cool completely on a wire rack.
Step 3: Making the Buttercream Frosting
While the cookies cool, prepare the buttercream.
- Beat the butter on medium-high speed until fluffy.
- Gradually add powdered sugar, one cup at a time, alternating with the heavy cream, one tablespoon at a time.
- Reserve about 2 teaspoons of plain white frosting for decorating the top star if desired.
- Next, mix in vanilla extract, a pinch of salt.
- This buttercream will be both your “glue” for stacking the cookie layers and the decorative icing for stars and swirls.
Step 4: Decorating the Cookies
- Fill a piping bag fitted with a star tip with your buttercream.
- Pipe stars, swirls, and designs onto each cooled cookie.
- While the frosting is still soft, add sprinkles or small candies for extra festive flair.
- For the smallest top star, coat it in the reserved white frosting and press it into gold sanding sugar or colorful sprinkles to make it stand out.
Step 5: Assembling the Gingerbread Tree (Day 3)
- Start by placing a dollop of frosting on the bottom of the largest star to anchor it to your serving plate or cake stand.
- Stack the remaining cookies, alternating the points slightly for a balanced, layered look.
- Continue stacking from largest to smallest, checking for alignment as you go.
Once your tree is assembled, you can optionally dust it lightly with powdered sugar for a snowy effect.
The result is a festive, edible centerpiece that looks professional but is completely homemade.
Tips and Tricks for Success
- Softening Butter: Heat butter in 15-second intervals at 30% power in the microwave to avoid melting.
- Prevent Sticking: Roll dough between parchment sheets instead of adding extra flour.
- Efficient Cutting: Begin with smaller stars, then roll remaining dough slightly thinner for larger stars.
- Transferring Large Stars: Roll the dough on parchment, cut around the star, and carefully transfer with the paper.
- Coloring: If gel coloring isn’t available, use a mix of liquid green, blue, and black food coloring to achieve a dark green. Gel colors tend to darken slightly over time.
Why This Gingerbread Tree Recipe Takes 3 Days
This gingerbread tree recipe is designed to unfold over three days to ensure the best results in both flavor and structure.
On Day 1, the dough is prepared and chilled.
- Chilling the dough is crucial because it allows the butter to firm up, making the dough easier to roll and cut without spreading during baking.
- It also gives the flavors a chance to meld, resulting in richer, more complex gingerbread notes.
Day 2 is dedicated to rolling, cutting, and baking the cookies.
- Baking the cookies on a separate day ensures the dough has reached the ideal consistency, so the stars maintain their sharp edges and don’t warp in the oven.
- This day also allows you to focus on frosting each cookie carefully, letting you create intricate designs with the buttercream without it melting or sliding off.
Finally, Day 3 is reserved for assembling the tree.
- Stacking the cookies immediately after frosting could cause them to collapse or slide, especially for larger stars.
- Allowing the frosting to set slightly and the cookies to cool completely ensures that each layer stays in place, resulting in a stable, visually striking gingerbread tree.
- Spreading the process over three days may seem long, but it guarantees both a professional look and a delicious taste that’s worth the wait.
Tips and Tricks for a Stress-Free 3-Day Gingerbread Tree
- Plan Ahead: This recipe works best when spread over three days. Preparing the dough, baking, frosting, and assembling all on separate days prevents rushing and ensures the cookies hold their shape and the frosting sets perfectly.
- Softening Butter Safely: To avoid over-softening, microwave butter in 15-second intervals at 30% power. Soft, not melted, butter is key for a smooth dough and creamy frosting.
- Rolling Made Easy: Roll your dough between two sheets of parchment paper to prevent sticking and minimize extra flour. This method keeps the dough tender and makes transferring large stars easier.
- Cutting the Stars Efficiently: Start with smaller stars first, then roll remaining dough slightly thinner for larger stars. This ensures you have enough dough for all sizes and reduces waste.
- Handling Large Stars: If moving larger cookies is tricky, roll the dough on parchment, cut around the star, and use the paper to transfer it to the baking sheet. This avoids stretching or breaking the cookie.
- Frosting Tips: Decorate cookies on Day 2, after they’ve fully cooled, to avoid melting the buttercream. Reserve a small portion of white frosting for the star topper to create a bright, contrasting highlight.
- Coloring Guidance: If you don’t have gel coloring, a combination of liquid green, blue, and black can be used to achieve a dark green shade. Keep in mind that the gel or liquid may darken slightly as it sits.
- Assembly Patience: Allow cookies and frosting to set overnight before stacking on Day 3. This ensures the tree stays stable and makes for an impressive, professional-looking centerpiece.
- Optional Snow Effect: Lightly dust powdered sugar over the finished tree on Day 3 for a snowy, festive finish. Doing this last keeps the look fresh and crisp


