


If you’ve ever struggled with making a DIY Gingerbread Christmas Tree that actually stands up and looks festive, you’re not alone. Let’s talk about turning this classic holiday treat into a fun DIY project that’s both beautiful and tasty.
The best thing about a gingerbread Christmas tree is that it doubles as décor and dessert, making your kitchen smell amazing while impressing friends and family. Here’s how to get creative, mix and match ideas, and make a gingerbread tree that’s uniquely yours.
Dough & “Glue” For A Gingerbread Tree
Before constructing your gingerbread tree you need to make sure the dough and glue you make is suitable for construction! Make a dough that is too flimsy and your whole gingerbread tree will fall apart.
We have an entire post on making the best gingerbread tree dough and buttercream “glue” that is perfect for making when trying out the ideas below.
Unique Gingerbread Tree Ideas
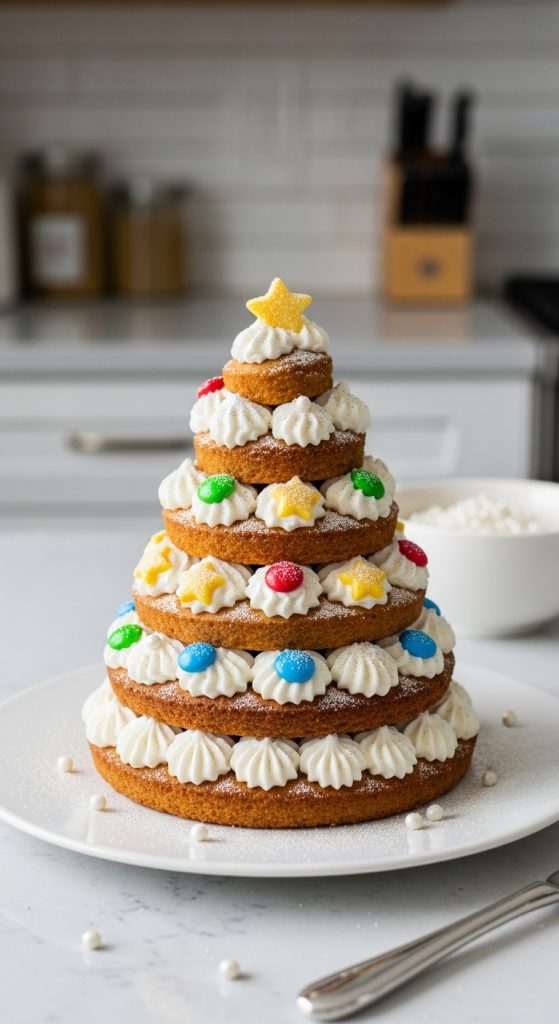
1 | Classic Layered Gingerbread Tree
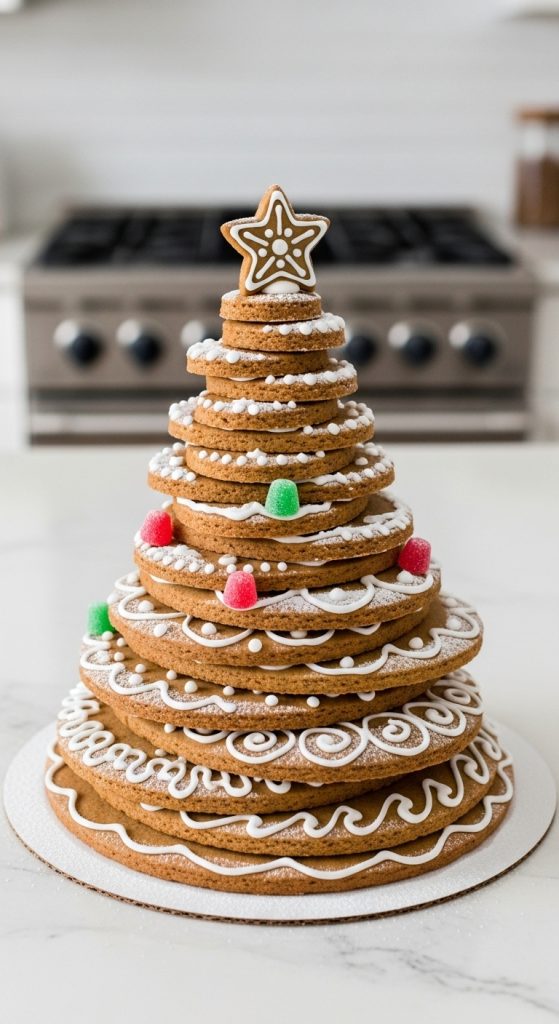
Start simple with a stacked tree made of gingerbread circles in decreasing sizes. I love the look of these tiered layers—it gives a clean, classic vibe and makes decorating easy.
DIY Steps:
- Prepare your favorite gingerbread dough (soft enough to roll but firm enough to hold shape).
- Roll the dough out on a lightly floured surface to about 1/4 inch thickness.
- Use round cookie cutters or templates to cut out circles in 4–5 different sizes.
- Bake the circles according to your recipe and allow them to cool completely.
- Make the royal icing thick enough to act as glue. Pipe a ring of icing around the edge of each circle.
- Stack from largest to smallest, gently pressing so they stick. Use a skewer through the center for extra stability if stacking more than 3 layers.
- Decorate with small candies, sprinkles, or icing patterns.
2 | Gingerbread Tree with Star Cutouts

This idea adds a whimsical twist by cutting stars out of each layer, letting light or color peek through. I love the look of tiny stars—it feels festive and magical.
DIY Steps:
- Roll out gingerbread dough to 1/4 inch thickness.
- Cut out stars or circles in various sizes for your layers.
- Use a small star cookie cutter to remove shapes from each circle. Save the cutout stars for decorating elsewhere.
- Bake and cool completely.
- Stack the circles with a layer of royal icing between each for stability.
- Optional: Attach small pieces of colored candy or thin fondant behind the star cutouts to create a stained-glass effect.
- Pipe icing around the edges for a finished, polished look.
3 | Mini Gingerbread Trees on Sticks

These little trees are perfect for gifting or as a cute centerpiece. Each “tree” is bite-sized but still looks adorable on a table.
DIY Steps:
- Roll dough and cut small triangles about 3–4 inches tall.
- Bake and cool completely.
- Insert a lollipop stick into the base of each triangle while holding it upright.
- Pipe icing over the stick base to secure it further.
- Decorate triangles with royal icing lines, dots, or small candies.
- Stack 2–3 triangles on a single stick if you want layered mini trees.
- Display in a foam block, small pot, or festive jar.
4 | Spiral Gingerbread Tree
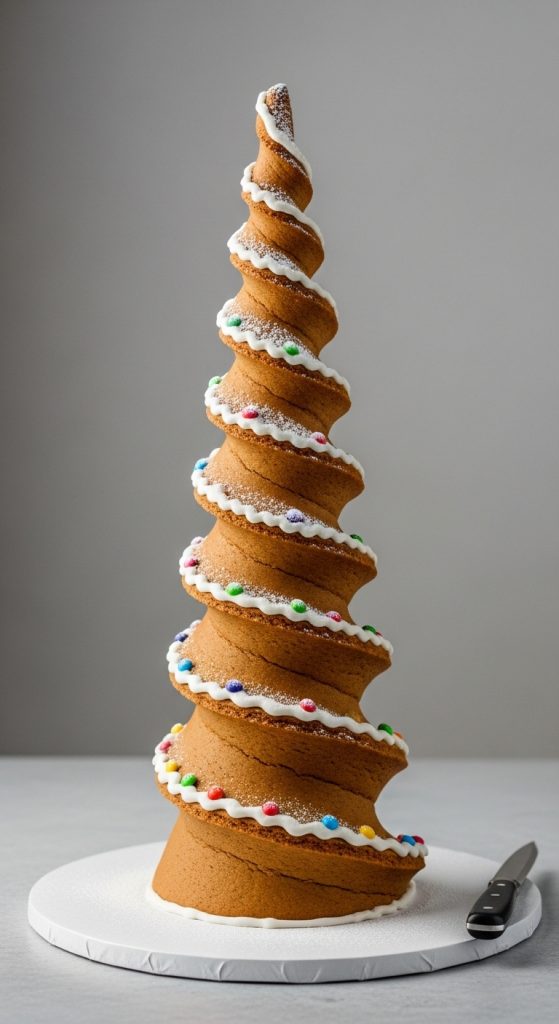
If you want a modern, creative look, cut the gingerbread into a long spiral that twists upward. This is a clever way to show off the shape of your dough and makes a dramatic centerpiece.
DIY Steps:
- Roll out a large triangle shape of dough about 1/4 inch thick.
- Use a sharp knife to carefully cut a spiral from the base to the top.
- Bake and allow to cool completely on a flat surface.
- Stand the spiral upright on a cake board or sturdy base using a dab of royal icing.
- Pipe icing along spiral edges, or add small candies for detail.
- Dust lightly with powdered sugar for a snowy effect.
- Make sure the base is stable before moving the tree.
5 | Chocolate-Dipped Gingerbread Tree
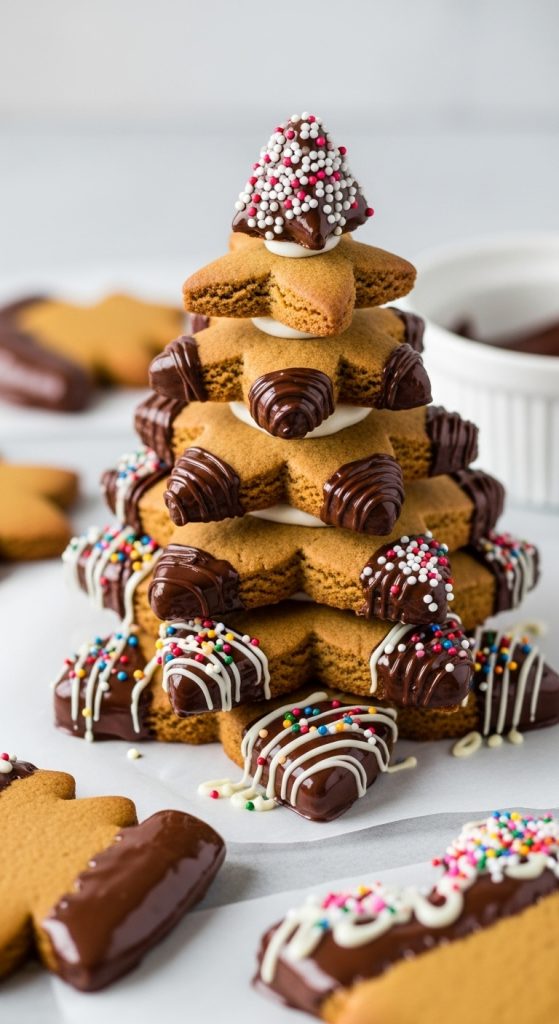
Adding chocolate creates contrast and extra flavor. I love the look of dark chocolate edges against golden gingerbread—it feels decadent yet simple.
DIY Steps:
- Bake and cool your gingerbread tree layers.
- Melt your preferred chocolate in a double boiler or microwave-safe bowl.
- Dip the edges or tips of your gingerbread pieces into the melted chocolate.
- Place dipped pieces on parchment paper and let them set.
- Stack layers with royal icing if building a tiered tree.
- Decorate remaining edges with sprinkles, mini candies, or drizzled white chocolate.
- Allow chocolate to fully harden before moving or serving.
6 | Candy-Covered Gingerbread Tree
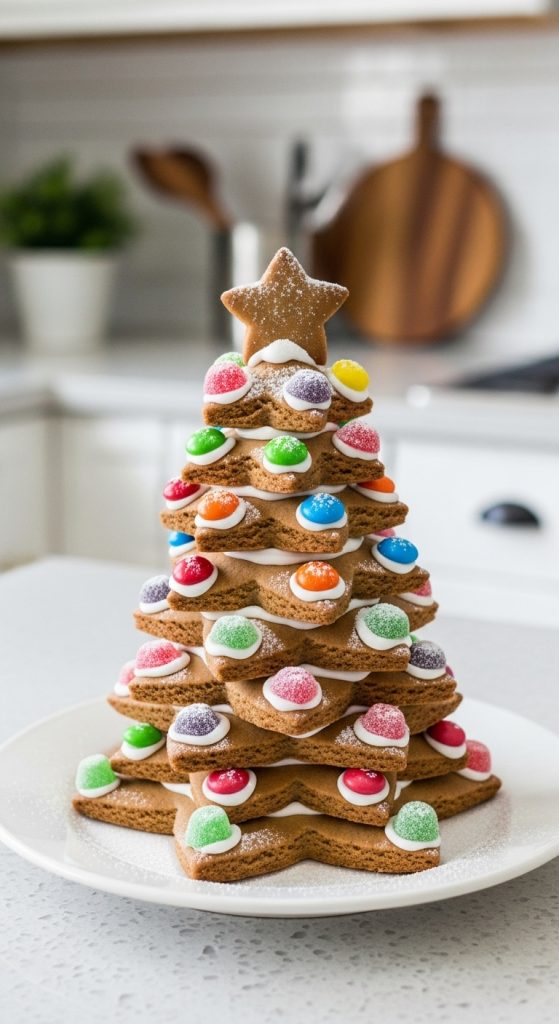
This is pure fun—cover your tree with small candies, gumdrops, or edible beads. Above is a good example of what I mean; it instantly turns into a festive centerpiece.
DIY Steps:
- Bake and cool your tree layers.
- Stack the layers using royal icing between them.
- Pipe icing onto each layer in sections to act as glue for candy.
- Press small candies or gumdrops into the icing, spacing them evenly or randomly for a playful effect.
- Continue until the whole tree is decorated.
- Top with a larger candy or fondant star.
- Optional: Dust lightly with powdered sugar for a snowy appearance.
7 | Frosted Snowy DIY Gingerbread Christmas Tree
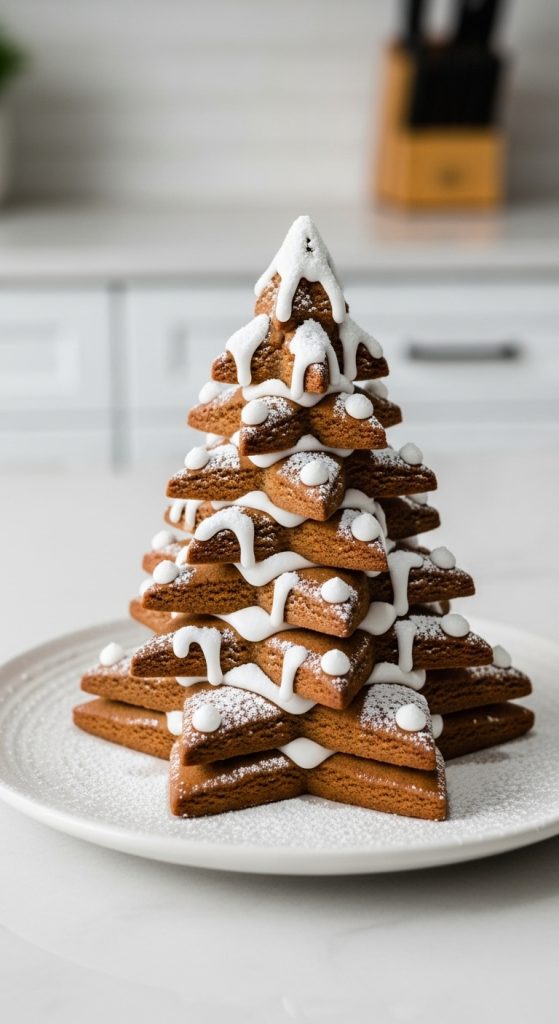
Create a snowy effect with icing that drips down the sides. This looks and tastes amazing, and the soft white frosting contrasts beautifully with brown gingerbread.
DIY Steps:
- Bake and cool your tree layers.
- Prepare a thick royal icing for snow effect.
- Pipe the icing along the edges, letting it naturally drip down for a snow-like appearance.
- Stack layers with icing between them for stability.
- Add extra small dots of icing to simulate falling snow.
- Dust with powdered sugar for an authentic wintery effect.
- Allow icing to fully dry before handling.
8 | Mini Ornament-Adorned DIY Gingerbread Christmas Tree
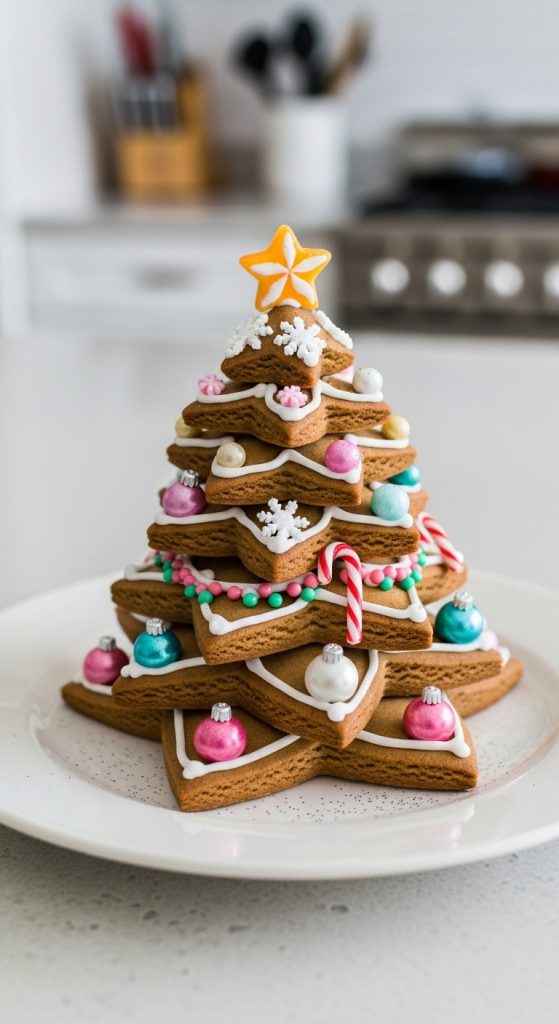
Decorate with tiny sugar ornaments or mini candy canes. A simple way to style this is by alternating colors and sizes to create a playful, balanced look.
DIY Steps:
- Bake and cool your tree layers.
- Stack with royal icing.
- Use icing as “glue” to attach mini sugar ornaments, edible pearls, or candy canes.
- Pipe icing garlands or small snowflake details.
- Add a candy or fondant star on top.
- Let icing dry completely for stability.
- Optionally, sprinkle edible glitter for extra sparkle.
9 | Gingerbread Tree with Icing Lace
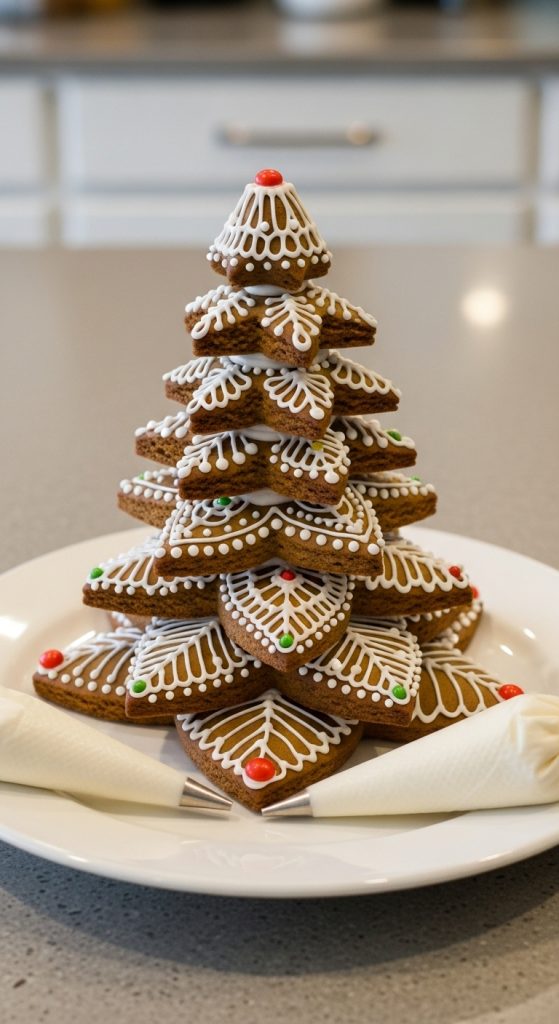
Use delicate piping to create lace patterns. This is a clever way to elevate a simple tree into something elegant without extra decorations.
DIY Steps:
- Bake tree layers and cool completely.
- Prepare royal icing in piping bags with small round tips.
- Pipe intricate lace or filigree patterns on each layer.
- Stack layers with icing in between.
- Add small candy accents if desired.
- Let dry fully to prevent smudging.
- Carefully transport or display once hardened.
10 | Layered Ring Gingerbread Tree
Instead of solid layers, cut each circle into rings for a textured, dimensional look. This is such a vibe because it’s unique and adds depth to your display.
DIY Steps:
- Cut large circles from dough and smaller circles out of the center to form rings.
- Bake and cool completely.
- Stack rings from largest to smallest with royal icing in between.
- Use a skewer for extra stability if stacking more than 3 rings.
- Decorate edges with icing, small candies, or sprinkles.
- Top with a candy or fondant star.
- Allow to dry before moving.
11 | Marbled Gingerbread Tree
Use colored dough to swirl patterns into your gingerbread for a playful effect. I love the look of marbled layers, it makes each tree unique and eye-catching.
DIY Steps:
- Prepare two dough colors and gently swirl together without overmixing.
- Roll out and cut circles or triangles.
- Bake and cool completely.
- Stack layers with royal icing in between.
- Decorate lightly with white icing or mini candies to avoid overpowering the marbled effect.
- Add a small star or candy on top.
- Let dry before serving or moving.
12 | Gingerbread Tree with Pretzel Branches
Add pretzels as branches to make your DIY Gingerbread Christmas Tree more dimensional. This is a clever way to incorporate texture and crunch into your design.
DIY Steps:
- Bake your tree base.
- Break pretzels into branch-sized pieces.
- Use royal icing to attach pretzels along the sides of the tree.
- Decorate branches with small candies or dots of icing.
- Dust with powdered sugar to simulate snow.
- Let dry completely for stability.
- Display as a centerpiece or gift.
13 | Tiered Mini Trees on a Stand
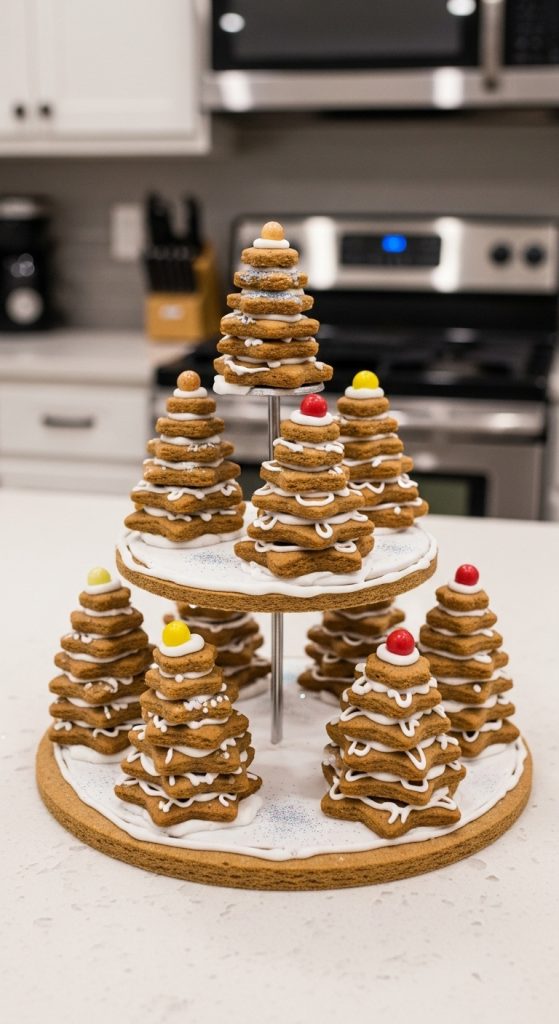
Make multiple mini DIY Gingerbread Christmas Trees on a single base for a clustered effect. Above is a good example of what I mean; it looks like a forest of gingerbread trees.
DIY Steps:
- Bake several mini layered trees.
- Prepare a sturdy base like a cake board or foam.
- Arrange mini trees on the base and attach with royal icing.
- Pipe extra icing around the base for stability.
- Decorate individually with candies or icing.
- Optional: sprinkle edible glitter for sparkle.
- Let dry completely before moving.
14 | Edible Glitter Gingerbread Tree
Finish off your DIY Gingerbread Christmas Tree with edible glitter for a magical, sparkling effect. It looks and tastes amazing, giving your tree a festive shine perfect for photos.
DIY Steps:
- Bake and stack your tree layers.
- Decorate with candies or piped icing.
- Lightly brush or sprinkle edible glitter over the tree.
- Add small candy stars or pearls for accents.
- Let glitter set for a few minutes.
- Display as a centerpiece or serve as dessert.
- Handle carefully to avoid smudging glitter or icing.