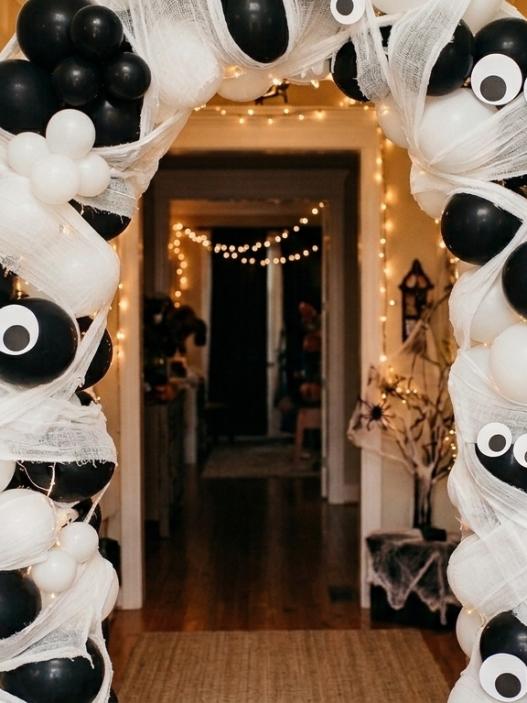


If you’re looking for DIY Halloween porch decorations that are fun, affordable, and easy enough to make with kids, you’re in the right place.
This collection of Halloween crafts focuses on simple projects that beginners can make! With a few basic craft supplies and some recycled household items, it’s easy to create decorations that look festive and welcome trick or treaters.
Below you’ll find 22 easy Halloween decor ideas, each with a list of supplies and step by step instructions. Whether you’re decorating a small Halloween porch, adding playful outdoor Halloween decorations, or refreshing your front porch decor for the season, these DIY projects make it easy to create a welcoming entrance without spending a fortune.
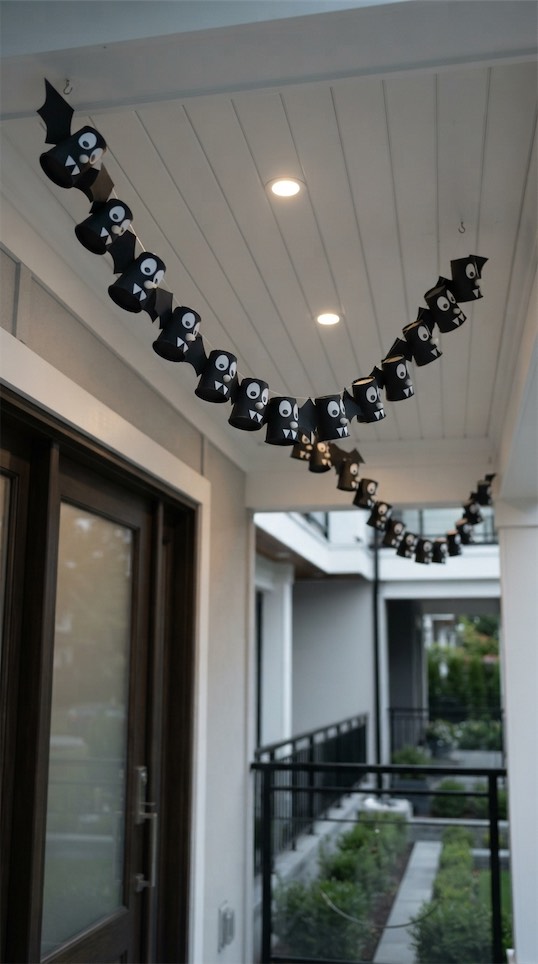
1. Floating Paper Bat Swarm
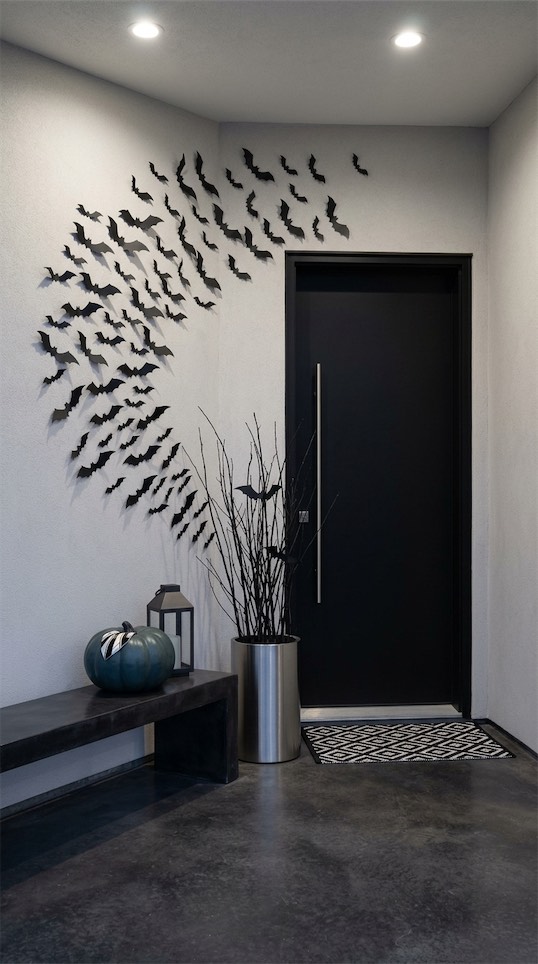
A paper bat display is one of the easiest DIY Halloween decor projects, yet it creates a dramatic first impression.
Black cardstock stands out beautifully against white siding, while the layered wings add depth without needing expensive supplies.
A growing swarm naturally guides visitors toward the front door and instantly makes the porch feel festive.
This is one of those Halloween decor ideas that looks impressive from the street while taking very little time to assemble.
Supplies Needed:
- Black cardstock or construction paper
- Bat template (printed or hand drawn)
- Scissors
- Removable adhesive putty or double sided tape
How to Make It
- Print or draw bat templates in several sizes.
- Cut bats from black construction paper or cardstock.
- Fold each wing slightly upward.
- Stick them to the wall or ceiling using removable adhesive putty.
- Arrange them so they appear to be flying toward the front door.
- Add a few larger bats near the entrance for extra impact.
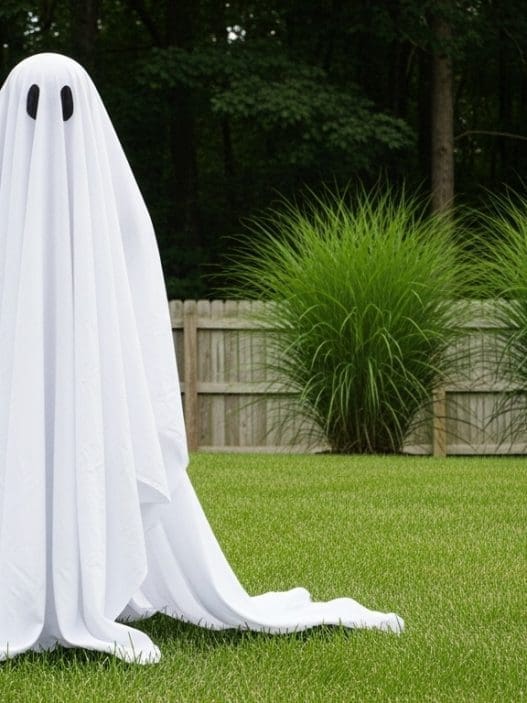
2. Friendly Paper Plate Ghost Family
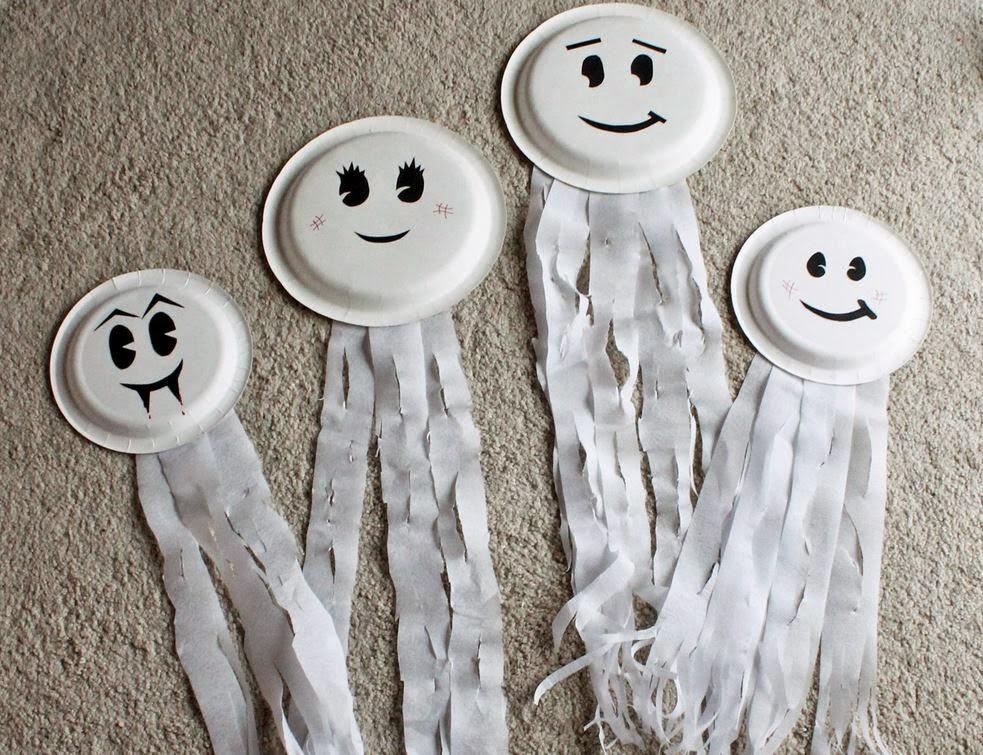
Paper plates are inexpensive, lightweight, and easy for younger children to paint and decorate.
Each ghost can have its own silly smile, surprised face, or sleepy expression, making every creation feel personal.
Hanging several together creates a playful display that sways gently in the autumn breeze.
This style of DIY Halloween porch decorations feels welcoming rather than frightening, making it perfect for families expecting young trick or treaters.
Simple ribbon or fishing line helps the ghosts float effortlessly overhead.
Supplies Needed:
- White paper plates
- Black permanent marker
- White tissue paper
- Glue stick
- Hole punch
- White ribbon or string
How to Make It
- Paint paper plates white if needed.
- Draw ghost faces using black markers.
- Glue strips of white tissue paper underneath.
- Punch two holes near the top.
- Thread ribbon through the holes.
- Hang several ghosts at different heights.
3. Cardboard Pumpkin Welcome Sign
Large cardboard boxes become beautiful porch decorations with a little orange paint.
A welcoming message makes guests smile before reaching the door, adding warmth to the overall front porch decor.
The sign can easily be customized with glitter, leaves, bows, or playful lettering. It is budget friendly and surprisingly durable for the season.
Supplies Needed:
- Large cardboard box
- Orange, green, and black acrylic paint
- Paintbrushes
- Pencil
- Scissors or craft knife (adult use)
- Clear sealer (optional)
How to Make It
- Cut a large pumpkin shape from cardboard.
- Paint it bright orange.
- Add green leaves and a brown stem.
- Write “Happy Halloween” across the front.
- Outline the letters with black paint.
- Lean it beside the front door.
4. Bendy Straw Spider Web
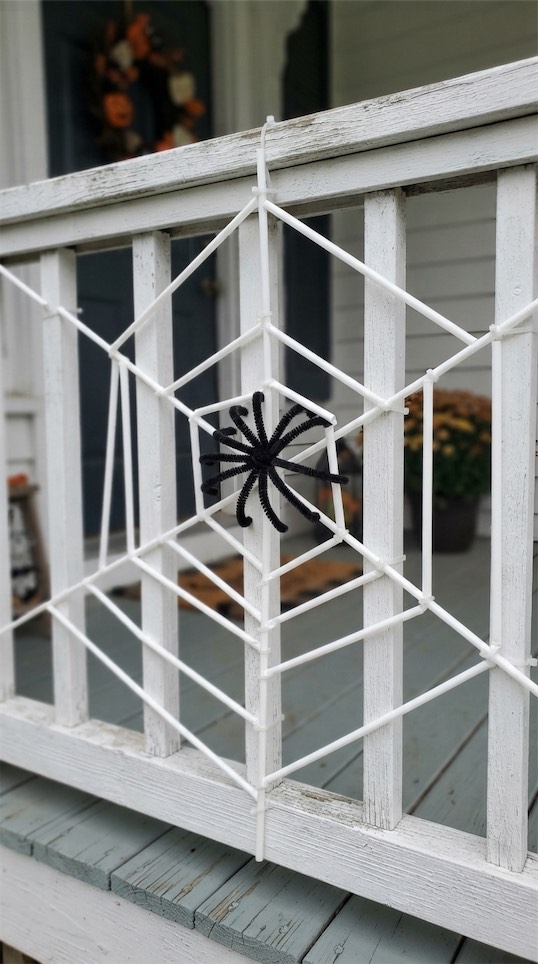
Turn ordinary bendy straws into a creative spider web.
Flexible drinking straws are fun to arrange into geometric shapes that resemble spider webs.
A finished web looks surprisingly detailed, especially with tiny plastic spiders attached around the edges.
It fits beautifully into larger outdoor Halloween decorations without taking up much space.
Children enjoy watching the straws transform into something completely unexpected.
Supplies Needed:
- Black bendy drinking straws
- Black yarn
- Hot glue gun (adult use) or craft glue
- Small plastic spiders
How to Make It
- Gather bendy straws.
- Cut several to different lengths.
- Glue them into a web pattern.
- Add thin yarn between the straws.
- Attach small plastic spiders.
- Hang the web on the front door.
5. Paper Mache Candy Bowl Pumpkin
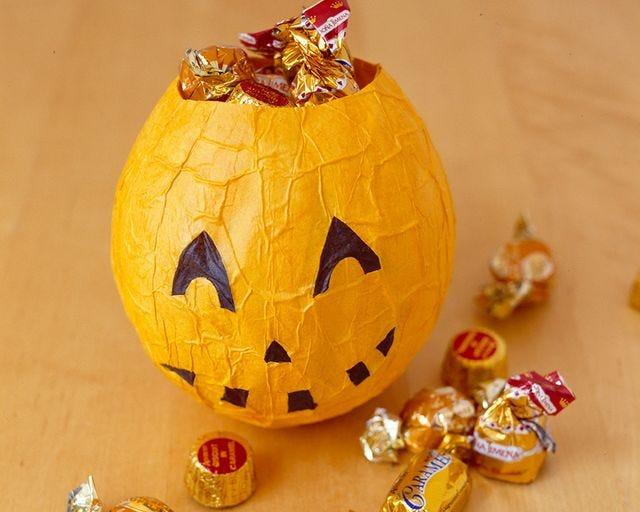
Nothing says Halloween quite like a handmade pumpkin filled with treats.
Paper mache is messy in the most enjoyable way, making it one of those classic Halloween crafts.
Once dry, the pumpkin becomes sturdy enough to hold wrapped candy or small decorations.
Painting the finished bowl bright orange makes it look festive while adding a homemade touch that store bought decorations cannot match.
Supplies Needed:
- Balloon
- Newspaper
- Paper mache paste (or flour and water)
- Orange and green acrylic paint
- Paintbrushes
How to Make It
- Inflate a balloon.
- Cover it with strips of newspaper dipped in paper mache paste.
- Let it dry overnight.
- Pop the balloon.
- Paint the bowl orange and add a green stem.
- Fill with wrapped Halloween candy.
6. Leaf Ghost Garland
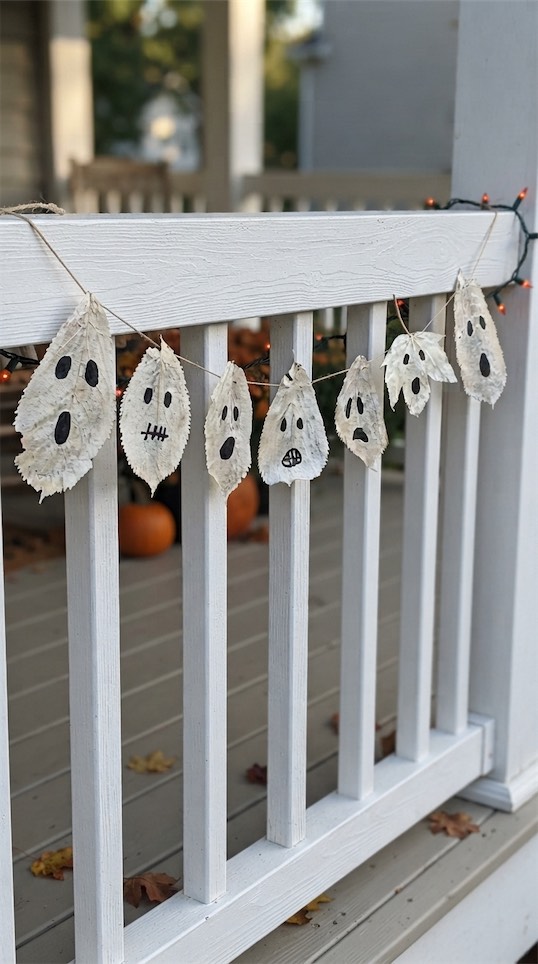
Autumn leaves become adorable little ghosts with just a few simple supplies.
Different leaf shapes create interesting ghost designs that feel completely unique.
Hanging the finished garland across the porch railing ties natural autumn textures into the seasonal decorations.
Supplies Needed:
- Large dried leaves
- White acrylic paint
- Black marker
- Hole punch
- Twine or string
How to Make It
- Collect large dried leaves.
- Paint them white.
- Draw ghost faces with black marker.
- Punch small holes.
- String them together with twine.
- Hang along the porch railing.
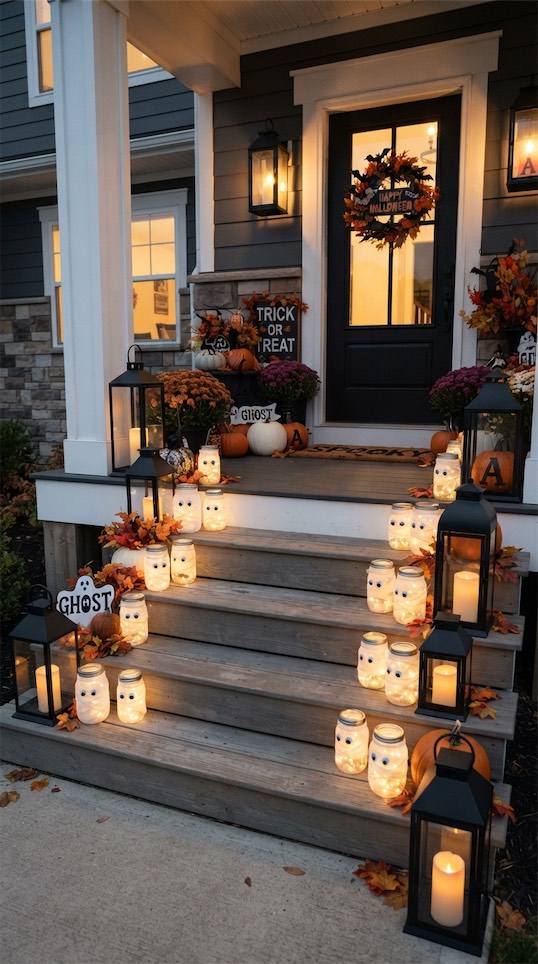
7. Glowing Milk Jug Ghost Lanterns

Empty milk jugs are perfect for transforming into cheerful Halloween lanterns.
The translucent plastic softly diffuses the light from battery operated LED candles, creating a warm glow that looks magical after dark.
Unlike glass lanterns, these are lightweight, shatter resistant, and easy for little hands to decorate with permanent markers.
A group of ghost jugs lining the porch steps or walkway instantly adds charm to your Halloween porch, while costing very little to make.
They also hold up well outdoors during autumn weather, making them a practical addition to your outdoor Halloween decorations.
Supplies Needed:
- Empty gallon milk jugs
- Black permanent marker
- Craft knife (adult use)
- Battery operated LED tealights or fairy lights
How to Make It
- Wash and thoroughly dry one or more empty gallon milk jugs.
- Remove the labels and any sticky residue.
- Draw ghost faces using a black permanent marker. Give each ghost its own fun expression.
- Cut a small flap or opening in the back of each jug, just large enough to fit an LED tealight or battery operated fairy lights inside (an adult should handle this step).
- Place the light inside and close the flap if desired with clear tape.
- Line the glowing ghost lanterns along the porch steps, walkway, or beside the front door for a welcoming Halloween display.
8. Hanging or Sitting Yarn Spiders
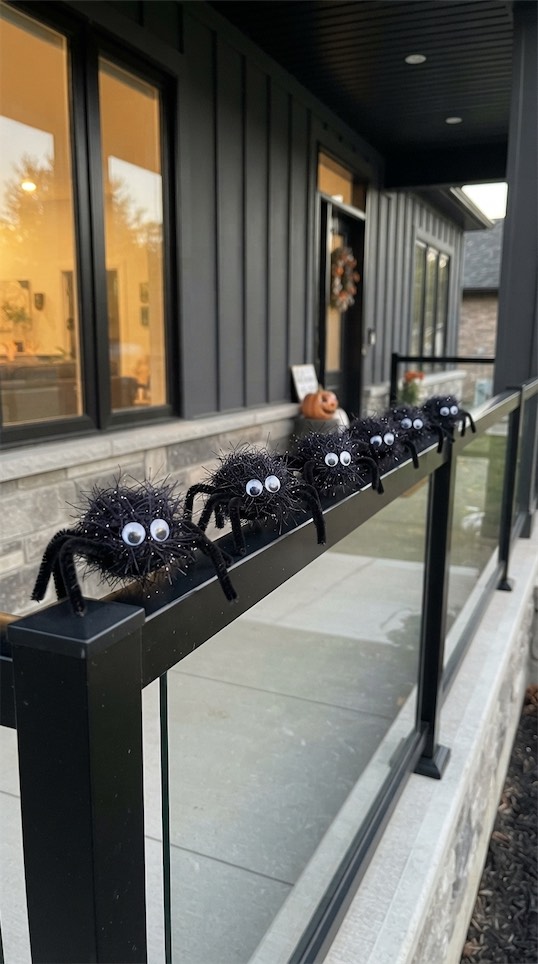
A fluffy spider made from yarn adds a fun surprise above the doorway.
Soft yarn creates texture that stands out beautifully against wood or brick.
Pipe cleaner legs are flexible enough for children to pose into silly positions.
Hanging or sitting several spiders at different heights makes the porch feel playful without becoming too spooky.
Supplies Needed:
- Black yarn
- Black pipe cleaners
- Googly eyes
- Craft glue
- Fishing line or string
How to Make It
- Wrap black yarn into pom poms.
- Trim into round shapes.
- Insert eight pipe cleaners.
- Bend the legs naturally.
- Glue on googly eyes.
- Hang with fishing line.
9. Painted Rock Jack O’Lanterns
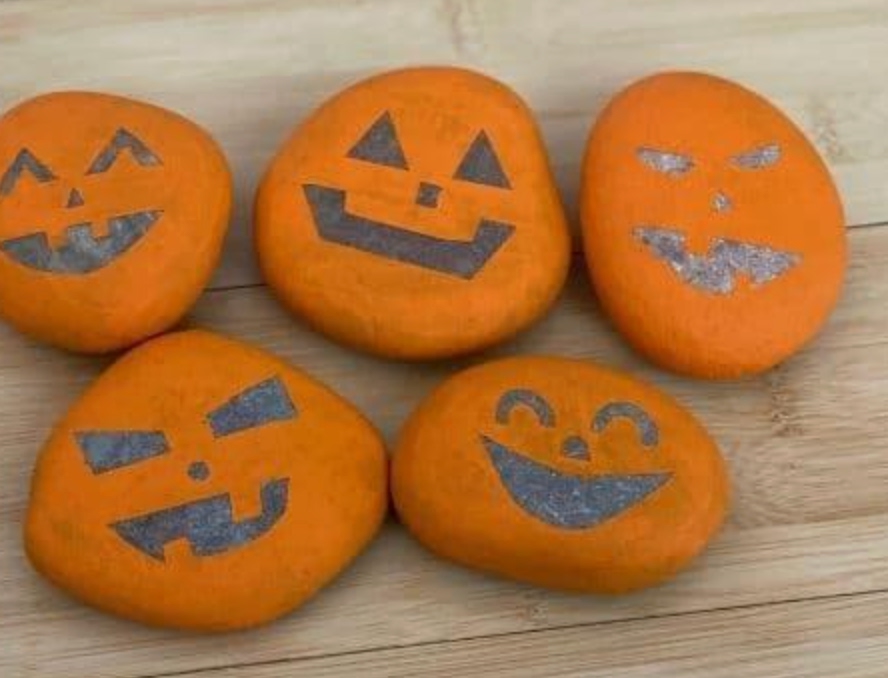
Rock painting is relaxing and wonderfully beginner friendly.
Finished rocks look adorable tucked into flower pots, around steps, or beside pumpkins.
Bright colors make the entrance feel cheerful while adding little surprises guests notice up close.
Children enjoy collecting the rocks before painting.
Supplies Needed:
- Smooth rocks
- Orange and black acrylic paint
- Small paintbrushes
- Clear outdoor sealer (optional)
How to Make It
- Wash smooth rocks.
- Paint them orange.
- Add black jack o’lantern faces.
- Seal with craft varnish.
- Let dry.
- Scatter around the porch.
10. Tissue Paper Candy Corn Garland
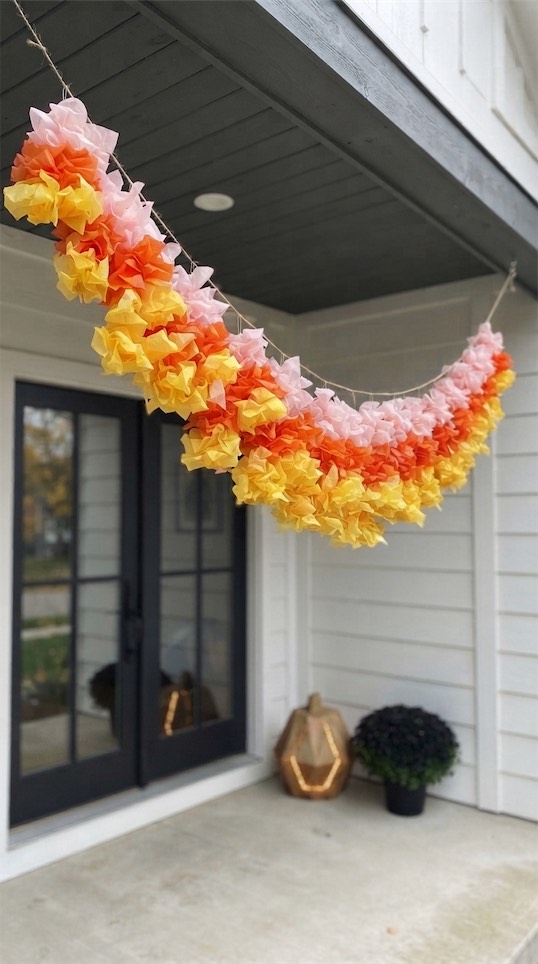
Layered tissue paper creates soft movement every time the wind blows.
The cheerful colors help balance darker Halloween decorations, making the overall display feel welcoming.
This lightweight garland works well across porch railings or around the front door.
Supplies Needed:
- White tissue paper
- Orange tissue paper
- Yellow tissue paper
- Glue stick
- Hole punch
- Twine
How to Make It
- Cut tissue paper into candy corn shapes.
- Layer yellow, orange, and white sections.
- Glue each piece together.
- Punch holes at the top.
- Thread onto twine.
- Hang across the porch.
11. Cardboard Black Cat Silhouettes

Large cat silhouettes are surprisingly eye catching from the sidewalk.
Children can personalize each cat with different tails, whiskers, and eye colors. You can even stick on little glow in the dark eyes, which look amazing at night!
Leaning them beside flower pots helps create depth throughout the Halloween porch without overcrowding the space.
Supplies Needed:
- Cardboard
- Black acrylic paint
- Yellow paint or marker
- Scissors or craft knife
- Wooden stakes (optional)
How to Make It
- Draw cat shapes onto cardboard.
- Cut them out.
- Paint them black.
- Add yellow eyes.
- Seal if placing outdoors.
- Display beside pumpkins.
12. Popsicle Stick Haunted House
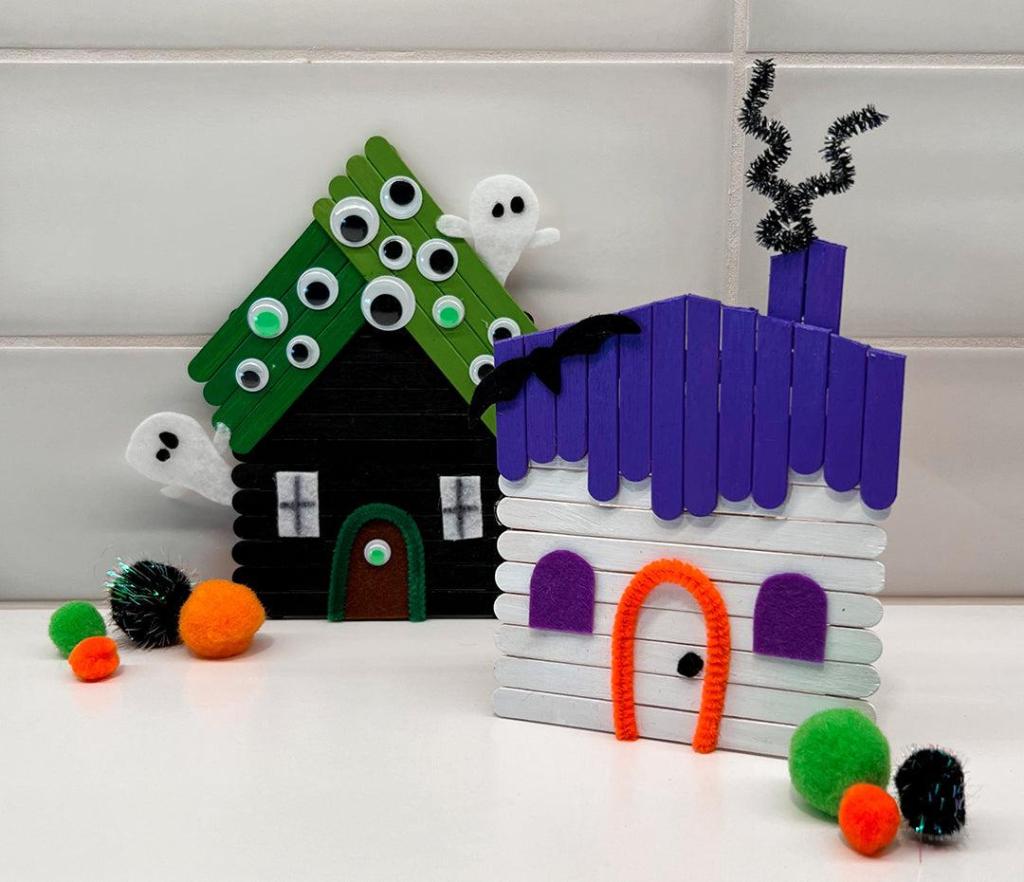
Mini haunted houses add handcrafted charm to porch tables.
Craft sticks are easy to glue together and paint, making them perfect for younger children learning basic crafting skills.
Tiny windows, doors, and little ghosts make every house completely different.
A small collection creates a sweet village display.
Supplies Needed:
- Popsicle sticks
- Black, gray, and white acrylic paint
- Craft glue
- Small paintbrush
- Black marker
How to Make It
- Glue popsicle sticks into house shapes.
- Paint them black and gray.
- Add white windows.
- Decorate with tiny paper ghosts.
- Let dry.
- Display on a porch table.
13. Paper Cup Hanging Bats
Turning everyday items into decorations keeps costs low while encouraging imagination. Upside down cups naturally resemble bat bodies, and folded paper wings add movement.
Several hanging together create a fun display overhead.
Supplies Needed:
- Black paper cups
- Black cardstock
- Googly eyes
- Glue
- Hole punch
- String or fishing line
How to Make It
- Paint paper cups black.
- Cut wings from cardstock.
- Glue wings onto the cups.
- Add googly eyes.
- Attach string.
- Hang from the porch ceiling.
14. Witch Hat Flower Pots
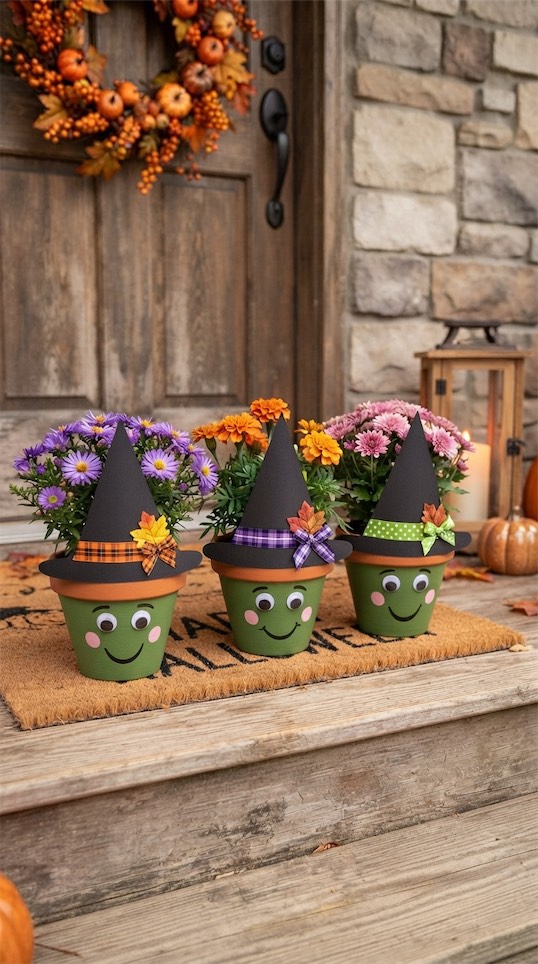
Flowers get a magical Halloween makeover.
Turning flower pots into friendly witches adds color without replacing existing plants.
Bright ribbon, painted faces, and tiny hats make every planter feel festive. It blends beautifully into existing front porch decor.
Supplies Needed:
- Terracotta flower pots
- Green acrylic paint
- Black cardstock
- Ribbon
- Glue
- Black marker
How to Make It
- Paint flower pots green.
- Draw friendly witch faces.
- Make hats from black cardstock.
- Glue hats on top.
- Add ribbon details.
- Place around the entrance.
15. Cardboard Candy Corn Stakes
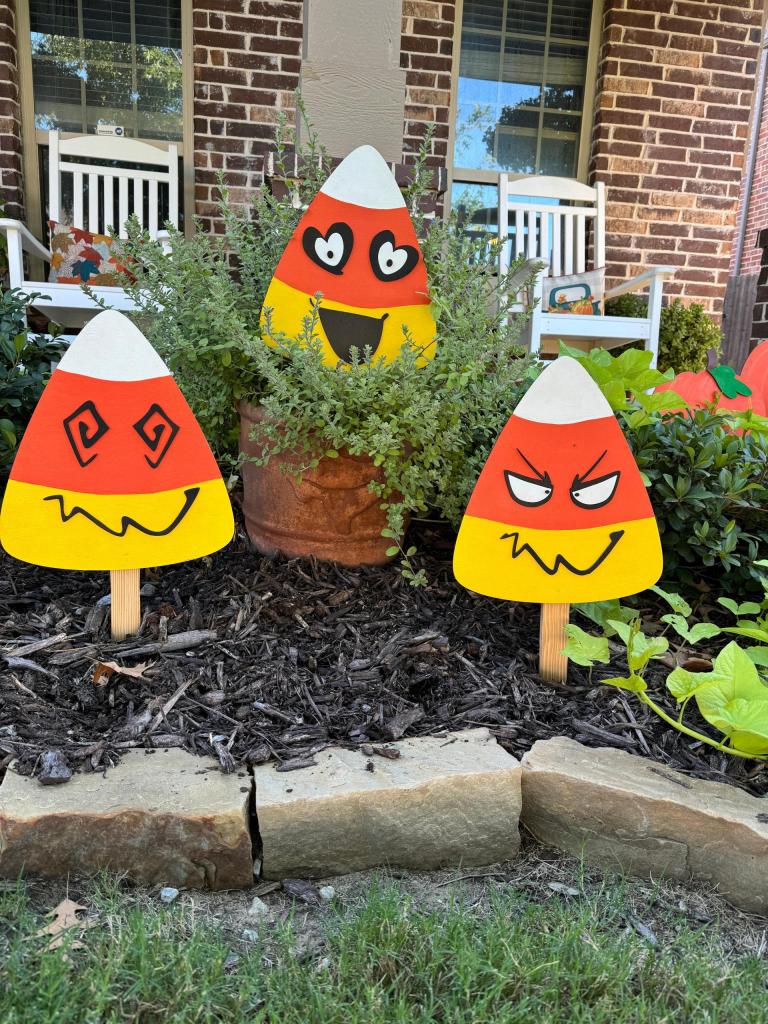
Oversized candy corn brings cheerful color to the yard.
Large decorations make a big visual impact without requiring expensive materials. Painted cardboard stands out against autumn leaves and helps frame the walkway leading toward the porch.
Supplies Needed:
- Thick cardboard
- White, orange, and yellow acrylic paint
- Paintbrushes
- Wooden garden stakes
- Strong tape or hot glue
How to Make It
- Cut candy corn shapes.
- Paint white, orange, and yellow sections.
- Let dry.
- Tape wooden stakes to the back.
- Push into the ground.
- Space evenly along the path.
16. Ghost Balloon Bouquet
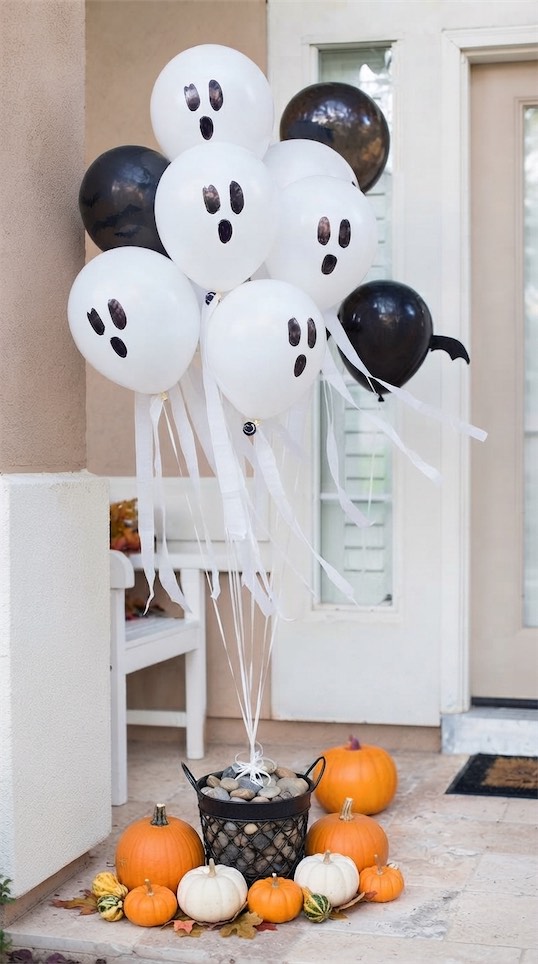
Floating ghosts create playful movement throughout the porch.
White balloons naturally resemble tiny ghosts, especially when decorated with funny faces.
Grouping them together gives the display extra height while keeping everything lighthearted.
Supplies Needed:
- White balloons
- Black permanent marker
- White curling ribbon
- Small bucket or planter
- Decorative mini pumpkins (optional)
How to Make It
- Inflate white balloons.
- Draw ghost faces.
- Tie white ribbon underneath.
- Secure to a small bucket.
- Add a few mini pumpkins around the base.
- Place beside the front door.
17. Egg Carton Spider Family
Recycled cartons become cute little spiders.
This is one of the easiest Halloween crafts for younger children because the sections are already perfectly shaped.
Bright painted spiders scattered around the porch create fun little surprises.
Supplies Needed:
- Empty egg carton
- Black or purple acrylic paint
- Pipe cleaners
- Googly eyes
- Craft glue
- Scissors
How to Make It
- Cut egg carton sections apart.
- Paint them black or purple.
- Add pipe cleaner legs.
- Glue on googly eyes.
- Let dry.
- Hide them around the porch.
18. Glowing Mason Jar Mummies
Soft glowing lights create cozy Halloween evenings.
Wrapping jars with gauze creates adorable mummy faces that glow beautifully after sunset.
Battery candles keep everything safe while adding warm light to larger outdoor Halloween decorations.
Supplies Needed:
- Mason jars
- Gauze bandage or cheesecloth
- Googly eyes
- Craft glue
- Battery operated LED tealights
How to Make It
- Wrap mason jars with gauze.
- Glue on googly eyes.
- Place battery candles inside.
- Secure the gauze if needed.
- Arrange jars in groups.
- Display along porch steps.
19. Pool Noodle Pumpkins
Bright pumpkins made from pool noodles are lightweight and weather friendly.
These colorful decorations stay vibrant throughout the season and are easy for children to assemble. Their rounded shape looks surprisingly realistic while remaining soft and safe.
Supplies Needed:
- Orange pool noodles
- Hot glue gun (adult use)
- Brown pipe cleaners
- Green felt
- Scissors
How to Make It
- Cut pool noodles into equal lengths.
- Form circles.
- Secure with hot glue (adult assistance).
- Add felt leaves.
- Attach brown pipe cleaner stems.
- Arrange around the porch.
20. Paper Bag Luminaries
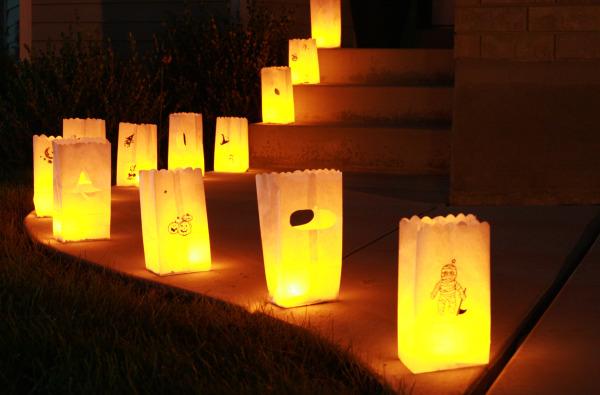
Warm glowing pathways always feel welcoming.
Decorated paper bags are inexpensive and create beautiful evening lighting.
Pumpkin, ghost, and bat cutouts project fun shadows across the walkway, adding extra personality to the Halloween porch.
Supplies Needed:
- Brown paper lunch bags
- Pencil
- Craft knife or scissors (adult use)
- Sand or small pebbles
- Battery operated LED tealights
How to Make It
- Draw Halloween shapes on paper bags.
- Carefully cut them out.
- Place a little sand inside each bag.
- Add battery candles.
- Line the walkway.
- Turn them on at dusk.
21. Toilet Paper Roll Monsters
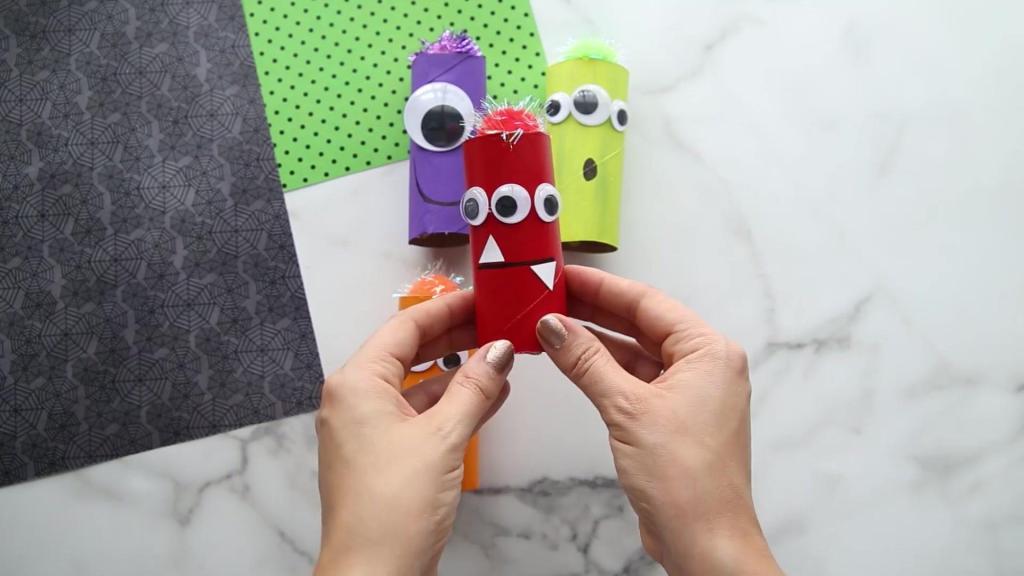
Tiny monsters make fantastic afternoon craft projects.
Recycled cardboard tubes are the perfect size for funny monster characters. Bright paint, silly eyes, and colorful paper horns let children create endless designs that fit perfectly into any collection of DIY Halloween porch decorations.
Supplies Needed:
- Empty toilet paper rolls
- Acrylic paint
- Googly eyes
- Colored cardstock
- Glue
- Scissors
How to Make It
- Paint toilet paper rolls.
- Add monster faces.
- Glue on paper horns.
- Attach googly eyes.
- Let dry.
- Display inside porch planters.
22. Handprint Ghost Welcome Banner
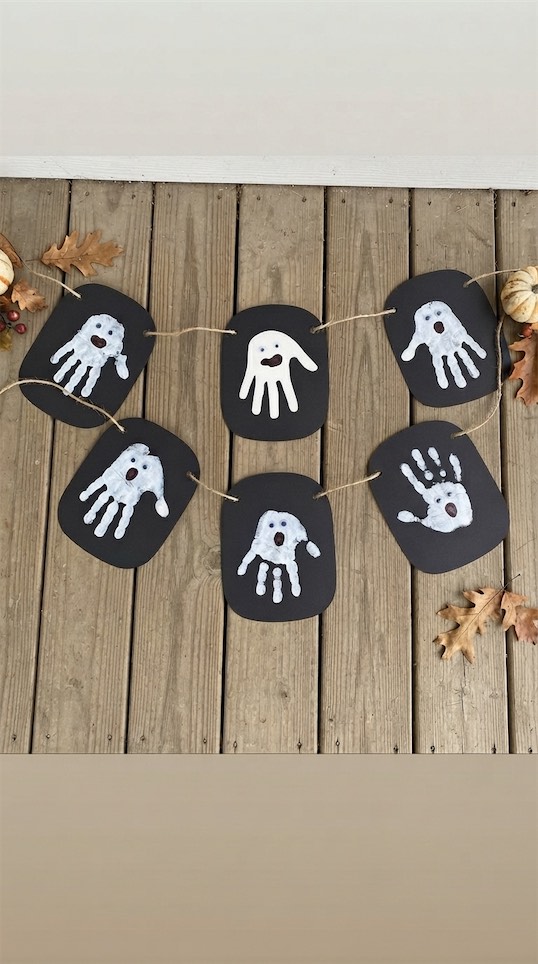
A banner filled with family handprints becomes a keepsake that comes back every Halloween.
Each handprint ghost captures a fun memory while decorating the entrance in a personal way.
White paint pops against black fabric, making the finished banner easy to see from the street.
It adds heart to the DIY Halloween decor, celebrates creativity, and makes guests smile before they even ring the doorbell.
Supplies Needed:
- Black fabric or black poster board
- White washable paint
- Paint tray
- Black permanent marker
- Hole punch
- Ribbon or twine
How to Make It
- Paint hands with white washable paint.
- Press handprints onto black fabric or cardstock.
- Let the paint dry completely.
- Add ghost faces using black markers.
- Punch holes and thread ribbon through the top.
- Hang the banner across the front porch entrance.