


Give your space charming holiday or everyday flair with handmade DIY Rustic Brown Paper Stars for Christmas, crafted from simple snack or lunch bags. These DIY stars are budget-friendly, easy to make and bring a warm, rustic vibe to any decor scheme.
Follow along and you’ll have one ready in about 10 minutes.
What You’ll Need (Materials & Tools)

- 12 brown kraft snack bags (6″ × 9″ size works nicely)
- Sharp scissors
- Hot glue gun + glue sticks
- Twine or ribbon for hanging
Note: You can adapt this by using white or colored paper bags if you like a pop of color.
Step 1: Prep the Bags

- Begin by trimming the tops of all the paper bags so that each has an even, flat edge.
Step 2: Cut Triangles On Top Of Bags
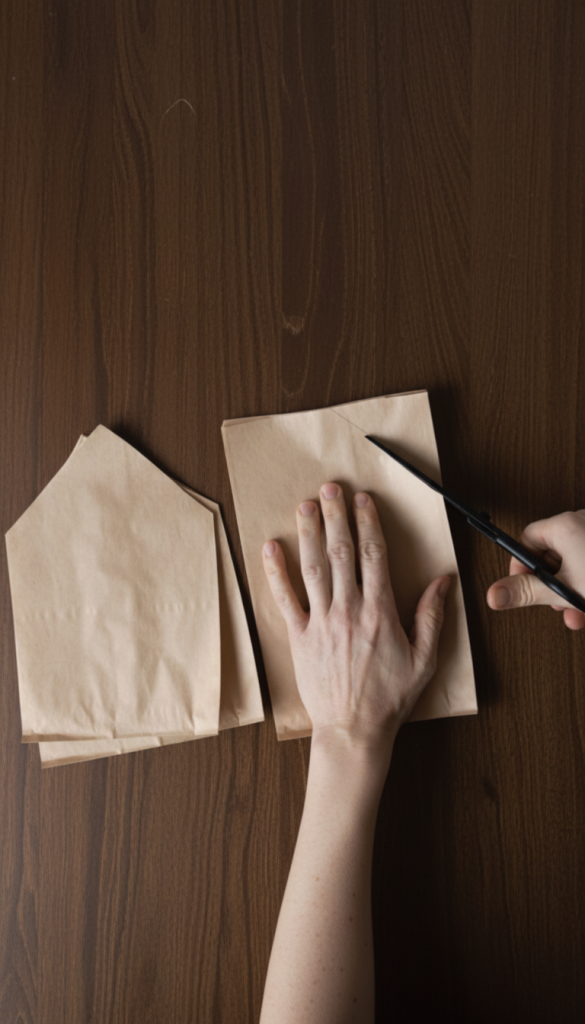
- Next, on each bag cut the top into a triangle shape (pointing upwards) to form the star’s points.
- If you wish to add decorative cut-outs (for example small triangles or scallops) do it now. Use one bag as a template, then replicate on the remaining bags for consistent shapes.
Step 2: Stack and Glue the Bags
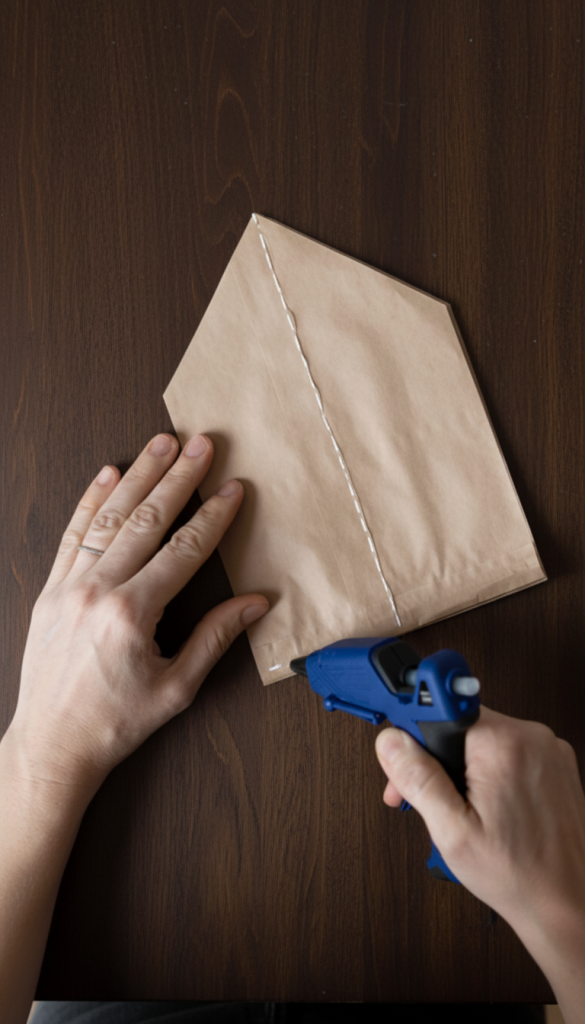
- Take your hot glue gun and apply a line of glue down the centre of the first bag.
- Then apply a second line of glue along the bottom edge of that first bag.
- Immediately place the second bag on top of the first, aligning bottoms and sides as closely as possible.
- Continue gluing each subsequent bag in the same way until all 12 bags are stacked.
Step 3: Fan and Check the Shape
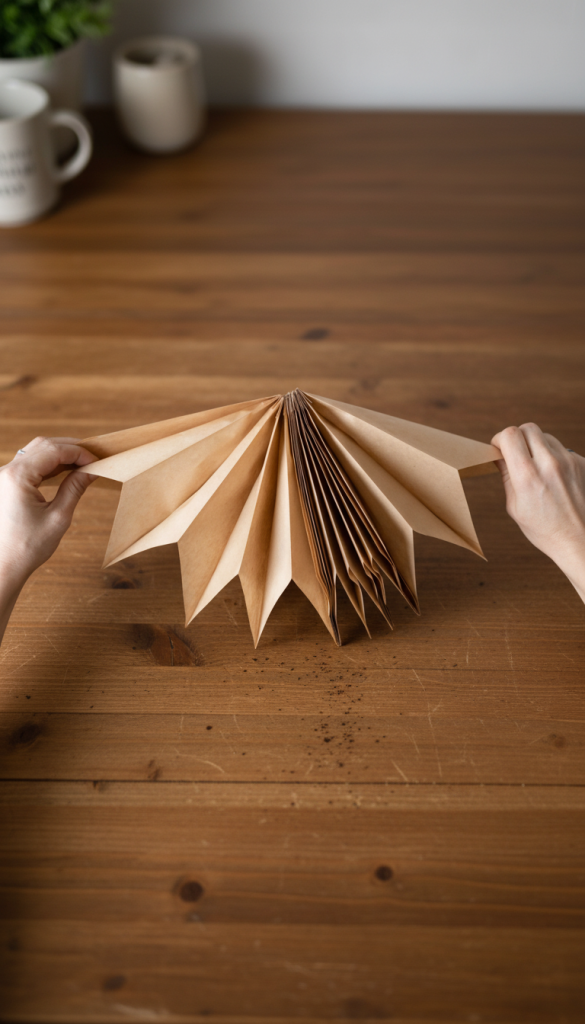
- Before gluing the final bag, gently fan out the stack of bags to ensure they will wrap around into a star shape without strain.
- If you notice the stack is too tight or the bags won’t fan evenly, you may need to add another bag or adjust how the bags overlap.
- Once you’re satisfied with the shape, glue the final bag in place just like the others. Then fan the stack outward and bring the first bag and last bag together. Insert your hand inside the first and last bags and press them together for a few seconds so the glue bonds securely.
Step 4: Create the Star Shape
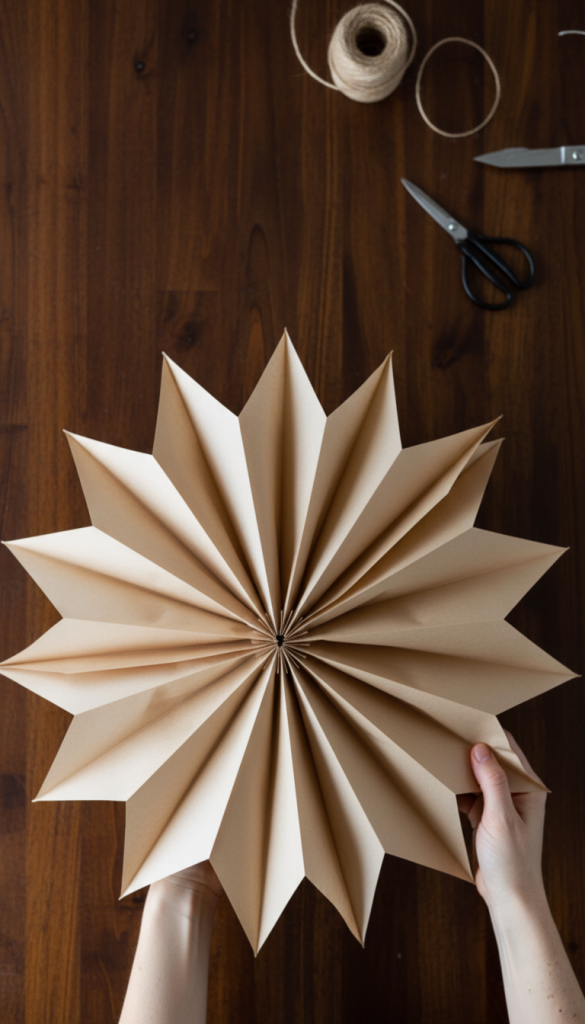
- After the glue has set, begin fanning open the glued stack so it forms a star shape in three dimensions.
- Make sure each bag opens properly – gently separate any stuck inner folds if glue seepage has caused sticking between layers.
- Adjust the star points with your fingers so the shape looks even and the star appears full and balanced.
Step 5: Add the Hanging Loop To Your DIY Rustic Brown Paper Stars

- Poke a small hole about one inch down from one of the star’s points (use a sharp tip of scissors or a needle).
- Thread your twine or ribbon through the hole and tie a loop for hanging.
- Your star is now ready to hang from a wall, mantel, branch, or window!
Pro Tips & Finishing Notes For Your DIY Rustic Brown Paper Stars
- These stars are lightweight but somewhat delicate, so hang them away from little hands or pets to prevent tears.
- For extra durability or visual interest, you could spray a light coat of clear matte sealant or add a metallic accent line.
- To vary size: Use smaller bags for a compact star, or larger bags for a bold center-piece.
- For added Christmas flair, you could try coloring in the corners with metallic or glittery markers in gold or silver.
- Try using colored or printed paper bags for seasonal versions (Christmas, birthdays, events) and mix sizes for layered décor.
Quick FAQ For These DIY Rustic Brown Paper Stars
Q: How many bags should I use?
A: The tutorial above uses 12 bags for standard size. Some versions use 8–9 for smaller stars or 13+ for larger ones depending on bag size.
Q: Can children help with this project?
A: Yes – kids can help with the trimming and cutting under supervision. Hot glue should be handled by an adult. The stars are delicate so this may be suitable for children 7+
Q: Are these reusable?
A: With gentle handling and careful storage, yes. But they are made of paper, so they’re also perfect to recycle and remake the next year.