


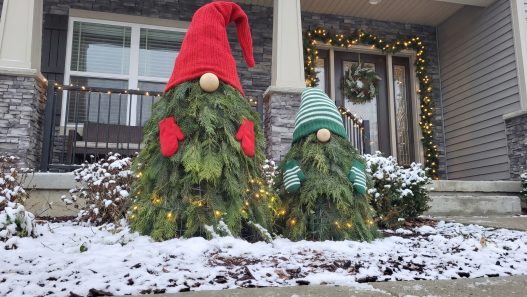



Looking for a fun and festive way to decorate your front yard for Christmas? These DIY outdoor Christmas gnomes made from tomato cages are an adorable way to add a little holiday magic to your garden, porch, or front entrance.
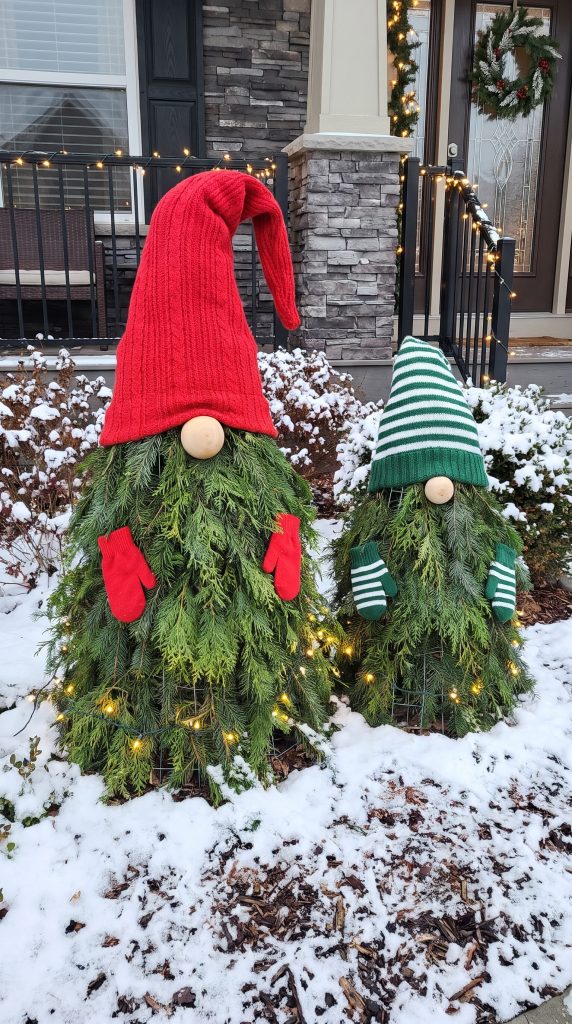
With their oversized knitted hats, bushy evergreen beards, cute wooden noses, and twinkling Christmas lights, these giant Christmas gnomes look like something straight out of a winter wonderland!
The best part? You don’t need any special crafting skills or expensive supplies to make them.
Using a simple tomato cage as the frame, fresh evergreen branches for the body, and a few festive accessories, you can create your own charming outdoor Christmas gnomes in just a few easy steps.
Whether you make one large gnome to welcome visitors or a pair of different-sized gnomes like the ones pictured, this DIY Christmas decoration is sure to bring smiles throughout the holiday season.
Why You’ll Love These DIY Outdoor Christmas Gnomes
There are so many reasons to try this easy Christmas decorating project:
- Budget-friendly: Tomato cages and evergreen clippings are inexpensive, and you may already have some supplies at home.
- Beginner-friendly: No complicated woodworking or special tools are required.
- Customizable: Choose your favourite hat colours, sizes, and Christmas accessories.
- Perfect for outdoor decorating: Display them in your garden, beside the front steps, or on a covered porch.
- Beautiful day or night: Evergreen branches look lovely during the day, while fairy lights make the gnomes sparkle after dark.
- Easy to make in different sizes: Create a whole family of Christmas gnomes using different-sized tomato cages.
These whimsical decorations are also a fantastic way to use leftover greenery after making Christmas wreaths or garlands.
Materials Needed to Make Outdoor Christmas Gnomes
Before getting started, gather the supplies you’ll need.
Supplies for One Giant Christmas Gnome
For the frame and body:
- 1 large metal tomato cage, approximately 42 to 54 inches tall
- Fresh evergreen branches, such as cedar, pine, fir, or spruce
- Green floral wire or garden wire
- Wire cutters
- Gardening gloves
- 2 to 4 sturdy garden stakes or ground anchors
- Cable ties (optional)
For the gnome’s hat and face:
- 1 oversized red knitted Christmas hat or handmade fleece hat
- 1 large wooden ball or wooden half-sphere for the nose, approximately 3 to 4 inches wide
- Outdoor-rated construction adhesive or strong weather-resistant fastening wire
- Red children’s mittens or small decorative mittens
- Stuffing for the hat tip (optional)
For decorating:
- Outdoor-rated warm white LED fairy lights
- Outdoor-rated extension cord, if needed
- Additional ribbons, ornaments, or Christmas accessories (optional)
Helpful tip: Cedar branches are particularly attractive for this project because their soft, cascading greenery creates the appearance of a long, fluffy gnome beard.
You can also mix different varieties of evergreen branches to give your Christmas gnome a fuller, more textured appearance.
The amount of greenery needed depends on the size of your tomato cage. A good starting point is approximately 25 to 40 evergreen stems for a large gnome, although you may need more for a particularly full design.
How to Make Giant Outdoor Christmas Gnomes Step by Step
Ready to create your own festive garden gnome? Follow these simple instructions.
Step 1: Prepare Your Tomato Cage Frame

The first step is to create the basic shape of your Christmas gnome.
- Choose a sturdy metal tomato cage in your preferred size.
- Turn the tomato cage upside down so the wide circular opening is at the bottom and the narrow wire ends point upwards.
- Gather the narrow wire ends together at the top.
- Secure the ends tightly using garden wire or strong cable ties.
- If necessary, carefully bend or trim any sharp wire ends so they won’t damage the hat.
Your tomato cage should now resemble a tall cone.
This cone-shaped structure will form the body of your Christmas gnome, with the widest part sitting on the ground and the pointed end supporting the oversized hat.
Tip: If you’re making two gnomes like the ones in the photo, choose one large tomato cage and one smaller cage. The difference in height creates an especially cute Christmas display.
Step 2: Secure the Tomato Cage in Your Garden
Before adding greenery, decide where your Christmas gnome will be displayed.
A garden bed near your front entrance is a wonderful choice because it provides a natural setting and allows you to anchor the frame securely.
- Position your upside-down tomato cage in the desired location.
- Push sturdy garden stakes into the soil around the base.
- Secure the tomato cage to the stakes using garden wire or cable ties.
- Make sure the frame is stable and cannot easily tip over.
This is an important step, especially if your garden experiences strong winter winds.
If you’re displaying your gnome on a porch or patio rather than in a garden bed, attach the cage to a stable, weighted base instead.
Safety tip: Don’t rely on greenery or decorative lights to hold the frame upright. Secure the structure properly before decorating it.
Step 3: Attach Evergreen Branches to Create the Gnome’s Body
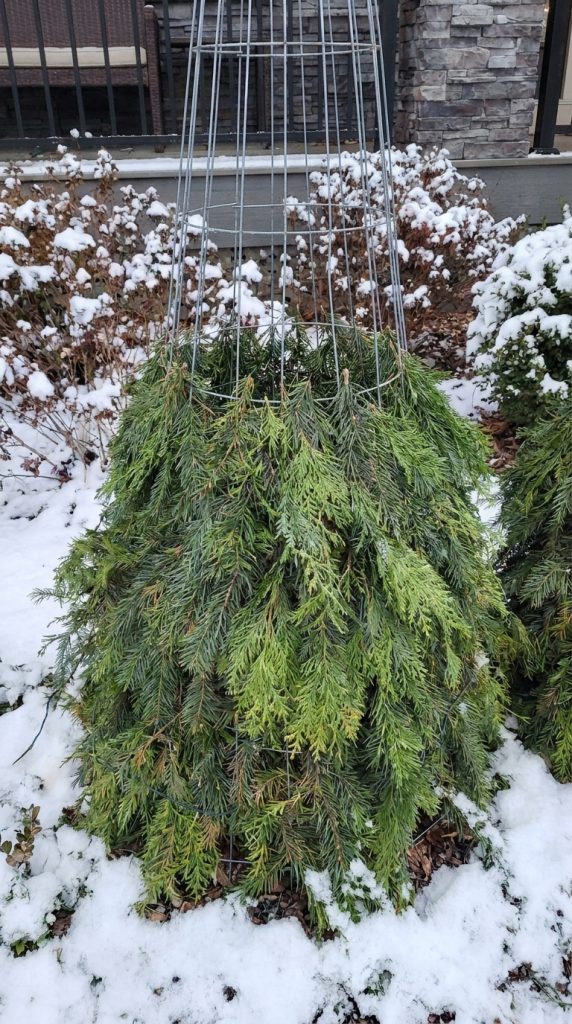
Now comes the fun part: transforming your simple tomato cage into a fluffy Christmas gnome!
Fresh evergreen branches give these outdoor gnomes their beautiful woodland appearance.
- Gather your evergreen branches and remove any damaged or brown foliage.
- Start at the bottom of the tomato cage.
- Position the branches vertically, with the cut ends pointing upwards and the leafy tips hanging downwards.
- Attach the stems to the horizontal cage rings using floral wire.
- Continue working around the cage until the bottom section is covered.
- Add another layer of branches above the first, allowing the greenery to overlap.
- Continue layering branches upwards until most of the tomato cage is hidden.
Try to arrange the greenery so that it hangs naturally towards the ground.
This creates the long, flowing appearance that makes these Christmas gnomes so charming.
You can use cedar branches for a soft, feathery effect or mix cedar, pine, and fir for a more rustic woodland look.
Helpful tip: Don’t worry about making the greenery perfectly symmetrical. Slightly uneven branches give the gnome a natural, whimsical appearance.
Step 4: Create a Long, Bushy Gnome Beard
One of the cutest features of these giant outdoor Christmas gnomes is their oversized evergreen beard.
Unlike traditional fabric gnomes with faux-fur beards, these outdoor decorations use real greenery to create the same effect.
Here’s how to give your gnome a lovely, full beard:
- Choose several long, soft evergreen branches.
- Position them at the front of the tomato cage, where the gnome’s face will be.
- Attach them securely with garden wire.
- Layer additional branches underneath to create fullness.
- Allow the branch tips to hang naturally towards the ground.
The beard should begin just below where the hat will sit.
For a particularly fluffy beard, use different lengths of cedar branches so the greenery falls in soft layers.
You can also trim a few branches around the sides to create a more rounded gnome shape.
Design tip: The greenery should cover almost the entire tomato cage, leaving only enough space at the top for the hat and nose.
Step 5: Add an Oversized Christmas Gnome Hat
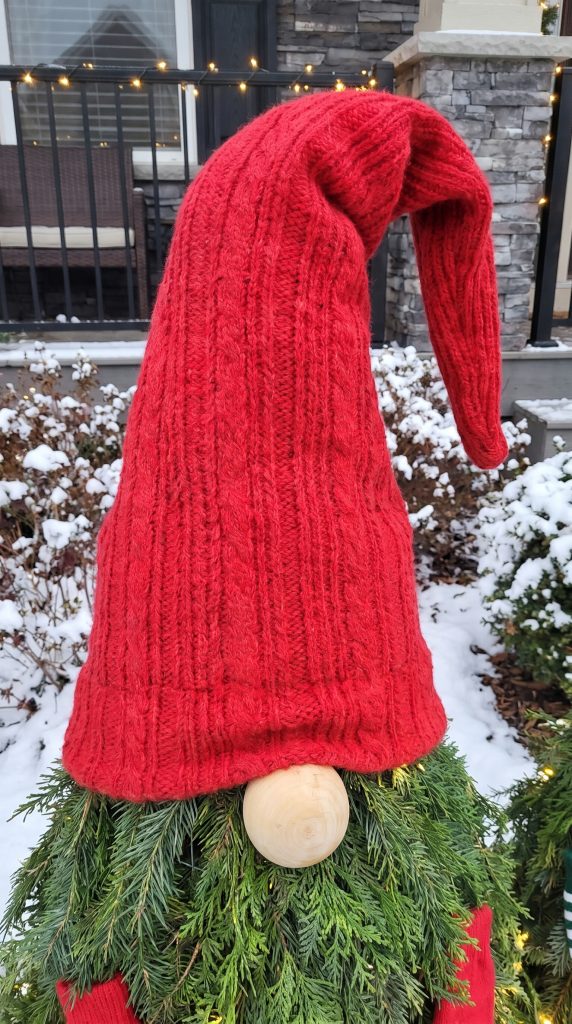
The giant hat is what really brings this Christmas decoration to life!
Both styles look adorable against the natural evergreen branches.
To attach your gnome’s hat:
- Choose an oversized knitted hat that fits over the top of the tomato cage.
- Pull the hat down until it covers approximately the upper quarter to third of the gnome’s body.
- Adjust the front edge so it sits just above where the wooden nose will be placed.
- Allow the pointed tip of the hat to flop naturally to one side.
- Secure the hat to the cage with discreet wire or cable ties through hidden fabric loops, if needed.
The hat should be large enough to fit comfortably over the greenery without compressing it too much.
If you can’t find an oversized knitted hat, you can make one from fleece or thick felt.
How to Make a Simple Gnome Hat from Fleece
Making your own giant Christmas gnome hat is easier than you might think.
Measure around the top section of your greenery-covered tomato cage where the hat brim will sit.
2. Cut two long, tapered pieces of fleece, allowing enough width for the hat to fit around the cage, plus seam allowances.

3. Sew the two pieces together along their long sides, leaving the bottom open.
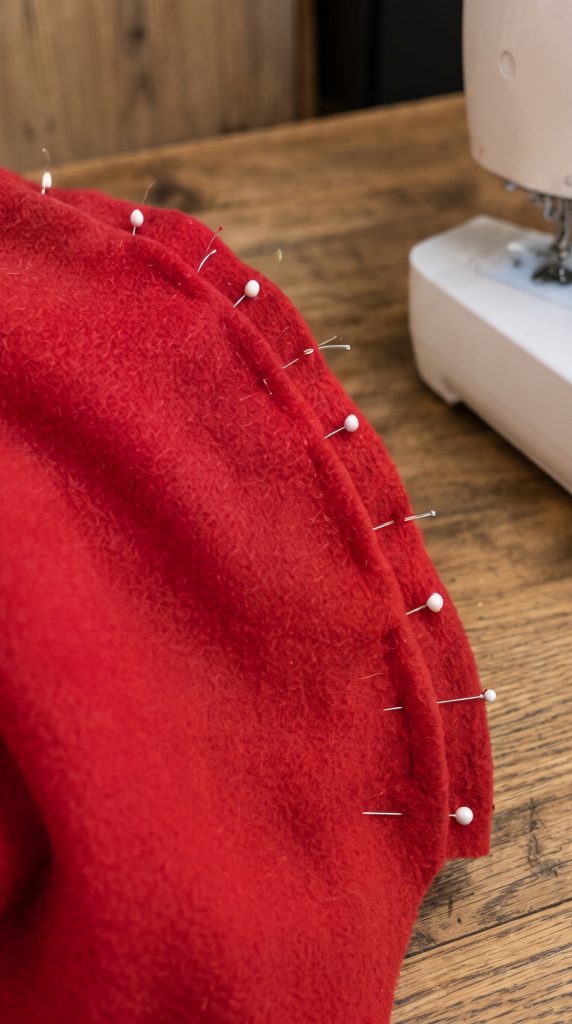
4. Turn the hat right side out. Fold the bottom edge upwards to create a neat brim.

5. Place the hat over your gnome and bend the long tip to one side.
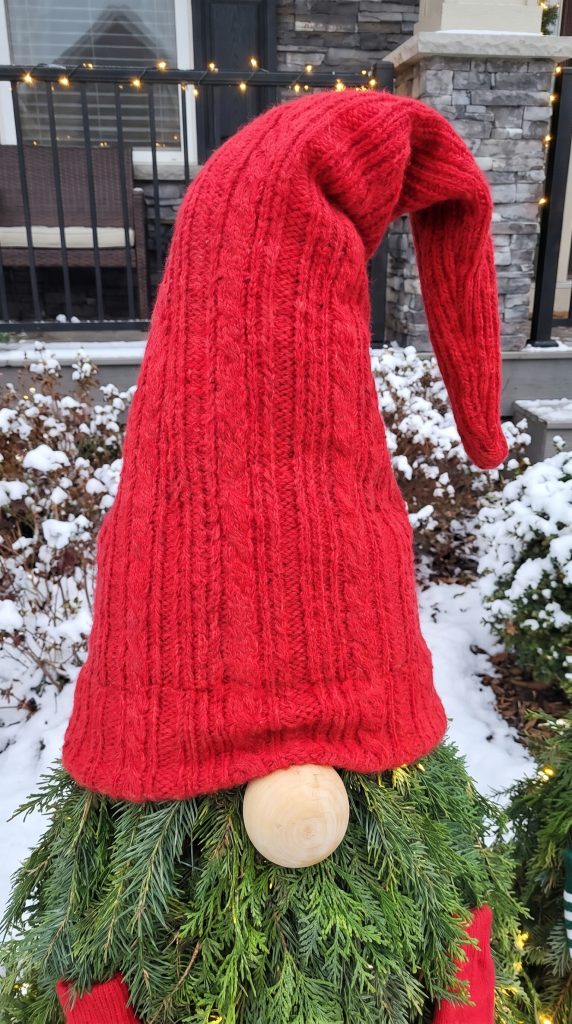
For a festive look, use red fleece, green fleece, or red-and-white striped material.
Tip: If you want the hat to hold a particular shape, add a small amount of polyester stuffing near the top. For outdoor use, choose weather-resistant materials or display the gnome in a sheltered area, as ordinary knitted and fleece hats absorb moisture.
Step 6: Attach the Gnome’s Wooden Nose
No Christmas gnome is complete without a big, round nose peeking out from underneath its hat!
For this project, a large wooden ball or half-sphere creates the perfect gnome nose.
- Choose a smooth wooden ball approximately 3 to 4 inches in diameter for a large gnome.
- Apply an exterior wood sealer to help protect the nose from moisture.
- Position the nose at the centre front of the gnome, just underneath the hat brim.
- Attach it securely to a small backing or support fixed to the tomato cage, using an appropriate weather-resistant fastener or adhesive.
- Adjust the surrounding greenery so the nose appears nestled into the beard.
Make sure the nose is securely attached and won’t fall off in windy weather.
The nose should be the only visible facial feature. You don’t need to add eyes or a mouth.
In fact, the hidden face is part of what makes Scandinavian-style Christmas gnomes so adorable!
Helpful tip: Wooden half-spheres are often easier to attach than full wooden balls because they have a flat back.
Step 7: Add Cute Christmas Mittens
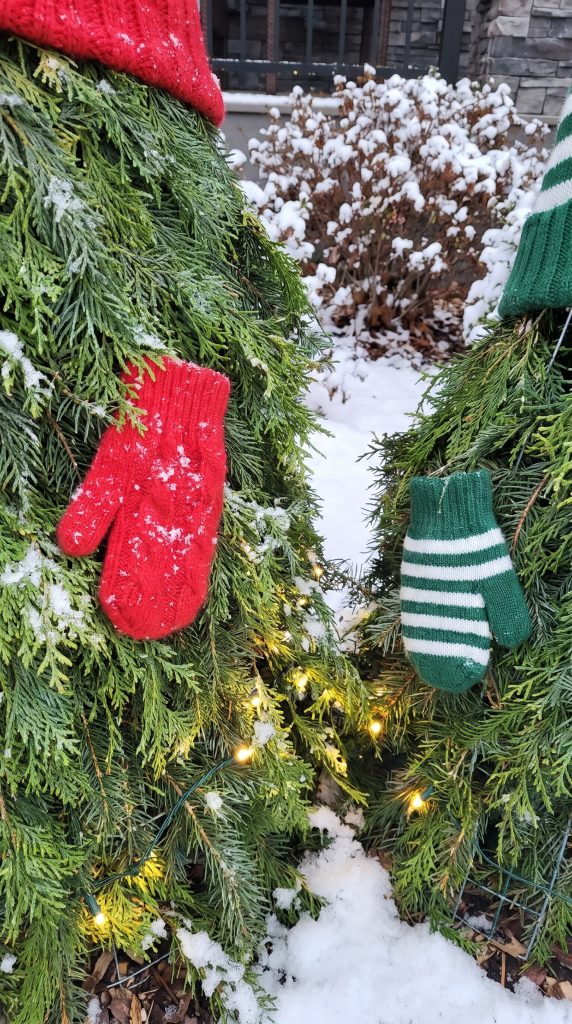
A pair of small mittens adds personality to your giant Christmas gnome and makes it look even more festive.
For a traditional Christmas look, choose bright red mittens to match a red hat.
Alternatively, use green-and-white striped mittens for a coordinating look.
Here’s how to attach them:
- Choose a pair of children’s mittens or lightweight decorative mittens.
- Position one mitten on each side of the gnome’s body.
- Attach each mitten to the tomato cage using floral wire, concealed loops, or cable ties.
- Tuck the fastening points underneath the evergreen branches.
- Adjust the mittens so they appear to hang naturally at the gnome’s sides.
You can position the mittens slightly forward to give the impression that the gnome has its hands resting on its belly.
For an extra-cute touch, use mittens that match the colours of your gnome’s hat.
Step 8: Wrap the Gnome with Outdoor Christmas Lights
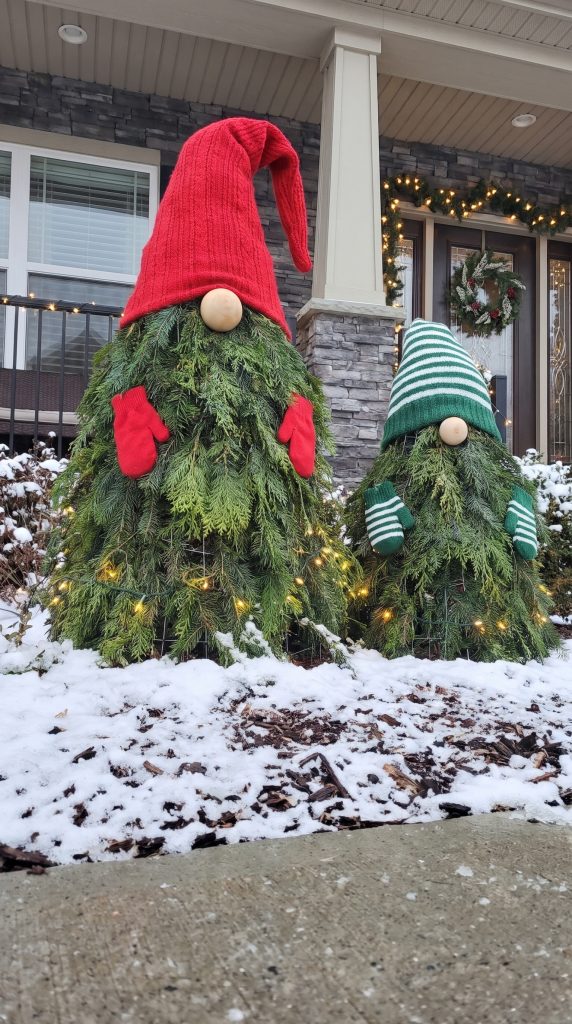
To make your Christmas gnomes look magical after sunset, add warm white fairy lights.
These create a beautiful soft glow among the evergreen branches and make the decorations stand out in your front yard.
- Choose outdoor-rated LED Christmas lights.
- Begin near the base of the gnome.
- Gently weave the lights around the greenery, working upwards.
- Space the lights evenly throughout the body.
- Tuck sections of the light wire behind the branches to keep them less noticeable.
- Secure loose sections with garden wire or outdoor cable ties, taking care not to damage the light cable.
- Connect the lights to a suitable outdoor power supply.
Warm white lights look especially beautiful with red and green Christmas hats.
However, you can also use multicoloured fairy lights if you prefer a brighter, more playful Christmas display.
Safety tip: Only use lights and electrical connections rated for outdoor use. Follow the manufacturer’s instructions, keep electrical connections protected from moisture, and use an RCD/GFCI-protected supply.
Step 9: Add the Finishing Touches
Your giant outdoor Christmas gnome is almost complete!
Now it’s time to make any final adjustments.
- Fluff out the evergreen branches to create a fuller body.
- Adjust the hat so the floppy tip hangs naturally.
- Straighten the wooden nose and mittens.
- Hide any visible floral wire.
- Check that the fairy lights are evenly distributed.
- Make sure the tomato cage is securely anchored.
Stand back and look at your Christmas gnome from a distance.
If you notice any gaps where the metal tomato cage is visible, simply attach a few more evergreen branches.
And that’s it!
You’ve created an adorable giant Christmas gnome that will make your front yard look festive throughout the holiday season.
How to Make a Pair of Christmas Gnomes for Your Front Yard
While a single giant Christmas gnome looks adorable, creating a pair makes an even bigger impact.
For a display similar to the inspiration photo, try the following combinations:
Large Christmas Gnome
- Use a 48 to 54-inch tomato cage.
- Add a bright red oversized knitted hat.
- Choose a large wooden nose.
- Attach matching red mittens.
- Use plenty of cascading cedar branches for a full beard.
Small Christmas Gnome
- Use a 33 to 42-inch tomato cage.
- Add a green-and-white striped hat.
- Choose a slightly smaller wooden nose.
- Attach matching striped mittens.
- Use shorter evergreen branches to create a proportionate body.
Place the taller gnome slightly behind or beside the smaller one for a charming, layered arrangement.
You can even make three or four Christmas gnomes in different sizes to create a whole festive gnome family!
Where to Display Your DIY Outdoor Christmas Gnomes
One of the best things about these homemade Christmas decorations is how versatile they are.
Here are a few lovely ways to display them.
1. Beside Your Front Door
Place a pair of giant Christmas gnomes on either side of your front entrance to welcome family and friends.
Add a matching Christmas wreath and twinkling garland for a coordinated holiday look.
2. In Your Front Garden
Position your gnomes among shrubs, flower beds, or evergreen plants.
The natural greenery blends beautifully with the garden and creates the appearance of magical woodland characters.
3. Along a Garden Path
Arrange several gnomes in different sizes along a pathway leading to your front door.
Add outdoor fairy lights for a beautiful nighttime display.
4. On a Covered Porch
A covered porch is a great location if you want to protect the knitted hats and decorative accessories from heavy rain or snow.
Just remember to secure the gnomes to a stable base.
5. As Part of a Christmas Garden Display
Combine your homemade gnomes with outdoor lanterns, wooden Christmas signs, decorative presents, or small Christmas trees.
The result is a charming, rustic Christmas display that looks beautiful without needing lots of expensive decorations.
How to Keep Your Outdoor Christmas Gnomes Looking Fresh
Because these Christmas gnomes are made with fresh evergreen branches, a little maintenance will help them look their best.
Here are a few simple tips:
- Use freshly cut greenery: Fresh cedar, fir, and pine generally look better and last longer than branches that have already started drying out.
- Choose a cool location: Evergreen branches tend to dry out faster in direct sunlight or warm, exposed locations.
- Mist the greenery when appropriate: Light misting may help reduce drying in suitable weather, but never spray electrical lights or connections, and avoid creating ice hazards.
- Check the decorations regularly: Make sure the hat, nose, mittens, and lights remain securely attached.
- Replace dried branches: If some greenery starts turning brown, remove those branches and replace them with fresh cuttings.
- Protect fabric accessories: Bring knitted hats or mittens indoors during prolonged heavy rain when practical.
- Inspect the frame after storms: Winter winds can loosen branches or move garden stakes.
Depending on your climate, the type of greenery used, and how exposed your decorations are, fresh evergreen branches may remain attractive for several weeks.
If you want to reuse your Christmas gnomes year after year, consider making them with artificial evergreen garlands instead.
Can You Make Outdoor Christmas Gnomes Without Fresh Greenery?
Absolutely!
If fresh cedar or pine branches aren’t available, you can create a similar look using artificial evergreen branches or Christmas garlands.
The process is almost identical.
Simply attach artificial greenery to the upside-down tomato cage using floral wire or cable ties.
Start at the bottom and work upwards until the frame is completely covered.
For a fuller appearance, choose artificial garlands with long, cascading branches.
Artificial greenery has a few advantages:
- It can be reused for multiple Christmas seasons.
- It doesn’t shed needles or dry out.
- It requires very little maintenance.
- It can be stored with your other Christmas decorations.
For the best results outdoors, look for greenery specifically designed to withstand outdoor weather conditions.
Creative Ways to Customize Your Giant Christmas Gnomes
Once you know how to make a basic tomato cage Christmas gnome, you can experiment with different colours and styles.
Traditional Red and Green Christmas Gnomes
Use red knitted hats, green-and-white striped accessories, and warm white fairy lights for a classic festive appearance.
Rustic Woodland Christmas Gnomes
Choose neutral-coloured hats, natural wooden noses, pinecones, and mixed evergreen branches for a cosy woodland-inspired design.
Snowy Winter Gnomes
Decorate your gnomes with white or grey hats, silver ribbons, and snowflake ornaments for a winter wonderland theme.
Matching Family of Christmas Gnomes
Make several gnomes in different heights using various tomato cage sizes.
Give each gnome a different hat colour or pattern to create its own personality.
Light-Up Christmas Gnomes
Use plenty of warm white LED fairy lights to create a glowing display that looks especially pretty on dark winter evenings.
Frequently Asked Questions About DIY Outdoor Christmas Gnomes
What size tomato cage should I use for a giant Christmas gnome?
A tomato cage measuring approximately 42 to 54 inches tall is a good starting point for a large outdoor Christmas gnome. Remember that the finished height will depend on the hat and how you position the frame.
For smaller Christmas gnomes, use a cage approximately 33 to 42 inches tall.
What kind of greenery is best for outdoor Christmas gnomes?
Cedar, pine, fir, and spruce are all suitable options. Cedar is especially attractive because its long, soft foliage creates a natural-looking beard.
You can also combine several evergreen varieties to add texture and fullness.
How do you make a Christmas gnome hat for a tomato cage?
You can use an oversized knitted Christmas hat or sew a simple pointed hat from fleece or felt. Make sure the hat is wide enough to fit around the upper part of the greenery-covered cage.
A long, floppy tip helps create the traditional Christmas gnome look.
How do you attach a wooden nose to an outdoor Christmas gnome?
Attach the wooden nose to a small support fixed securely to the tomato cage. A flat-backed wooden half-sphere is particularly useful because it provides a larger attachment surface.
Position the nose just underneath the hat brim so it appears to peek out from the evergreen beard.
How do you keep tomato cage Christmas gnomes from blowing over?
Secure the base of the tomato cage to sturdy garden stakes or ground anchors.
If displaying your gnome on a hard surface, attach it to a weighted, stable base.
This is especially important for larger gnomes or those positioned in exposed areas.
How long will fresh evergreen Christmas gnomes last?
Fresh evergreen decorations can often remain attractive for several weeks in cool winter conditions.
Their lifespan depends on the type of greenery, temperature, wind exposure, and moisture levels.
Replace any branches that become excessively dry or discoloured.
Can I leave my DIY Christmas gnomes outside in the snow?
Yes, these gnomes can be designed for outdoor display, but you’ll need to protect the fabric accessories and use weather-resistant materials.
Choose outdoor-rated Christmas lights, secure all decorations, and inspect the gnomes after heavy snow or strong winds.
Can I reuse tomato cage Christmas gnomes every year?
Yes! The metal tomato cage, wooden nose, and other reusable decorations can be stored after Christmas.
If you use fresh evergreen branches, you’ll need to replace them each year. Artificial evergreen branches offer a reusable alternative.
Final Thoughts: Make Your Front Yard Magical with DIY Christmas Gnomes
These DIY outdoor Christmas gnomes made from tomato cages are such a fun and creative way to decorate your home for the holidays.
With just a few simple materials, you can transform ordinary garden supplies into adorable oversized Christmas decorations that look beautiful beside your front door, in your garden, or along your walkway.
The combination of lush evergreen branches, floppy knitted hats, round wooden noses, and warm twinkling lights gives these homemade gnomes a wonderfully cosy, Scandinavian-inspired Christmas look.
And because you can customize the size, colours, and accessories, no two gnomes have to look exactly alike!
Whether you make one giant Christmas gnome or a whole family of festive little characters, this easy DIY project is a lovely way to add handmade charm to your outdoor Christmas decor.
So grab a few tomato cages, gather your evergreen branches, and start creating your own magical Christmas gnomes!
And don’t forget to save this idea to Pinterest so you can find it again when you’re ready to start decorating for Christmas.
Happy Christmas crafting!